Lab 2 - Advanced
Last modified: Tue, 27 Feb 2024
Webex Contact Center API and Customer Journey Data Services (JDS)
Welcome to the Contact Center API and JDS Lab Guide – your gateway to exploring advanced features in Contact Center solutions. This intermediate-level tutorial focuses on integrating APIs and exploring JDS functionality.
As businesses prioritize exceptional customer experiences, this guide empowers you to enhance agent workflows. You’ll gain hands-on experience integrating Contact Center APIs and discover how to use JDS effectively with JDS widget.
Let’s dive in and unlock the potential of Contact Center API integration and JDS use cases!
Table of Contents
| Topic | Lab Type | Difficulty Level | Estimated length |
|---|---|---|---|
| Part 1: APIs on Webex Contact Center | Practical Lab | MED | 45 min |
| Lab 1: APIs Fundamental | Self-learning | ||
| Lab 2: Developer Portal | |||
| Lab 3: WxCC APIs on Postman | |||
| Lab 4: OAuth2 and Collections Importing | |||
| Part 2: JDS APIs & Use Case | Practical Lab | MED | 45 min |
| Lab 1: Exploring JDSs APIs & Widget | |||
| Lab 2: Use Case: Journey Based Queue Priority |
Part 1: APIs on Webex Contact Center
This is an intermediate level lab intended for engineers with prior Webex Contact Center (WxCC) experience.
The WxCC APIs enable you to access the WxCC platform programmatically to customize, fine tune and build the solution.
Upon completion of this lab, you will be able to:
- Get familiar with Developers portal and Postman
- Learn some WxCC APIs
- Configure and Implement WxCC via APIs
- Obtain WxCC information via APIs.
Disclaimer: This lab is not designed for a production system, thus not all recommended features are implemented or enabled optimally. For implementation and design-related questions, please contact your representative at Cisco, or a Cisco partner.
Lab 1: APIs Fundamental
Objectives
The objective of the lab is to introduce you to concept of APIs and the way the Postman tool can be used to manage APIs.
Note: If you are already familiar with APIs and Postman, you can skip this lab. We also recommend using Google Chrome for all labs requiring a web browser but for this lab sometimes we have used Firefox for some specific simplicity.
Task 1: APIs Fundamentals
An API is a set of tools, definitions, and rules or protocols for building a software application.
APIs allow one component of software to easily communicate with another component of software. Cisco product designers determine the APIs that each Cisco product supports.
Many of the Webex Customer Experience APIs are RESTful. Each resource is represented by a base URL and supports various methods for API usage. Refer to API Reference https://developer.webex-cx.com/documentation/introduction-to-apis for details.
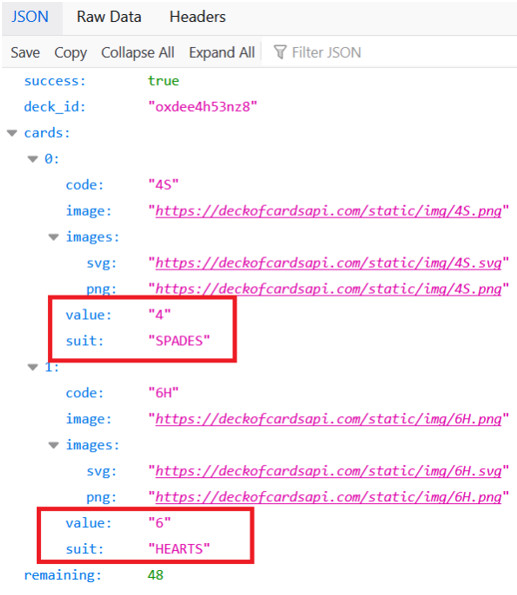
Methods
An API method defines what the API Client (who is allowed to ask for the data or request the service) should or must do to submit a request to access the service at the backend (API server)
These are the methods supported for Webex Contact Center APIs:
API Anatomy
Here is an example of an API GET request that helps define the API anatomy:

- http:// or https://
- Protocol over which data is sent between client and server.
- ‘s’ in https stands for secure. ##### - Server or Host
- Resolves to the IP and port to which to connect. ##### - Resource
 - The location of the data or object of interest ##### - Parameters
- Details to scope, filter, or clarify a request. Often optional.
Authentication and Authorization
To use the Webex REST API, you’ll need a Webex account backed by Cisco Webex Common Identity (CI).
When making requests to the Webex REST API, an Authentication HTTP header is used to identify the requesting user. This header must include an access token.
For authorization, there are different types that are supported for Webex APIs:
- None: Web API resource is public, anybody can place requests
- Basic (over SSL/TSL): Username and password passed to server in base64 encoded (not encrypted) string.
- Authorization : Basic ENCODEDSTRING
- Oauth 2.0: Standard framework to retrieve access token from Identity Provider
- Authorization: Bearer ENCODEDSTRING
- Authorization can be short-lived and require refreshing of token.
Examples:
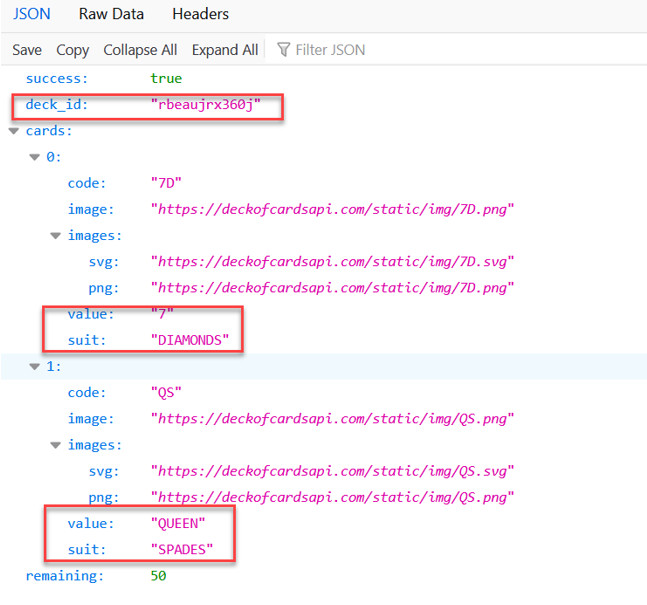
In this example you will use deck of cards public API to simulate a game of cards.
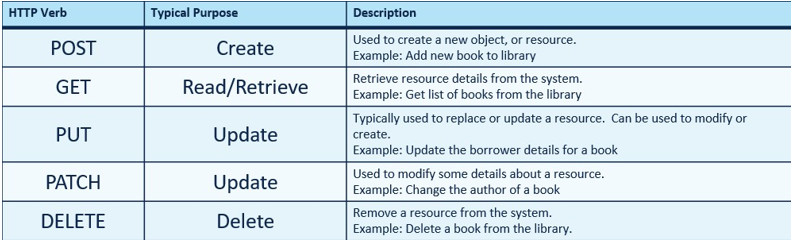
Step 1. Open a Web browser (Firefox or Edge recommended), execute this GET API and define the number of decks you want to use. The default is one. But change the parameter to 6 in order to play Blackjack.
https://deckofcardsapi.com/api/deck/new/shuffle/?deck_count=6
You see the response in Json format:
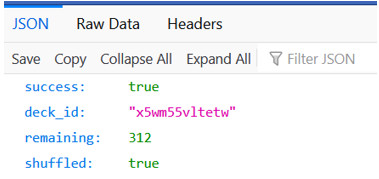
Step 2. Change the parameter now to 1 and check the response. https://deckofcardsapi.com/api/deck/new/shuffle/?deck_count=1
You see the remaining cards in one deck.
Step 3. The count variable defines how many cards to draw from the deck. Be sure to replace deck_id with the id obtain from the previous example. You can also replace it with “new” to create a new shuffle deck and draw cards from this new deck.
https://deckofcardsapi.com/api/deck/«deck_id»/draw/?count=2
Replace the deck_id with the id, you got from the previous response. For example: https://deckofcardsapi.com/api/deck/58f7v8te5530/draw/?count=2

or replace it with “new” https://deckofcardsapi.com/api/deck/new/draw/?count=2

Note: In these examples, you did not have to be authenticated and authorized because it is a public API.
Lab 2: Developer Portal
Developers can build, enhance, and customize their Customer Experience solution with the rich set of APIs, which includes Contact Center, AI, Journey, Orchestration and Experience Management. The Developers portal help you to get started with the APIs. The Developers portal provides detailed API reference docs as well as the Try Out functionality which help to familiarize you with WxCC APIs and learn quickly.
Objectives
The objective of the lab is to understand the benefits of the Cisco Developers Portal to learn and understand WxCC APIs.
Task 1: Introduction to developer portal
Step 1. Open a web browser and navigate to the developer portal: https://developer.webex-cx.com Sign in with the username and assigned to you and the password is your Gold Tenant admin credentials.

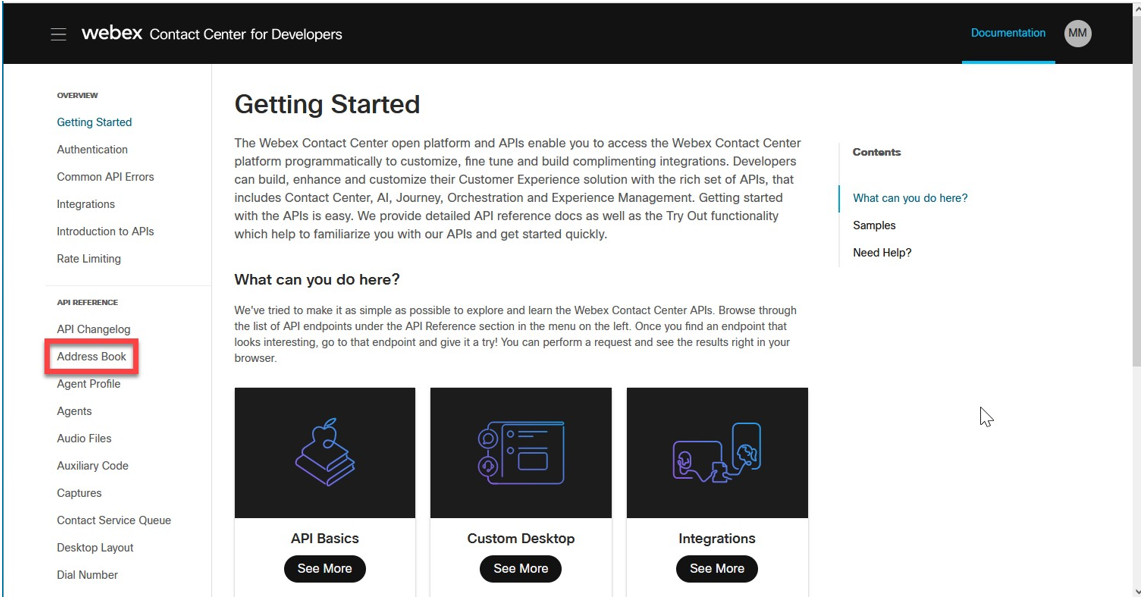
Step 2. Select Documentation from the top-right corner.
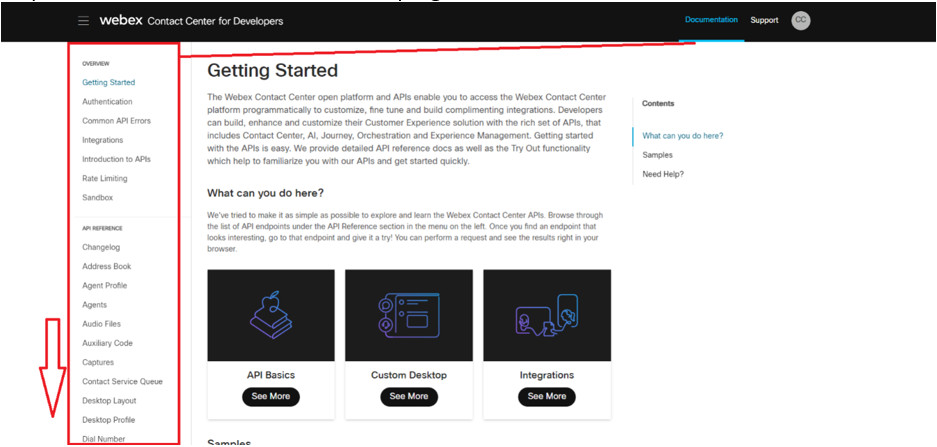
You can see different sections on the left-hand sides, for example:
Authentication: This section explains the authentication method used by WxCC and the prerequisites.
Common API errors: In this section you have the list of errors that can be returned as a response to an API request.
Introduction to APIs: In this section you can find an overview to the WxCC open architecture APIs.
API Reference: You will see in this section all the APIs categories that WxCC offers.
Step 3. Navigate to the API reference and select Address Book
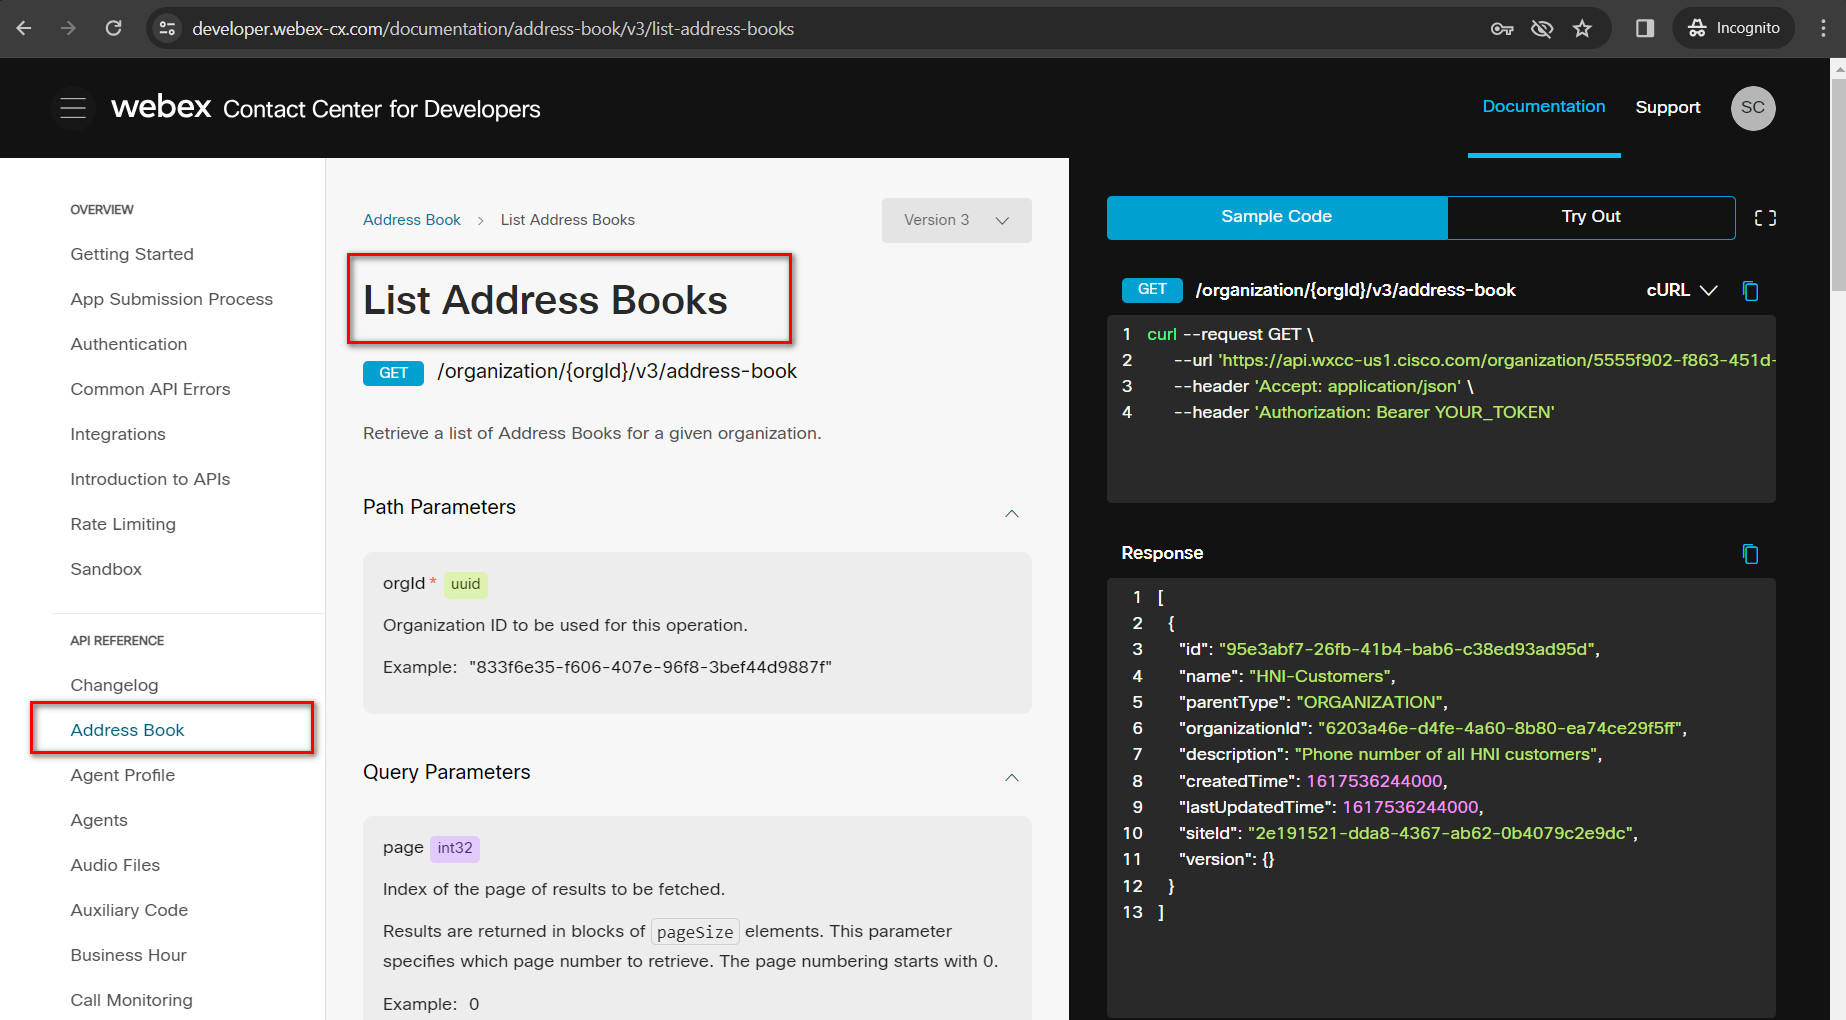
Step 4. In this case, you want to first list the address books already created. So, select the GET request under “List Address Books”
Step 5. You can see all the parameters required, like orgId and optional parameters, like page or page size, and so on.
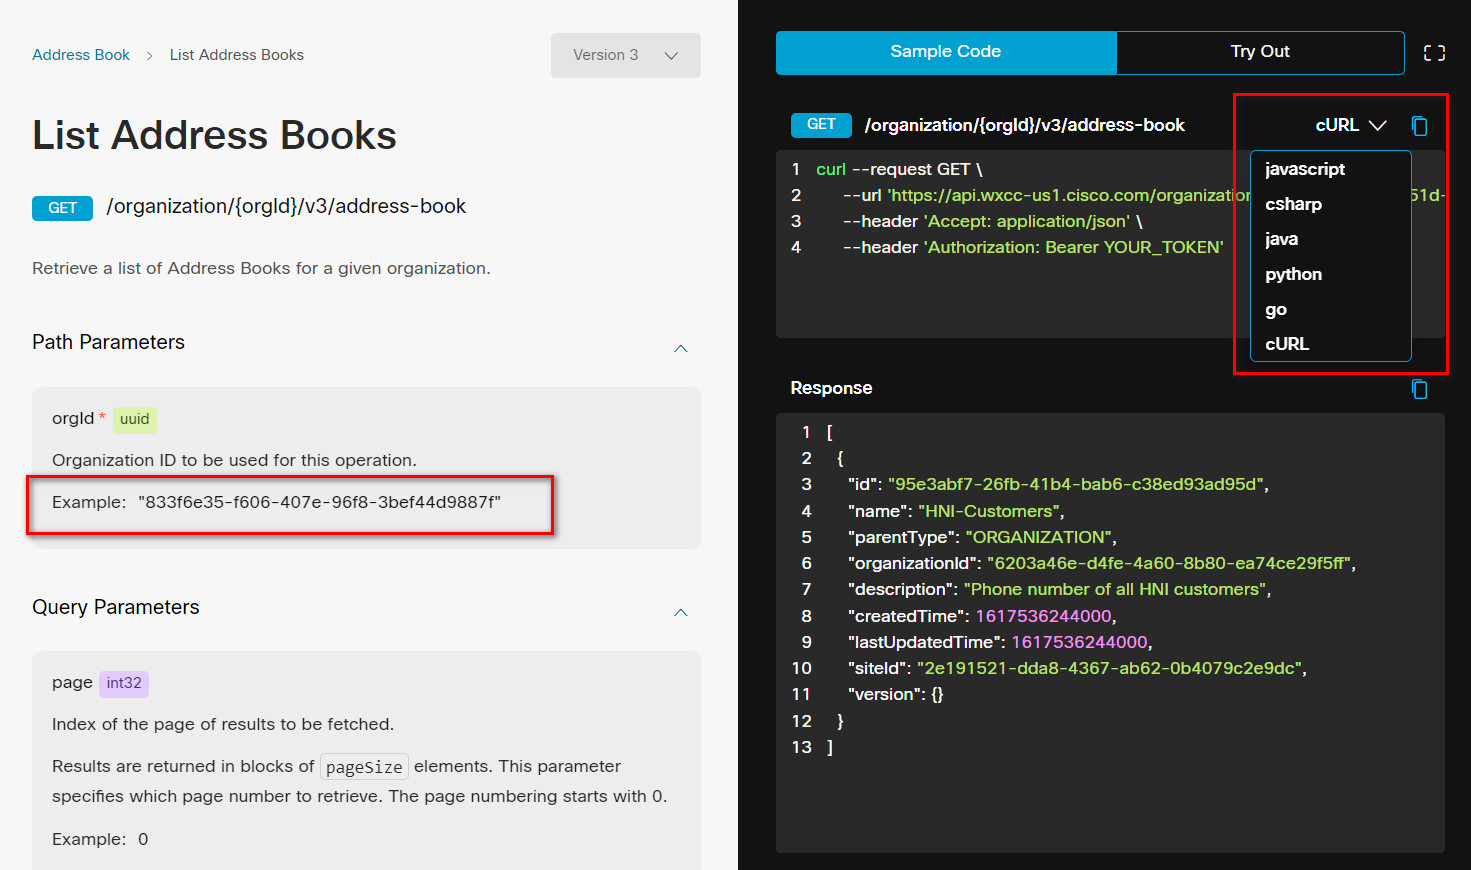
Step 6. On the right-hand side, you see how the API is executed. You can see the method; GET; the URL used with the variable (orgId) and the code language that is being used (you can use cURL, csharp, java, python, etc.)
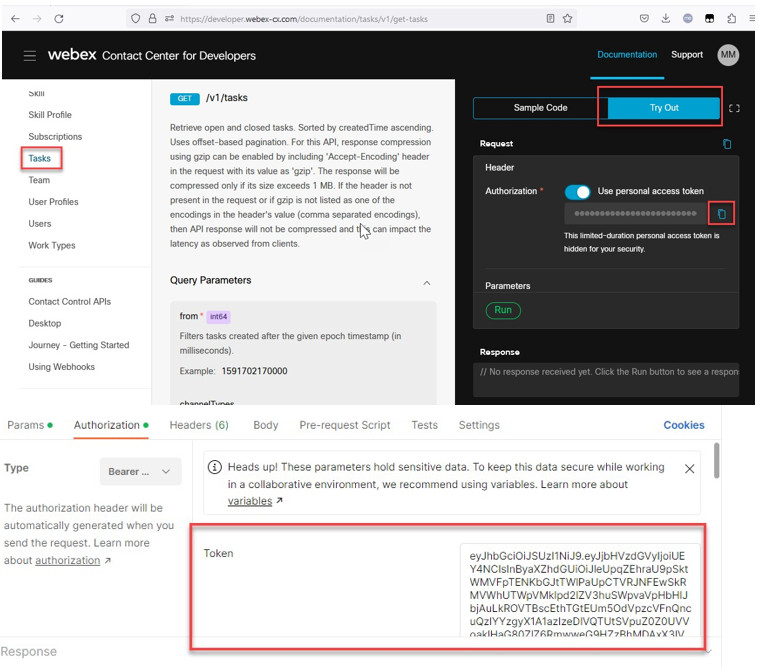
Step 7. Select the Try Out section. As you notice, this requires an authorization token. The token used by default, is the one automatically assigned when you log in with the admin credentials to the Developers portal. It also pulls the orgId from the organization the user you logged in is part of. Click Run.
You see the 200 Response, which indicates the request was successful. You also see the address books created in this org. You can scroll down in the response window to see the list of all address books.
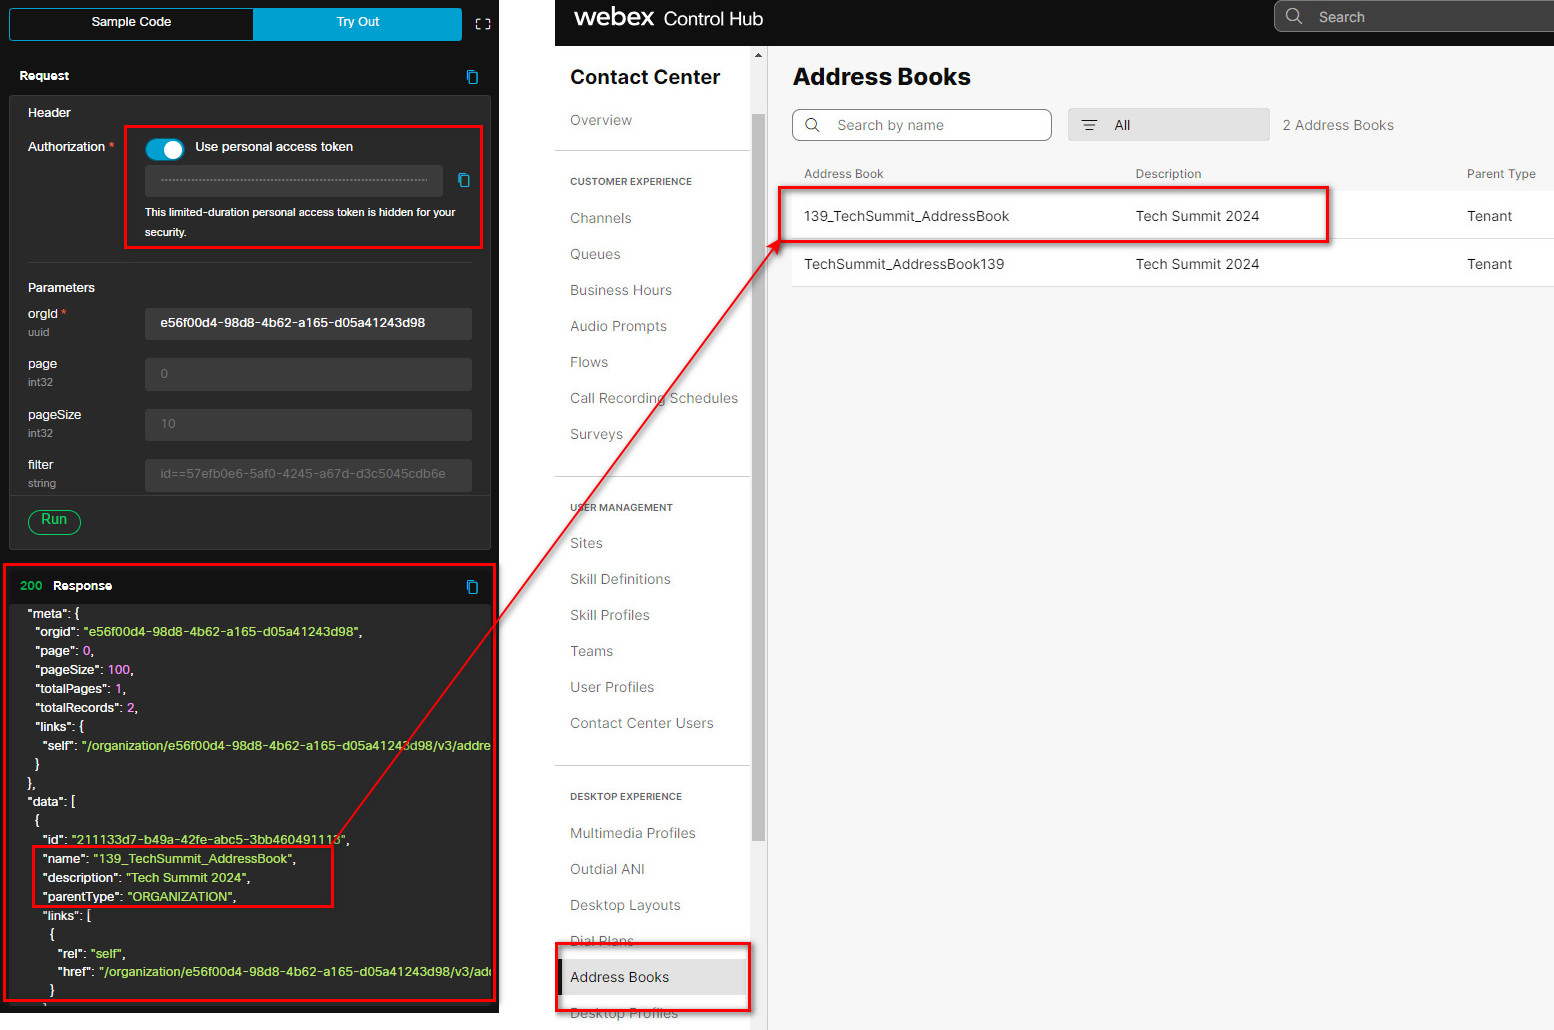
Step 8. Log in with the same user to Control Hub https://admin.webex.com, navigate to Contact Center > Address Book

Task 2. Develop a Webex Application
This task shows you the configuration steps to create a Webex application. This covers how to build the authentication part of the application for use with Postman.
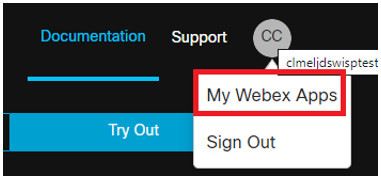
Step 1. Logon to https://developer.webex-cx.com with your username and password. On the top-right hand corner, hover over your userID and select My Webex Apps from the pop-out menu.
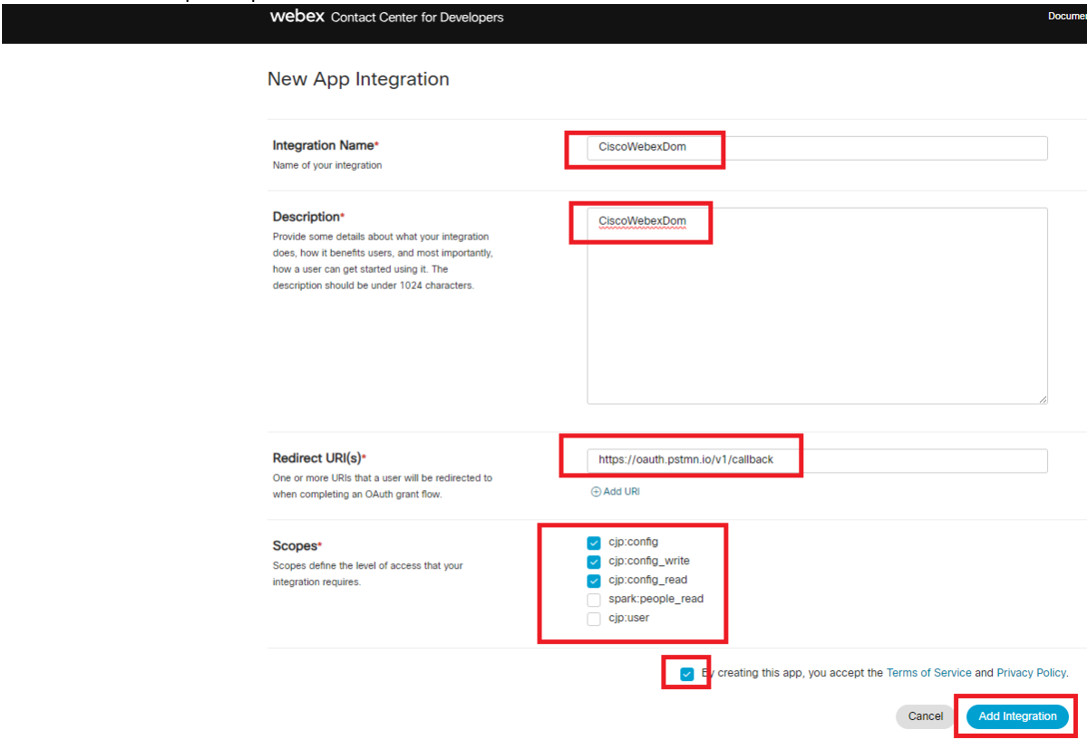
Step 2. Provide the name of your choice, description of your choice, the redirect URI and check the scopes (Config, write and read).
For the URI, we are using Postman as a sample application so, use this URI: https://oauth.pstmn.io/v1/callback and select the top 3 scopes as shown in the screenshot below.
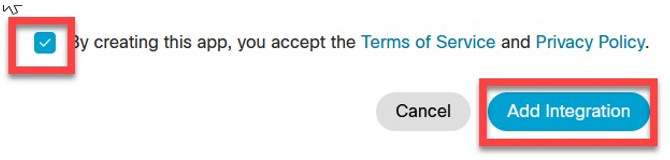
Step 3. Accept the terms and click Add Integration.
Step 4. You will get the response with the Client ID, Client Secret, and the URL that you could embed in your application to initiate the authentication.
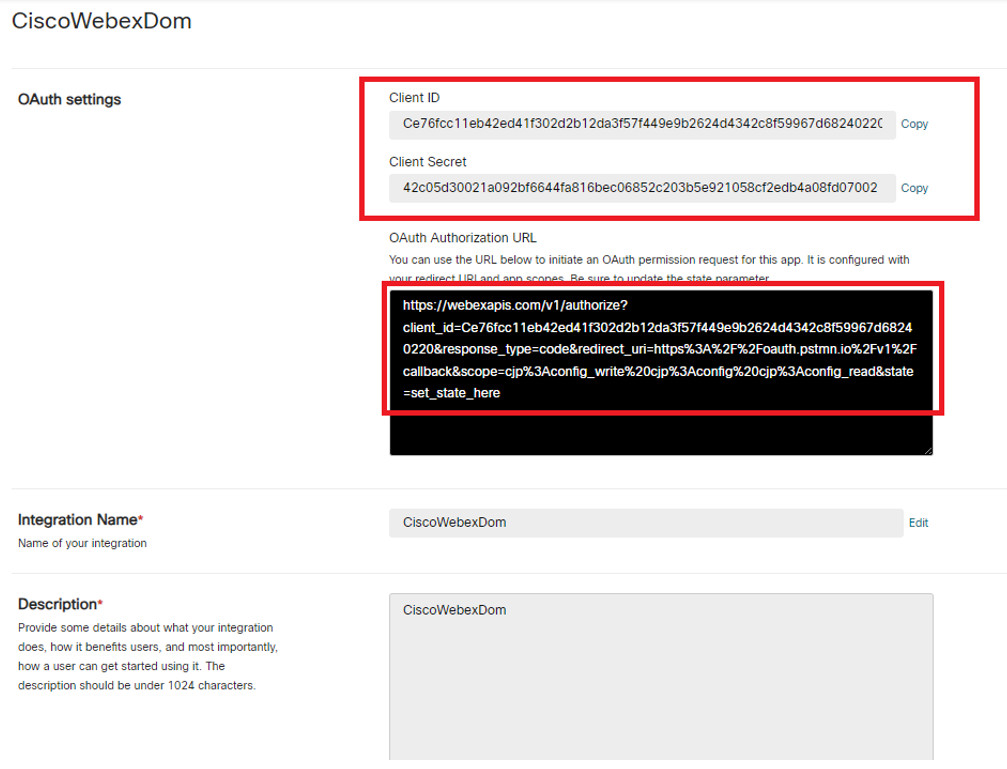
Save Client ID and Secret ID into a text file. We will use it later in Lab 4.
Caution: Do not share or publish your production Client and Secret IDs as they can be used by bad people to harm your system.
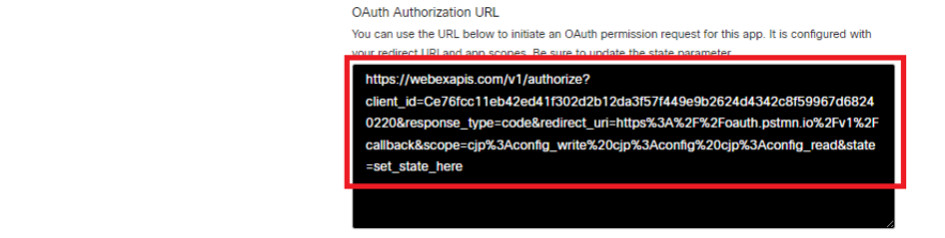
Step 5. Copy the whole URL into a new browser window and you see that redirect you to a Webex authentication page.
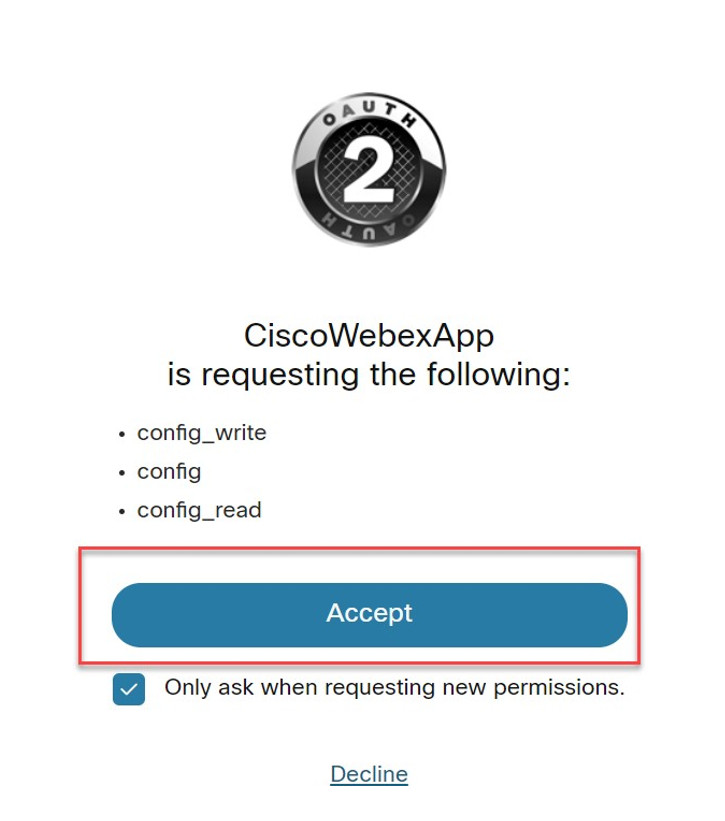
Step 6. On the authentication window, click Accept.
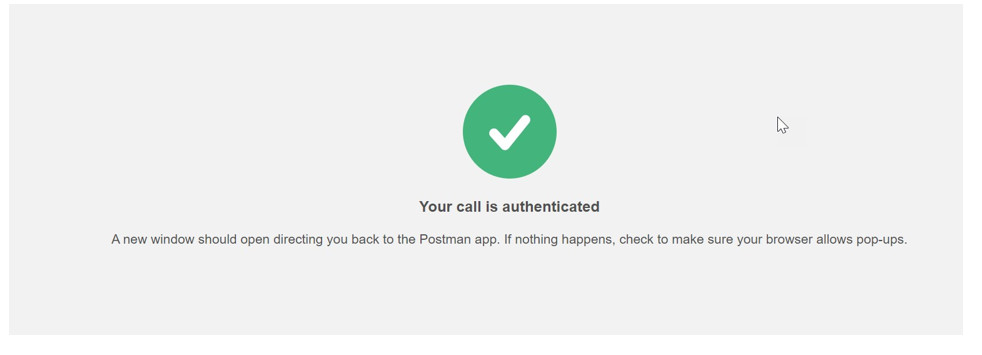
Step 7. You see that your application is now authenticated.
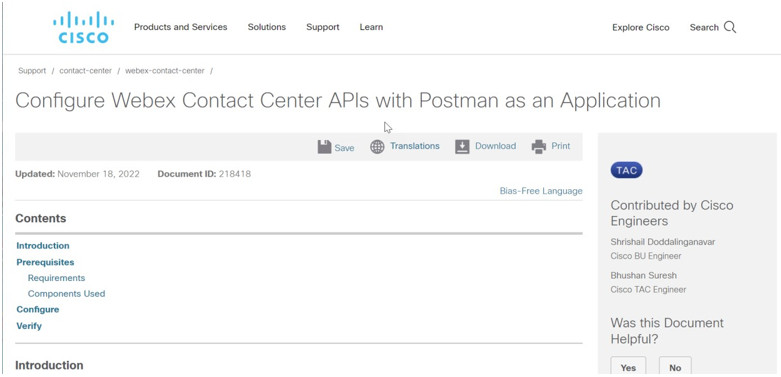
More Information about creating a Webex application and using Postman in this document: https://www.cisco.com/c/en/us/support/docs/contact-center/webex-contact-center/218418-configure-webex-contact-center-apis-with.html
Lab 3: WxCC APIs on Postman
Postman is an API platform for building and using APIs. It includes a comprehensive set of tools that help accelerate the API lifecycle—from design, testing, documentation, and mocking to the sharing and discoverability of your APIs.
Postman can run on the Chrome browser. To use Postman, you will first need to install Google Chrome. As alternative you can also install free Postman application available on https://www.postman.com/downloads/
In this lab we will use Web based version of the Postman API client tool to define API requests and test them.
Note: This lab is built for Postman browser mode but you can use pre-installed version of Postman.
PREREQUISITES:
You should have your own Postman account in order to use the software or online version of Postman. Please follow Task 1. Postman Account Creation. If you already have account feel free to skip this task and proceed with Task 2.
Task 1. Postman Account Creation (Optional in case you don’t have your own account)
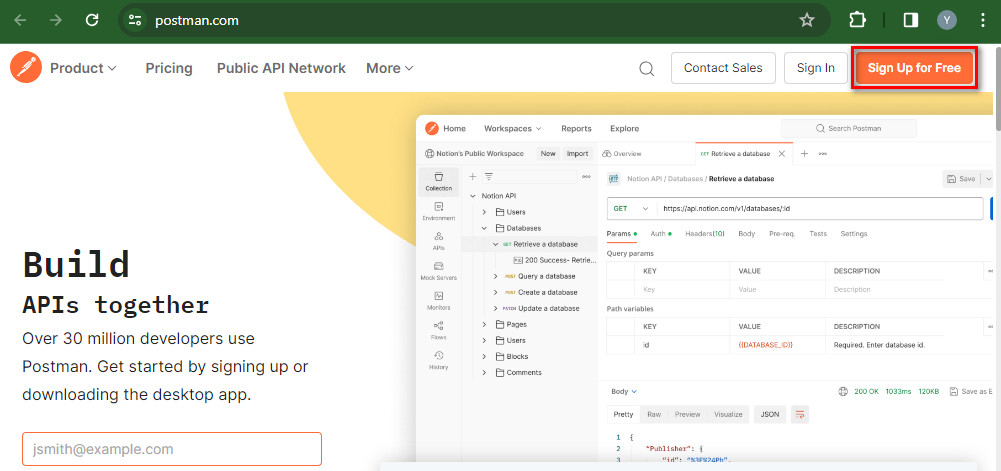
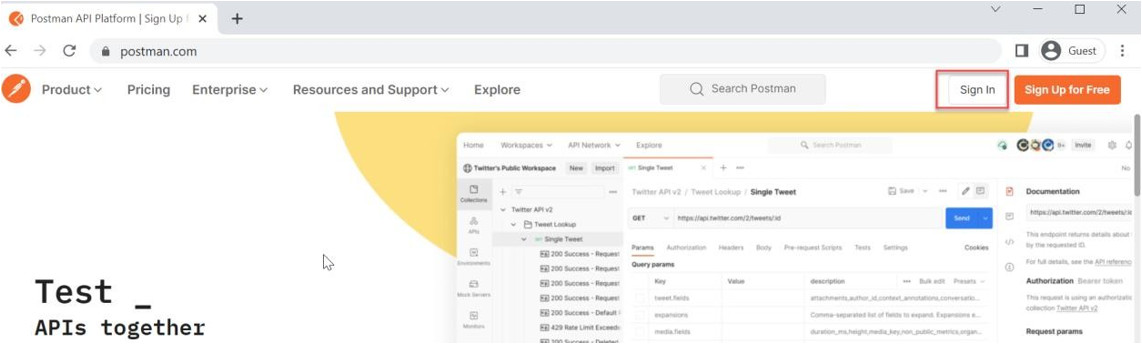
Step1. Access https://www.postman.com/ and click on Sign Up for Free
Step 2. Provide your email, username and password then click Create Free account. Step2a. (Alternatively) You can use your own Gmail account if you want.
 Note: Email address provided on screenshot used as example.
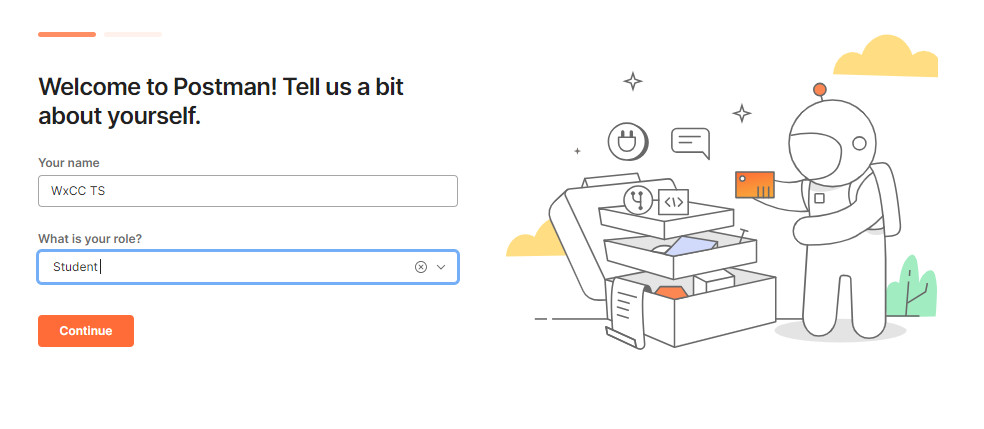
Step 3. Provide additional details. Choose anything you like from drop down list.
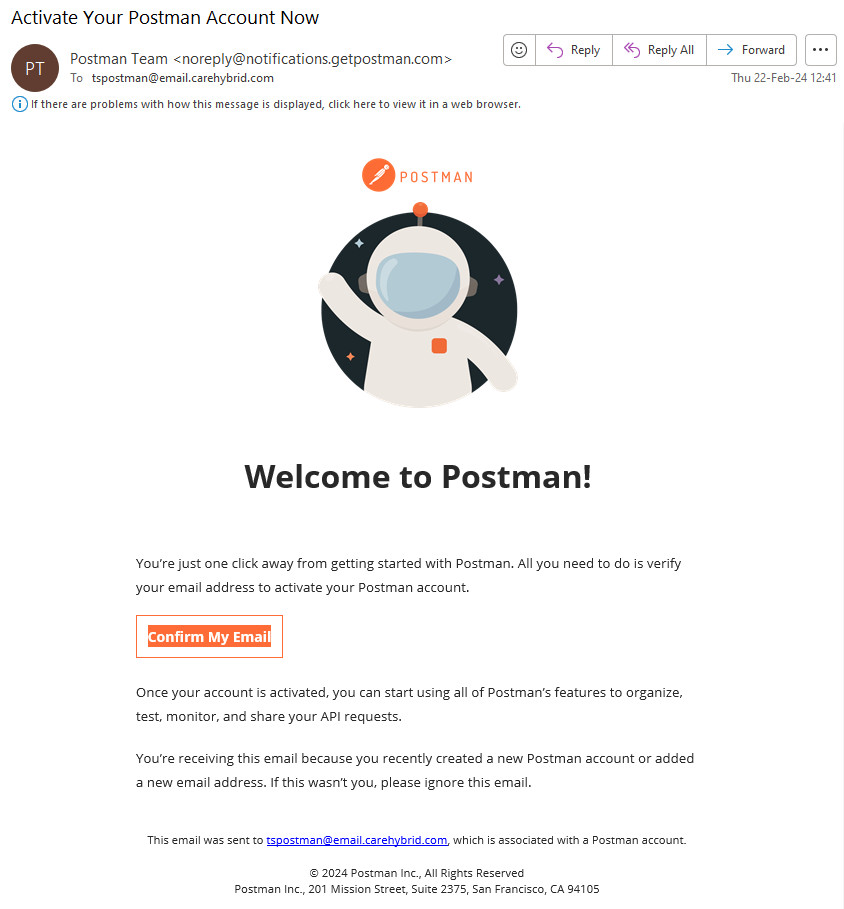
Step 4. Confirm your account by accessing provided mailbox and clicking Confirm My Email. You will be redirected to Postman Web Page that you can use to build you API Calls.
Task 2: Postman Fundamentals
Step 1. Locate the Chrome icon at the bottom of the task bar and launch it.

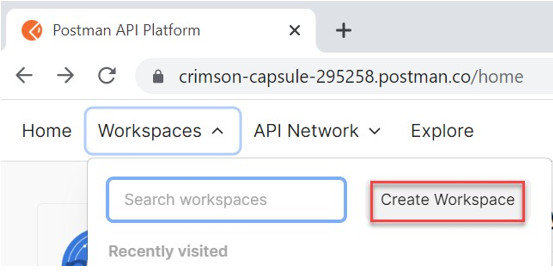
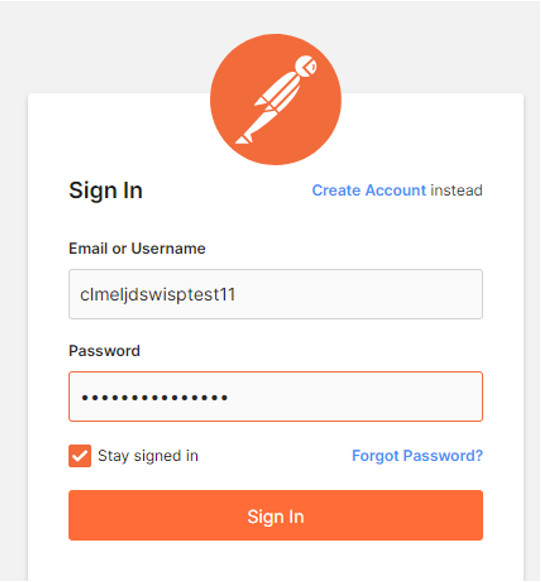
Step 2. Navigate to postman.com and select sign in.
Step 3. Provide your username and the password.
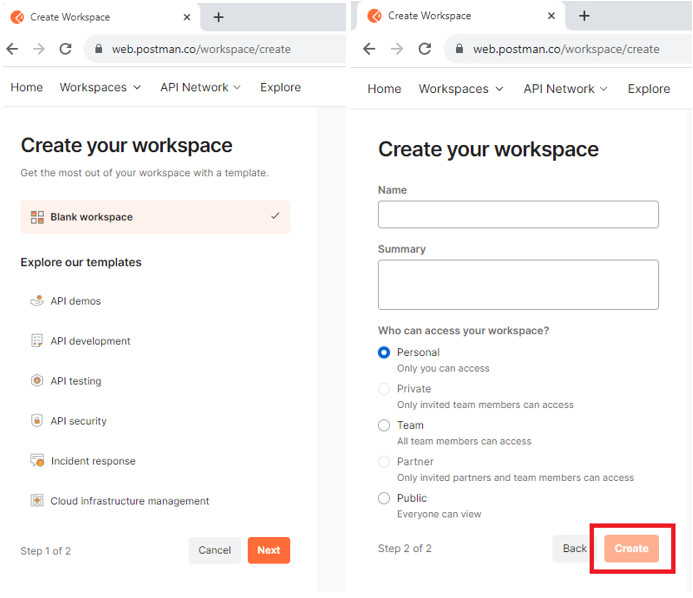
Step 4. Create your workspace. On the Workspaces tab, type the name of your workspace. In this exercise your workspace name could be the same as your username.
Step 5. On the Workspace create window, add the name, check the Personal option and click Create Workspace.
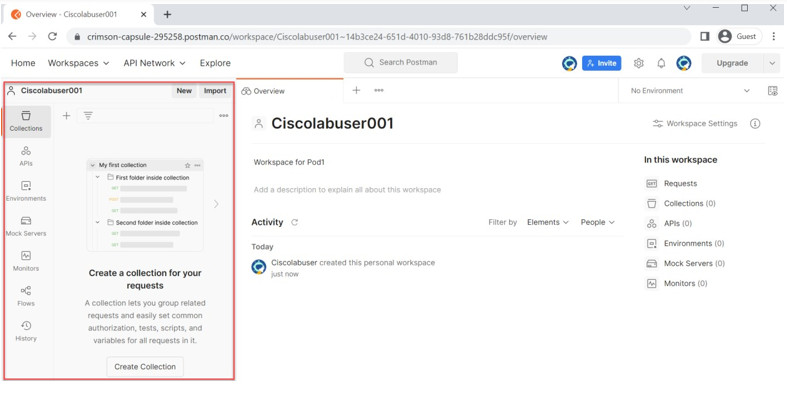
Step 6. You see your workspace created and all options on the left side of the window. You will navigate to each of this option to understand Postman functionality.
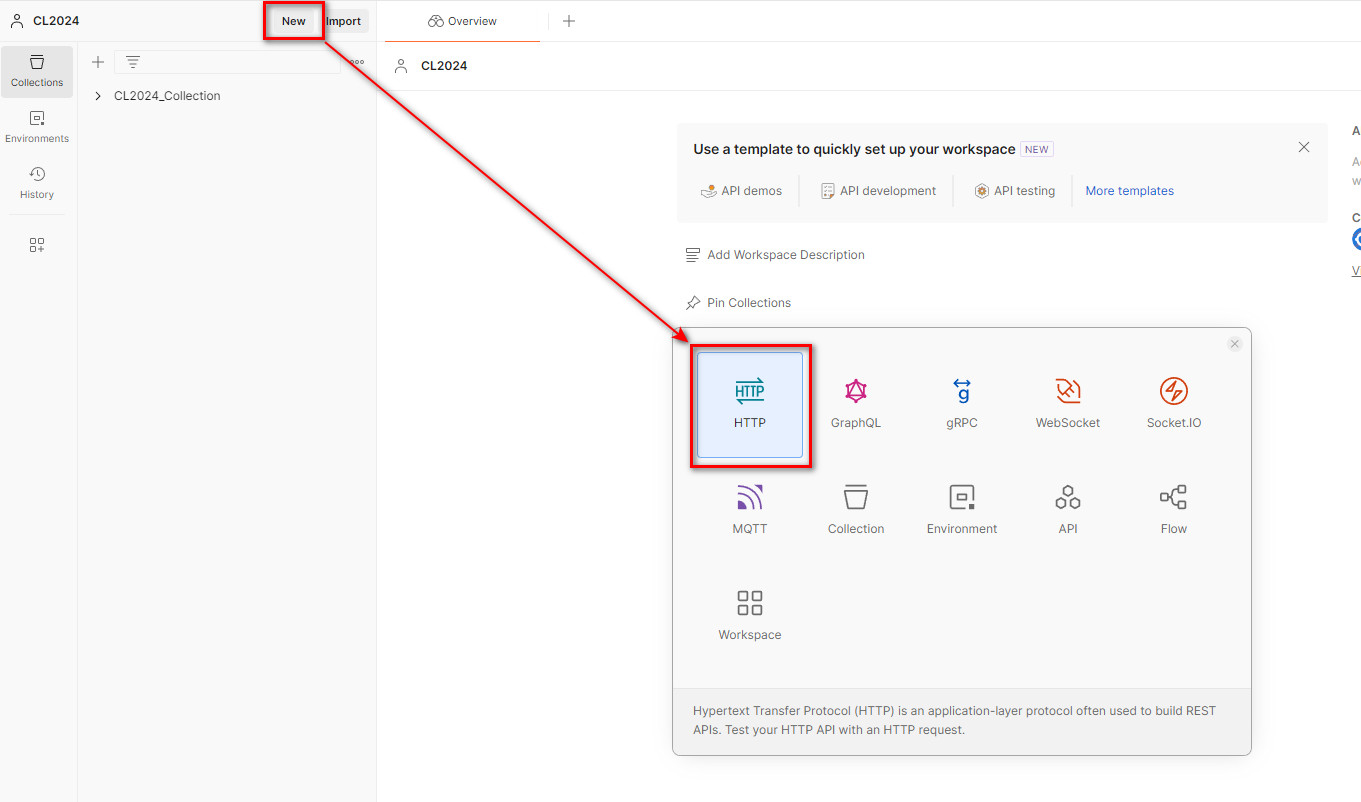
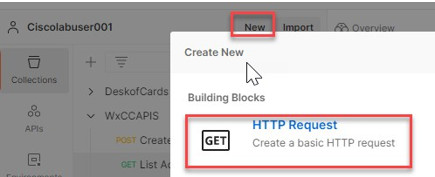
Step 7. Select New and then HTTP Request to create a new API request.
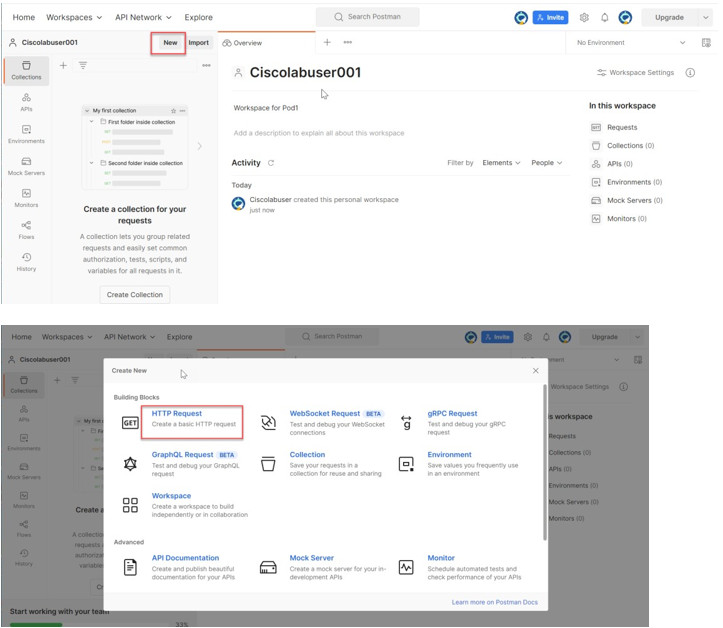
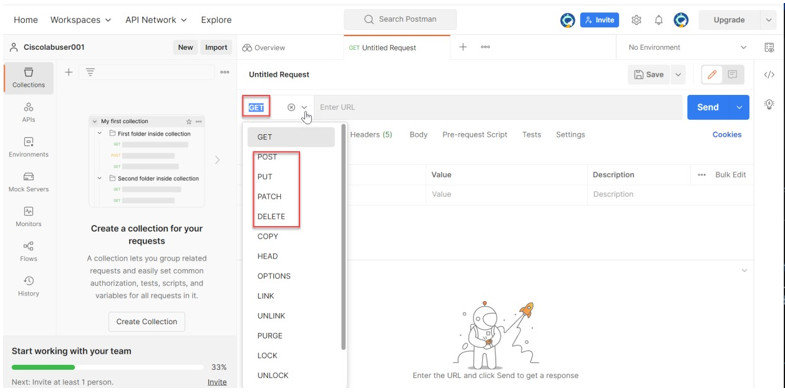
Step 8. Notice in the screenshot below that the default method is GET; Click the drop-down arrow next to it to show all other REST API methods including the ones mentioned above for WxCC.
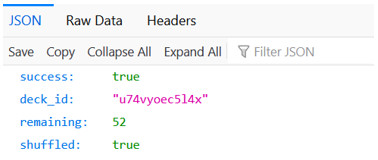
Step 9. Evaluate the previous deck of cards API via Postman. Copy the following URL and paste it into Postman and select the GET option to the left:
https://deckofcardsapi.com/api/deck/new/draw/?count=2
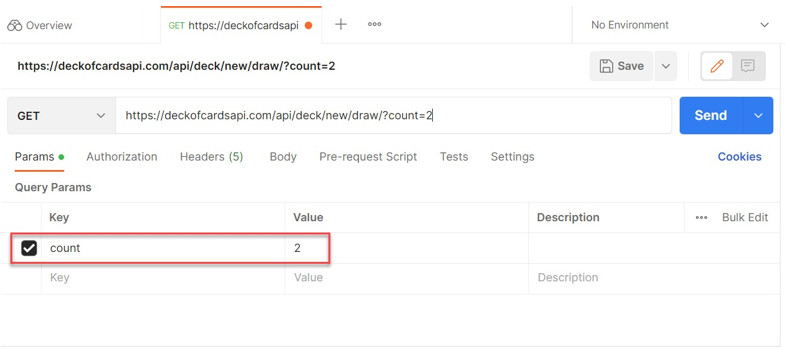
Note, that after adding the URL, the parameter count was automatically added.
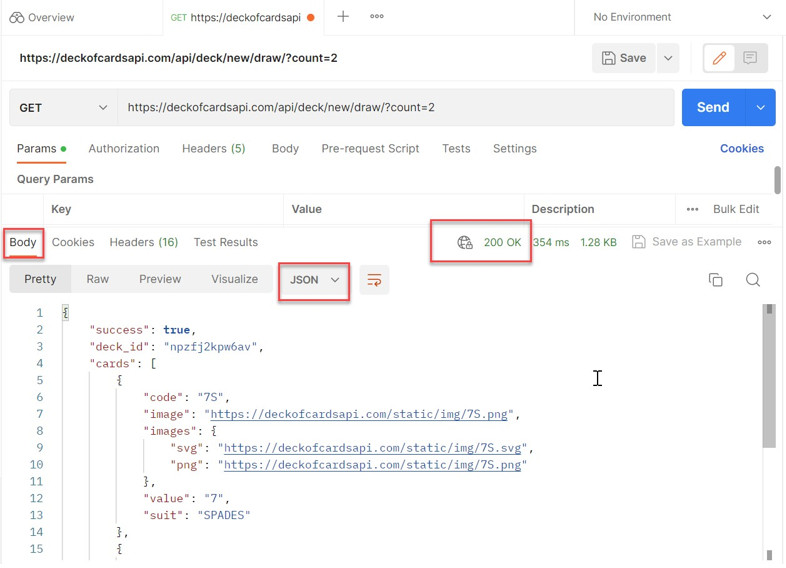
Step 10. Click Send button. Review the results. You see 200 OK in the response, which indicates that this was a successful response, you see the body of the response and the format.
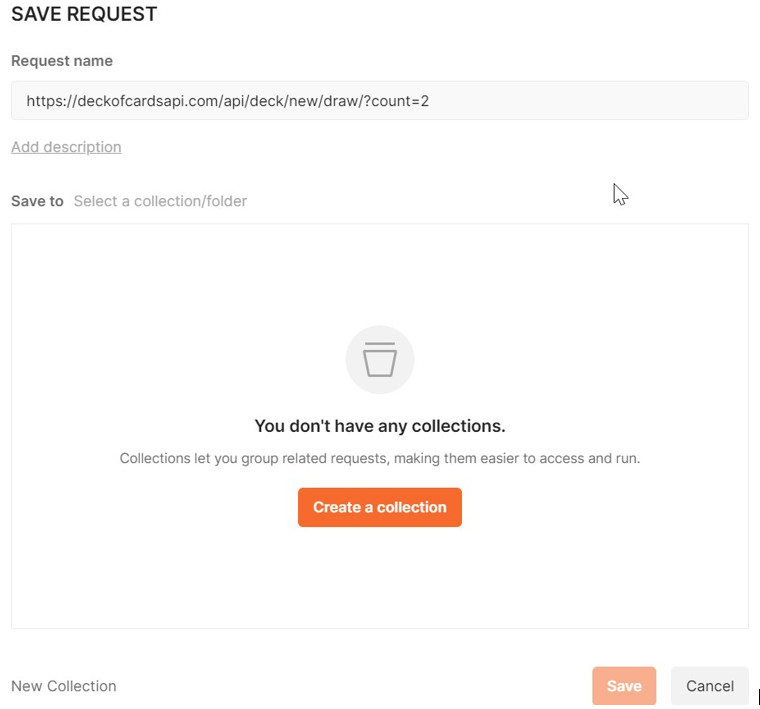
Step 11. Save this request in a Collection. Select Save As from the pull-down button.
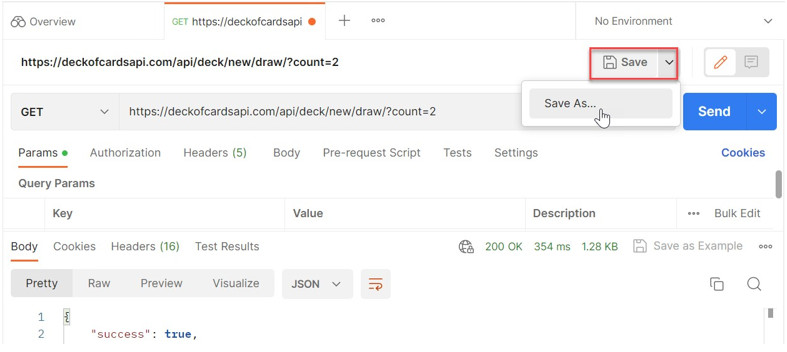
Step 12. Click Create a Collection. Add the name DeckofCards and click Create. Then, click Save.
Task 3. Postman - WxCC Address Book Management
Step 1. Locate the Chrome icon at the bottom of the task bar and launch it.
Step 2. Navigate to postman.com and select sign in.
Step 3. Provide your username and the password.
Step 4. Navigate to the Workspace tab and select your workspace (created in Lab3.Task 2: Postman Fundamentals).

Step 5. Create a new request. On the left-hand side window select New and then select HTTP Request.
Step 6. Open another browser window and log in to Developer Portal https://developer.webex-cx.com. Once logged in, click on Documentation link on top and select Address Book (under API REFERENCE)
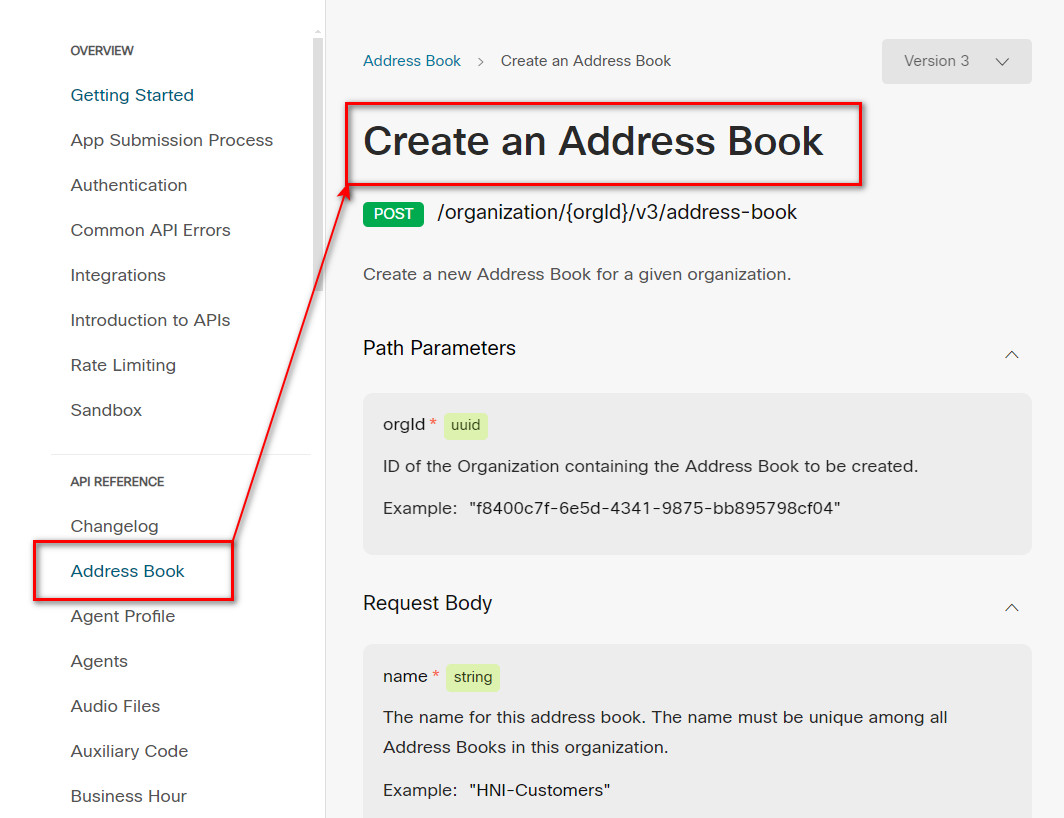
Step 7. Since we want to create a new address book, we will use a POST request. Select this Post request on the Developers portal. Use v3 API for this. See screenshot.
Step 8. Here you can see the required parameters that you need to provide in Postman:
Method: POST
URI: /organization/{orgId}/address-book, where {orgId} is a variable that you can create in Postman and assign the value of your organization ID.
Step 9. Select the Try out button to show information that Postman will need as parameter or env variable for the API request. Refer to the screenshot below. You will need this request body too.
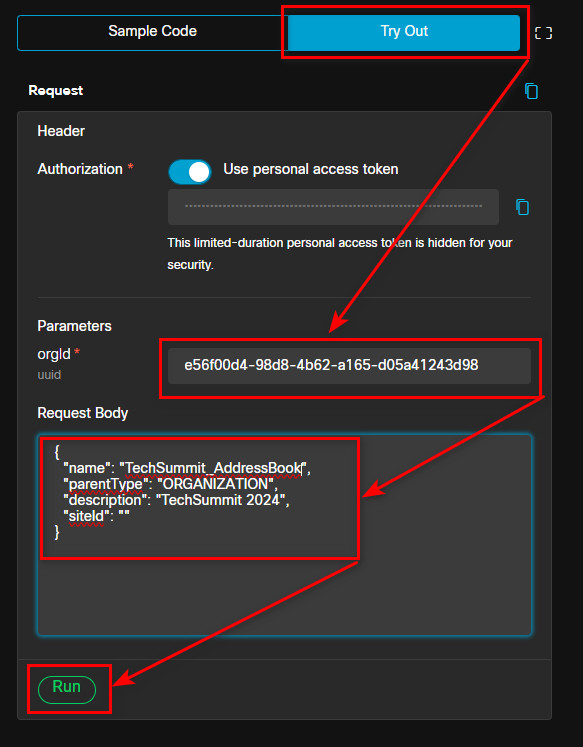
Example: Body:
{
  "name": "TechSummit_AddressBook_<YOUR ID from USERNAME>",
  "parentType": "ORGANIZATION",
  "description": "TechSummit 2024",
  "siteId": ""
}
Click Run
Note: If you use shared lab tenant given by Cisco, use your given username as appendix for the address book name. Otherwise there are might be name conflicts in creation. Example: If username is wxcclabs+agent_ID100@gmail.com the address name should be “name”: “TechSummit_AddressBook_ID100”.
You should see:
If you have not logged in to the portal already, in another tab, login to the portal:
And verify that you can see this new address book created like this example:

Congratulations! You have run a simple API towards Webex CC and created an address book without logging into the portal.
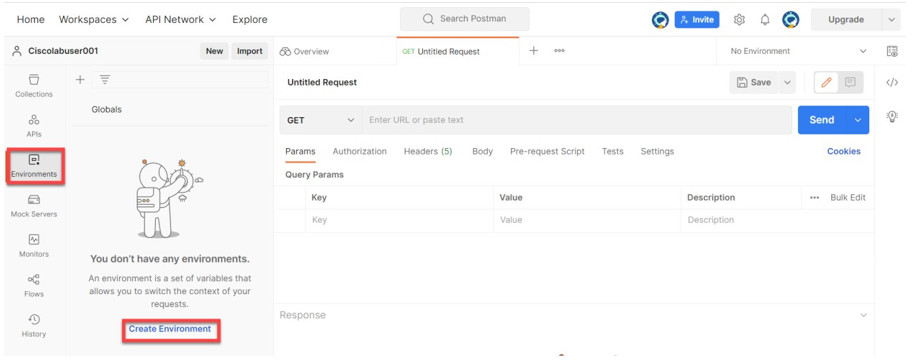
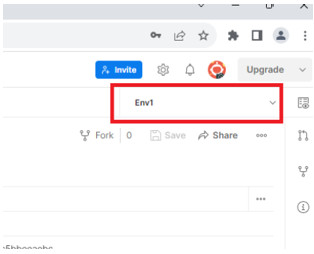
Step 10. Switch back to your Postman browser tab. Before sending the API request to create an address book, we need to create 3 environment variables: orgId, addressBookId and datacenter. This is a required parameter to create an address book. On Postman, select Environments and then Create Environment.
Step 11. Rename the New environment to any name you like, for example: Ciscolabusser001E
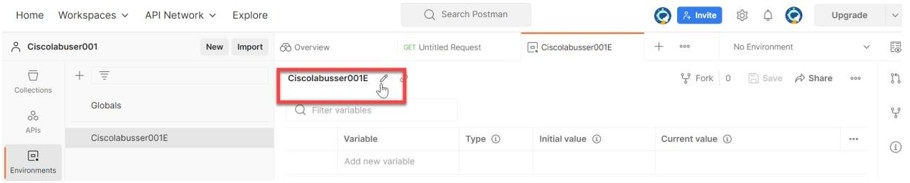
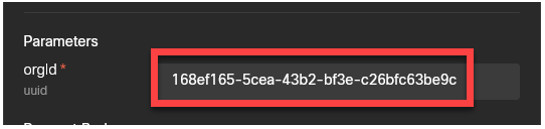
Step 12. Add a new Variable called datacenter with the initial value of us1, if you use lab pods. Note: In case you’re using your Gold Tenant use either eu1, eu2, anz1, ca1 or jp1 (Check with lab proctor if you’re not sure). Then add another variable with the name orgId (info in screenshot may be different – orgId) and copy the orgId value from the Developers portal to the initial value. Add a 3rd variable addressBookId and for the Initial value, obtain the Address Book ID from the Control Hub-> Contact Center -> Address Book. Verify that all Variables are set and click Save.

Developers Portal:
Step 13. On the left Menu panel, choose Collections, and click on the + to create a new Blank collection for Webex CC and give it a name (click on the 3 dots and rename it). Select the environment on the top-right corner of the postman window.
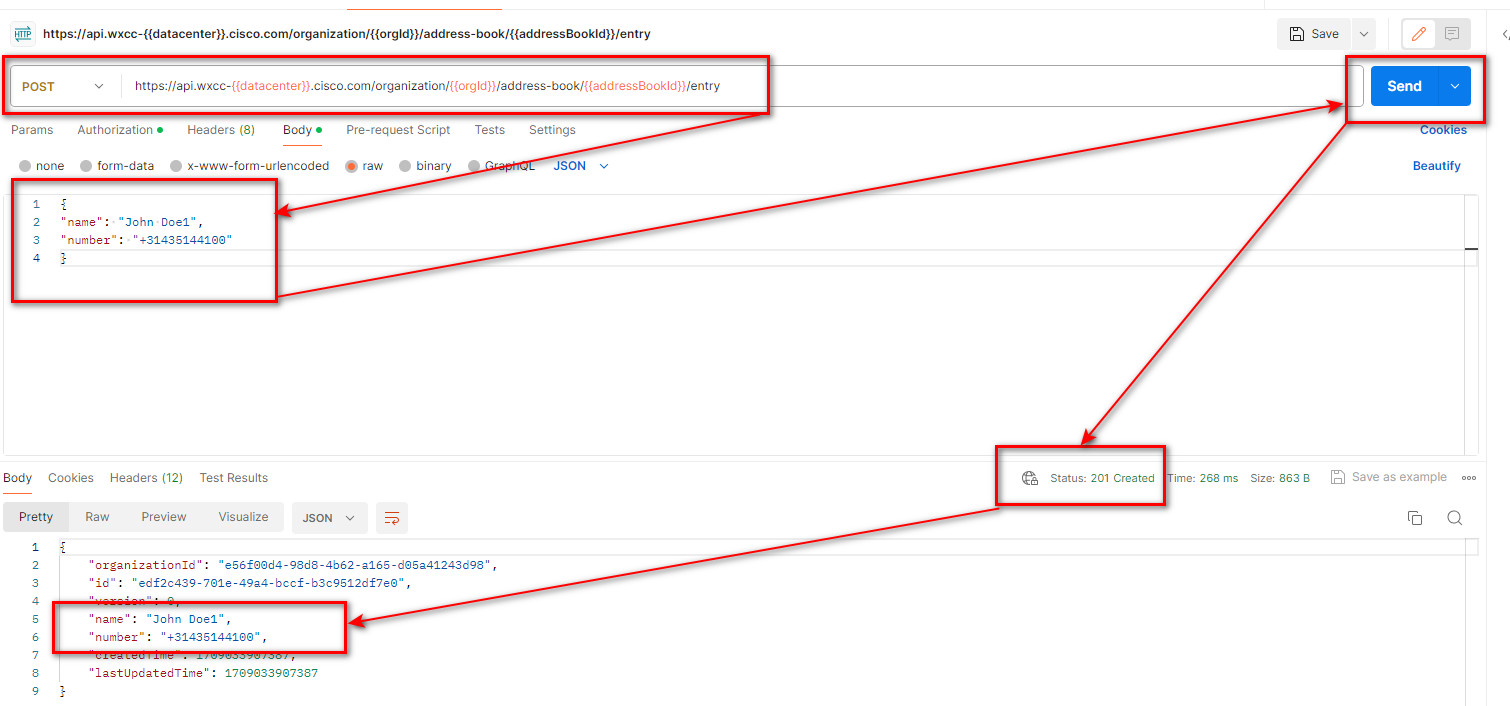
Step 14. Under the collection you just created, click on Add Request. On the Untitled Request window (or the New Request), click on the 3 dots and rename it to “Address Book Entry”, change the method to POST (not GET) and on for the URI enter the one provided in the Developers portal /organization/{orgId}/address-book/{addressBookId}/entry) plus the server address. Change orgId for the variable you created orgId and add {}:
https://api.wxcc-{{datacenter}}.cisco.com/organization/{{orgId}}/address-book/{{addressBookId}}/entry
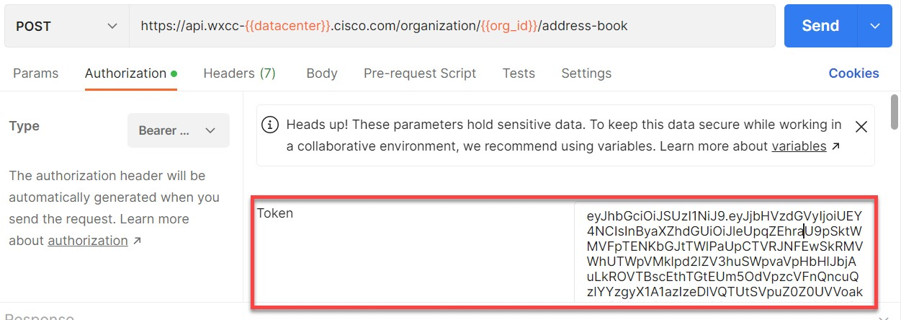
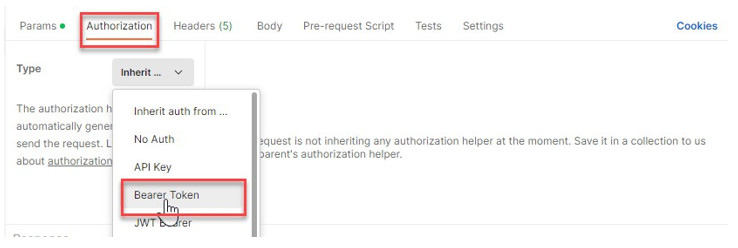
Step 15. Next step is to provide the authorization. In Postman click on the Authorization tab and select Bearer Token.

Now, login to the Developers portal: https://developer.webex-cx.com/documentation/address-book
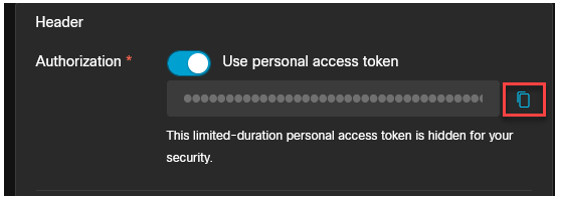
Go to Documentation on the right hand top corner > Click on Create an Address Book Entry and Try Out on the right – You can now copy your personal token and use it.
Step 16. Now, you need to provide the request parameters in the body. Select the Body tab in Postman and then select raw.
Step 17. Copy the following request format and paste it into Postman body request.
{
  "name": "John Doe1",
  "number": "+31435144347"
}
Step 18. Select Headers and add Content-Type and the value application/json
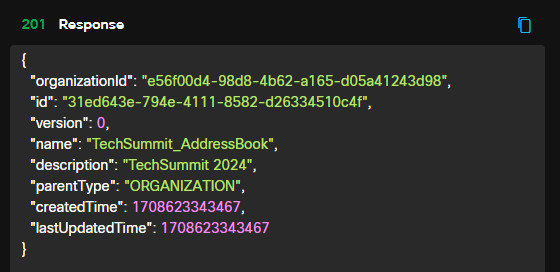
Step 19. Click Send. You see the response 201 created and the id for the new address book. Copy this address book id and paste it in notepad because we will use it later.
Step 20. Save this API request in a new collection. Select Save, then Save As.

On the Save window, add the Request name (Create Address book). Select existing collection if any or Click on New Collection to create a new one. If new Collelction add the name of the collection and click Create, then click Save after the collection has been created.
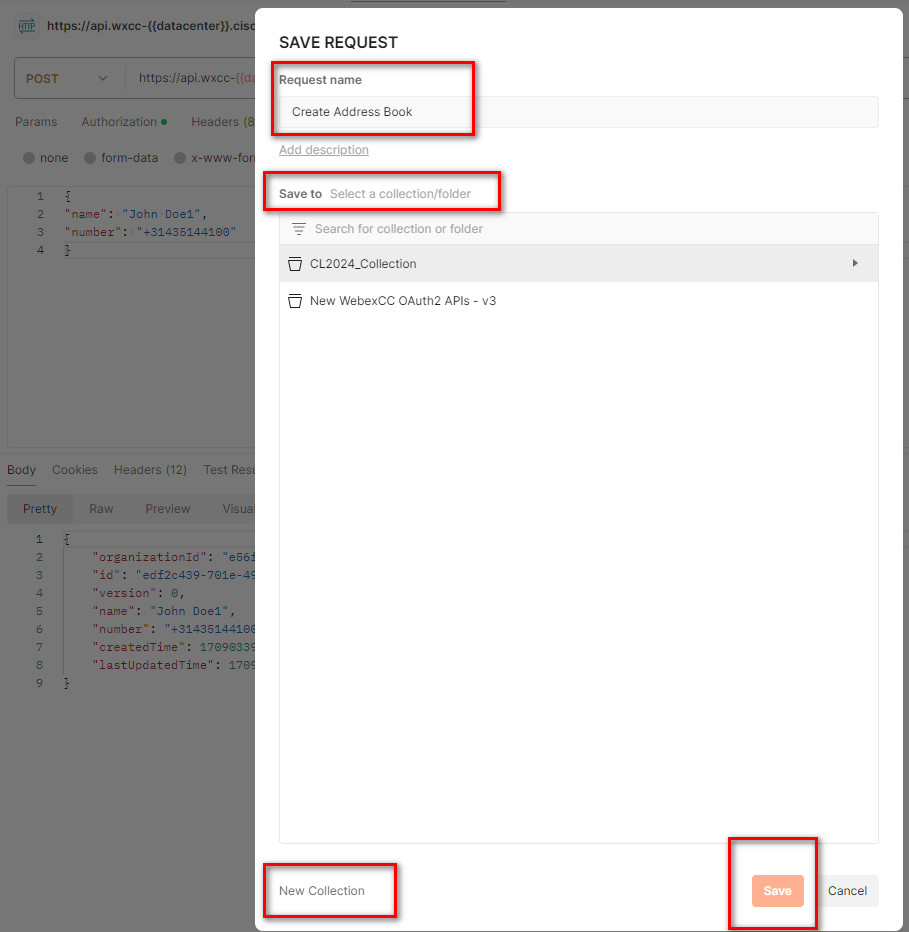
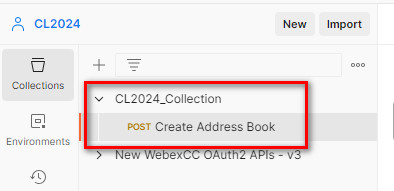
You see the new collection and API request added.
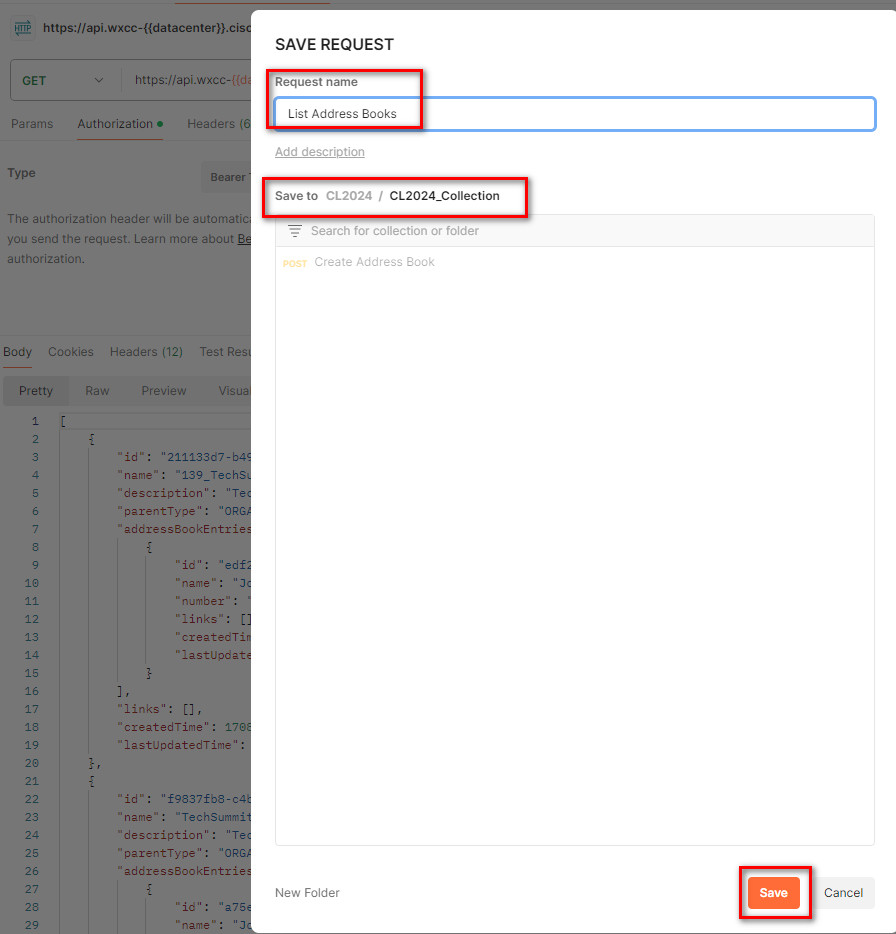
Step 21. Using an API request verify that this address book exist in WxCC. This is very simple. Create a new tab in Postman and use this against the GET method https://api.wxcc-{{datacenter}}.cisco.com/organization/{{orgId}}/v3/address-book to list all the address books. Remember to use the Environment and the Authorization as Bearer token as described before.
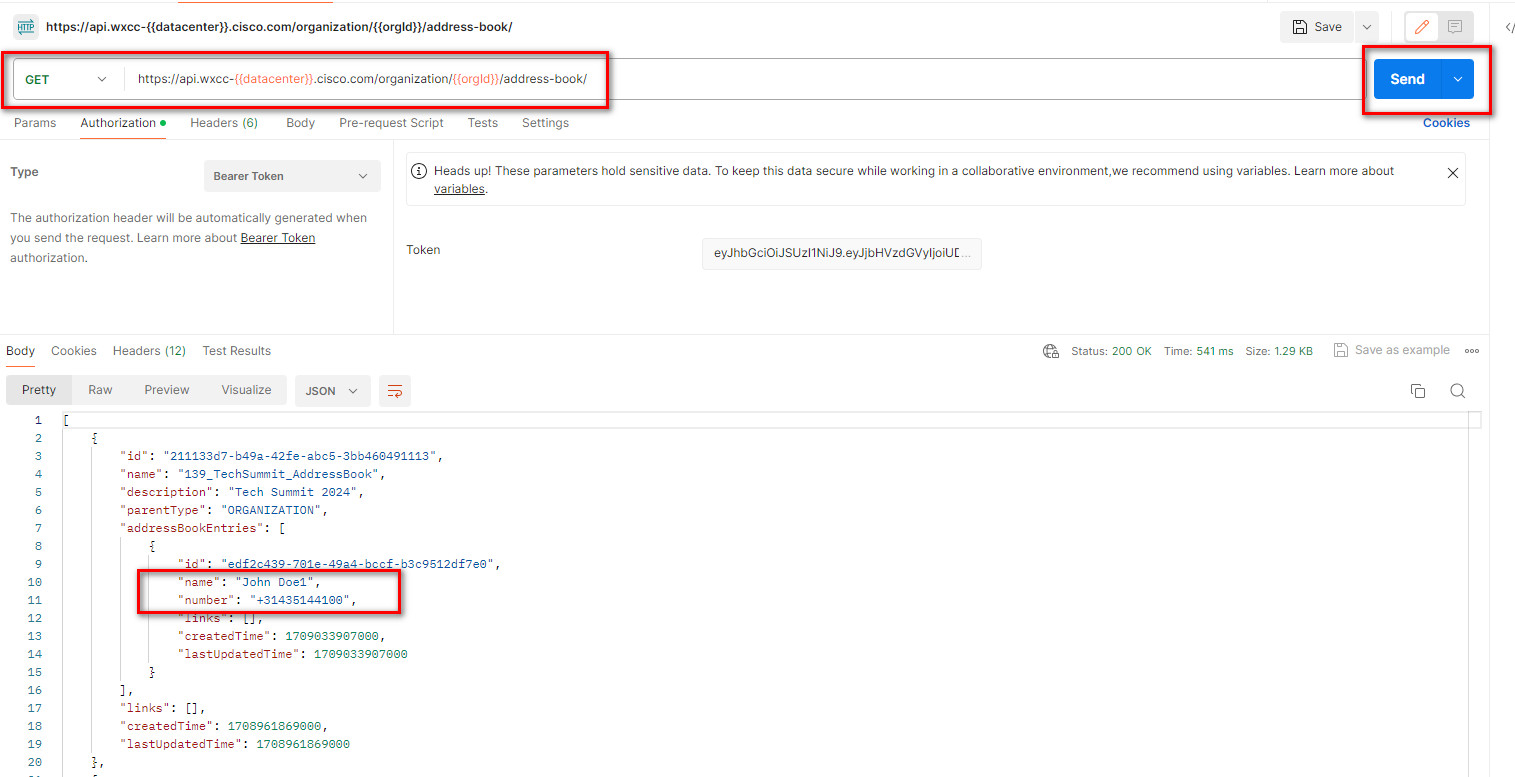
Step 22. Save this API in the collection. Click Save then Save As. On the Request name add List Address books. Click Save to save it on the WxCCAPIs collection.
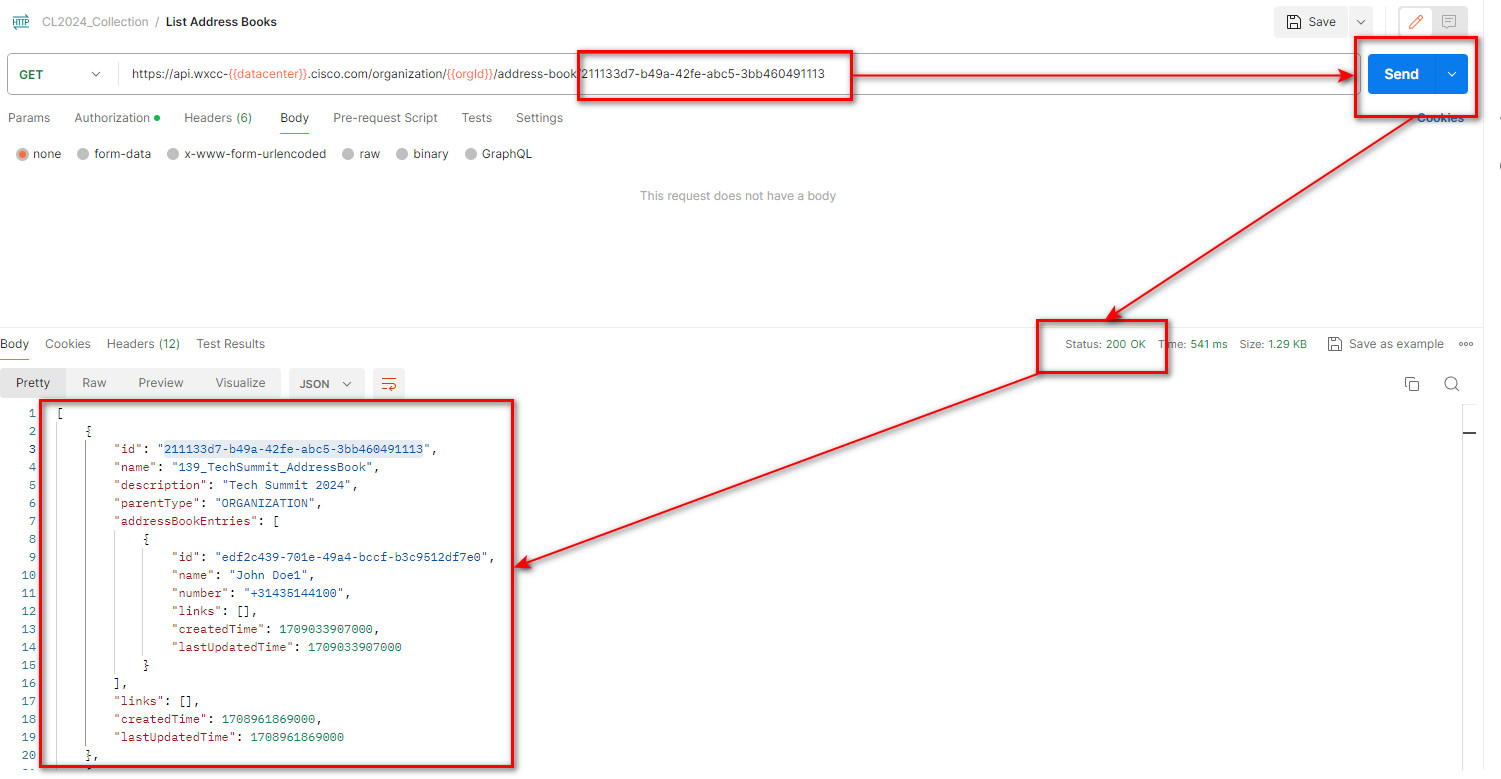
Step 23. You can also list a specific address book. Use the same GET API and just add the address book id that you have previously copied into notepad and click Send.
for example: https://api.wxcc-{{datacenter}}.cisco.com/organization/{{orgId}}/address-book/8fd95b96-556d-49be-94b8-fabc1237054c
You see only the address book with that id.
Step 24. Delete the address book just created. Using the same GET API, we use in the previous step, change the method to DELETE and click Send.

You see 204 No Content, which indicates that the address book was deleted but there is no content in the response body, which is expected.

Step 25. Execute the GET API for the specific address book, one more time. You see 404 Not Found since the address book no longer exist.

Lab 4: OAuth2 and Collections Importing
Objectives
Access tokens tend to expire after 8-12 hours, while refresh tokens tend to expire in days. This lab demonstrates how to how to configure refresh token in your postman. Also Cisco provides you with preconfigured APIs that can be imported from the WxCC Developers Portal.
Task 1. Import Collection APIs from Cisco Documentation
You can import APIs collection from another Postman application or from any other exported file.
Cisco TAC has created a document explaining WxCC API functionality and where you can download a set of APIs collection and then import it in your postman section.
Step 1. Open Chrome web browser and navigate to this document: https://www.cisco.com/c/en/us/support/docs/contact-center/webex-contact-center/218418-configure-webex-contact-center-apis-with.html
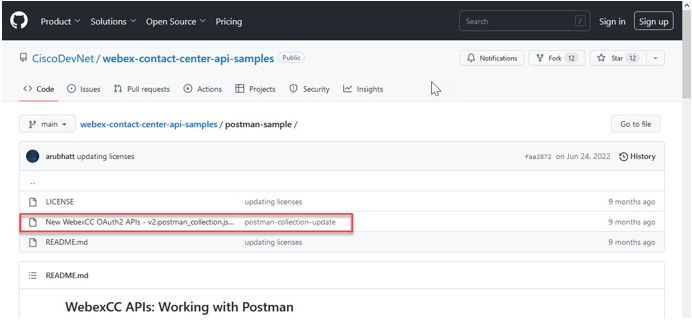
Step 2. Scroll down to step 5 in the document and click on the Sample Postman APIs link.

Step 3. On the new GitHub window, select New WebexCC OAuth2 APIs…
Step 4. Select the icon to copy the API samples and past it to a notepad text (CTRL -V).
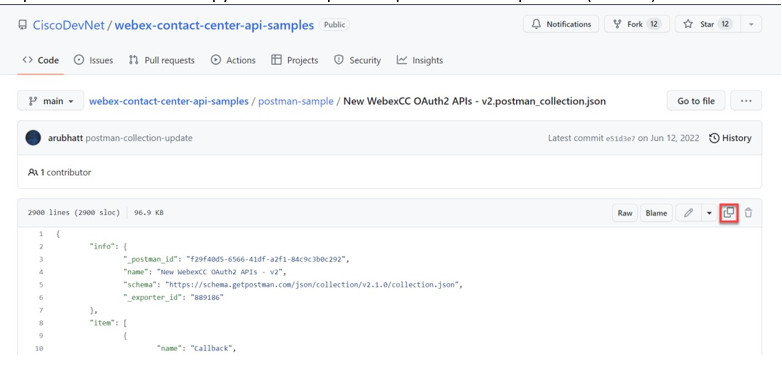
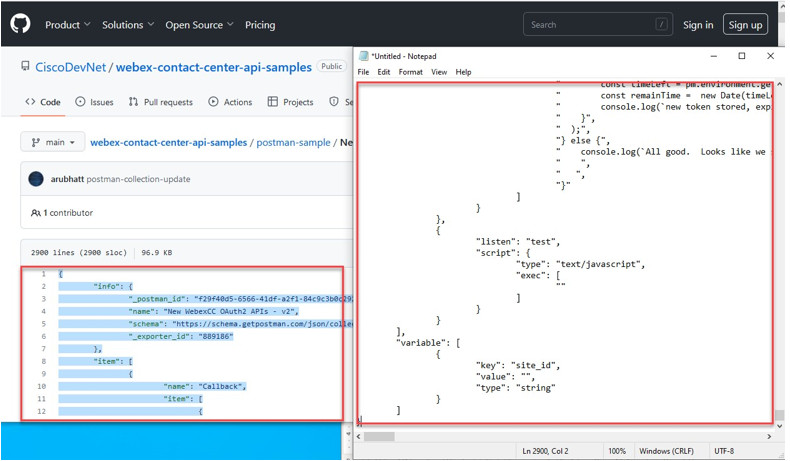
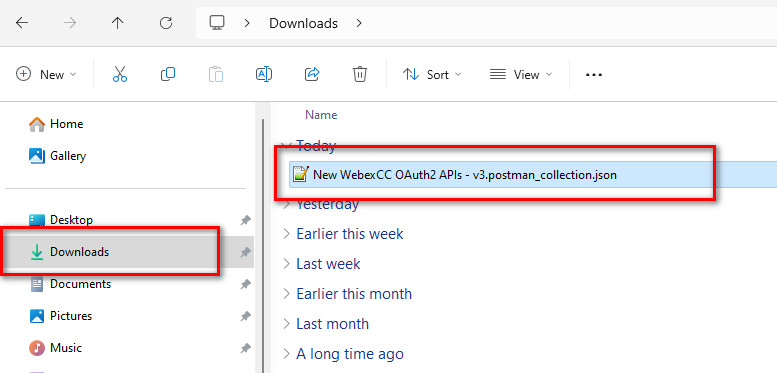
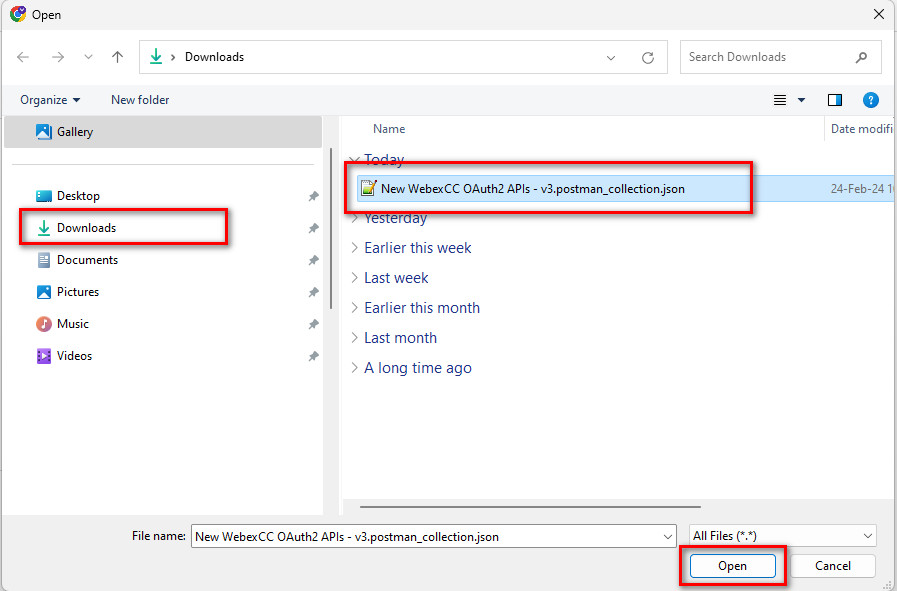
Step 5. Save the file in the Downloads folder. By Default the name of the file is **New WebexCC OAuth2 APIs - v3.postman_collection.json
**
Step 6. On Postman, select Import.
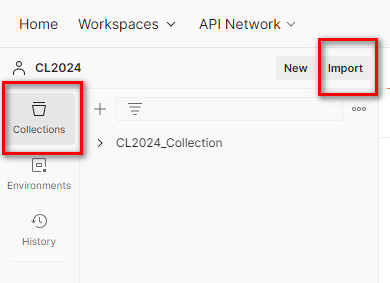
Step 7. On the import window, select files from the Drop section.
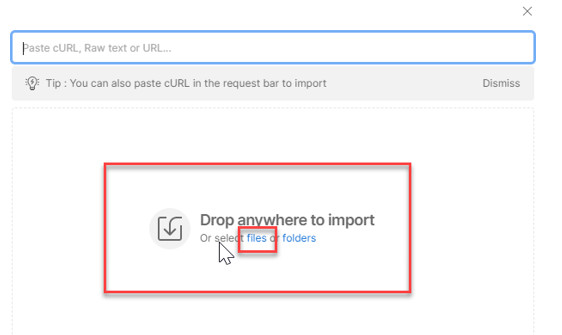
Step 8. Navigate to the Downloads folder and click Open.
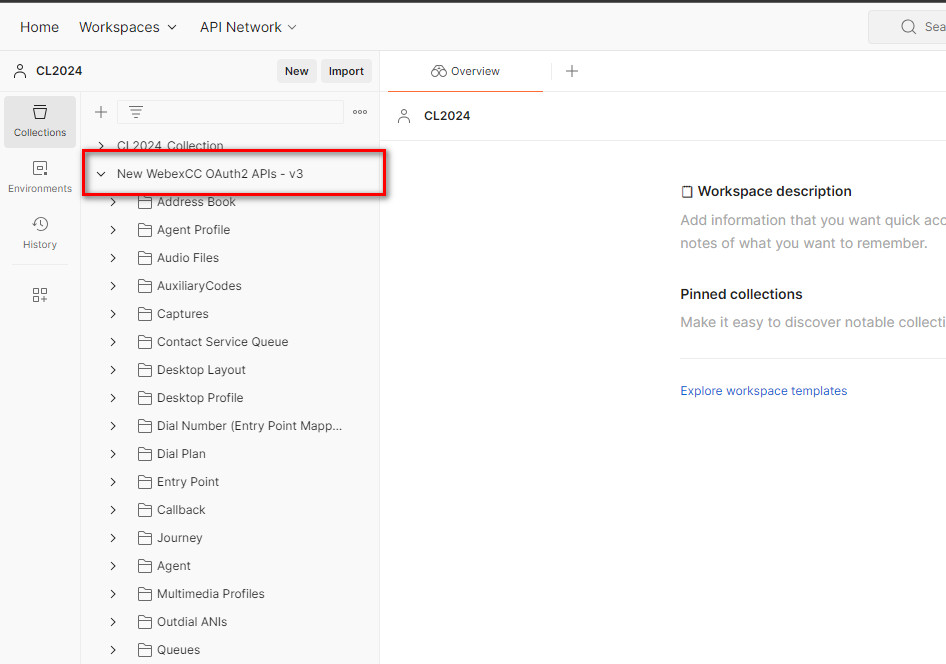
Step 9. You will see a new collection created with all WxCC APIs.
Task 2. Getting Started with OAuth2 & Postman
Note: For this task you need to have pre-installed version of Postman. You can download it from postman web portal https://www.postman.com/downloads/
Step 1. Locate the Postman icon at the bottom of the task bar and launch it.

Step 2. Login with the your own Postman account or with account you created in Lab3:Task1.
You will be redirected to your browser where you need to authenticate yourself
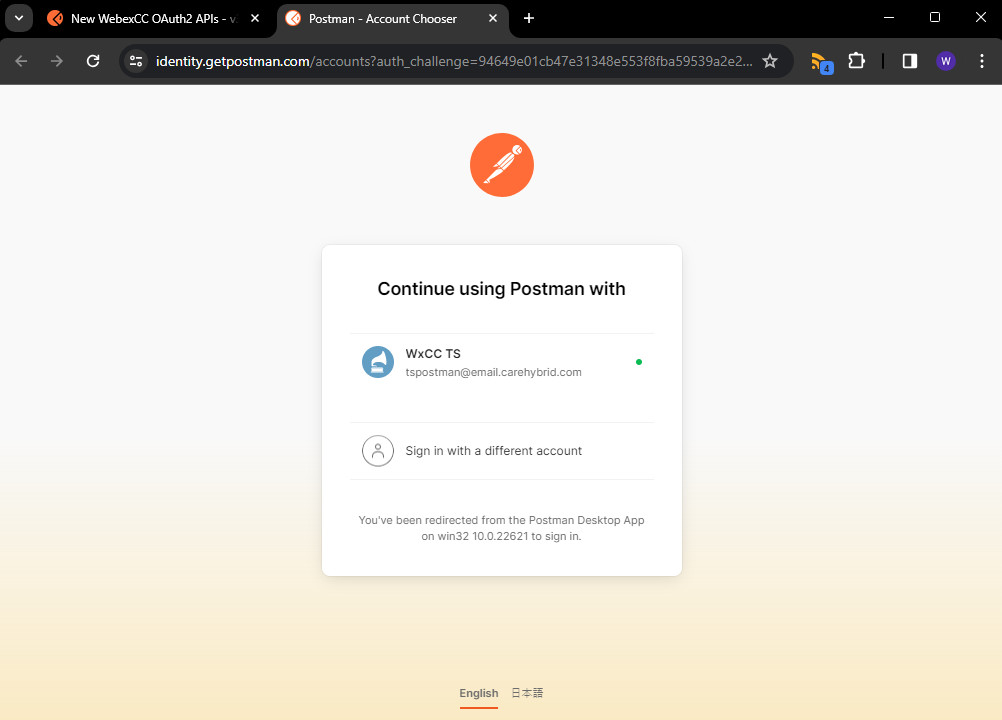
If login successful, Click on Open Postman if your browser asks you to do so.
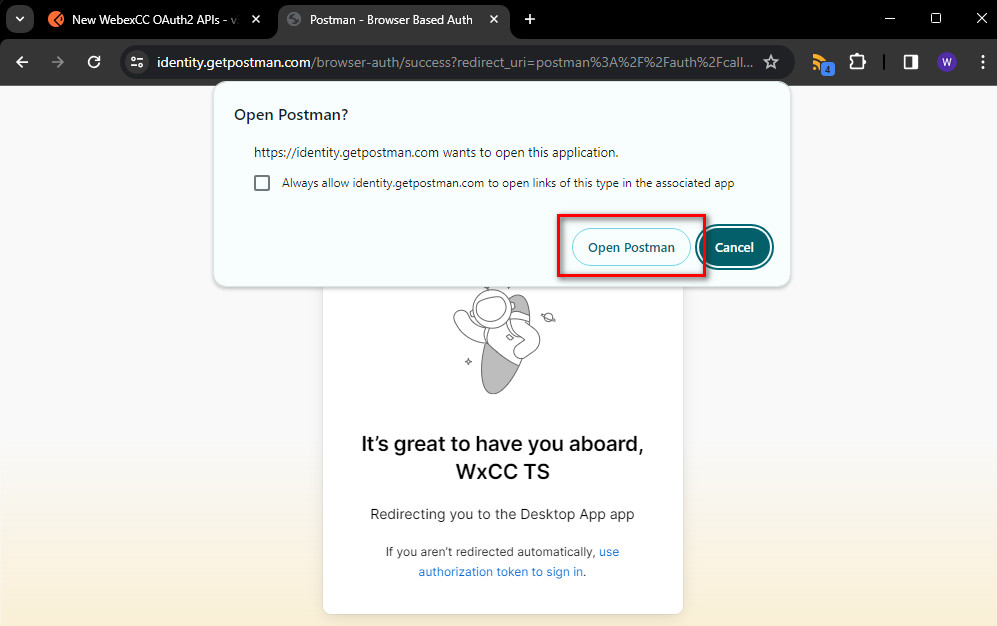
Note: You will notice that everything you created in Web portal of Postman will be uploaded automatically once you login.
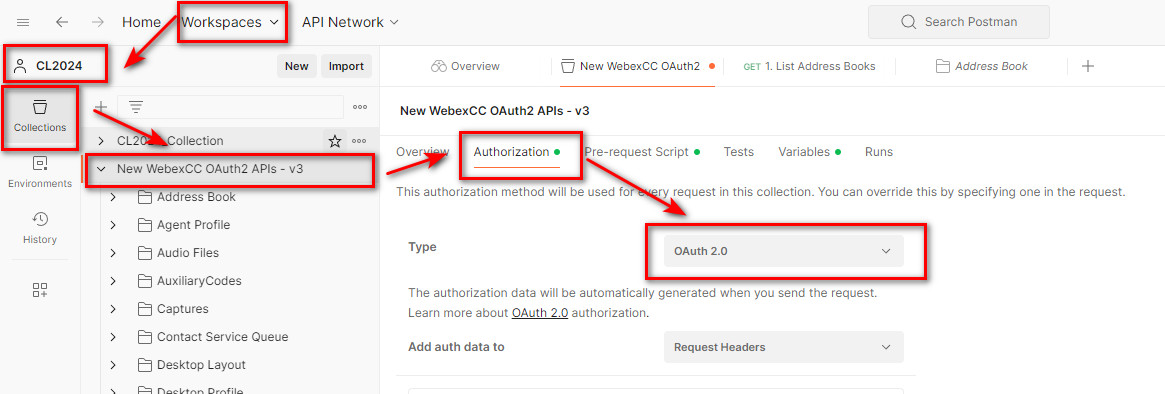
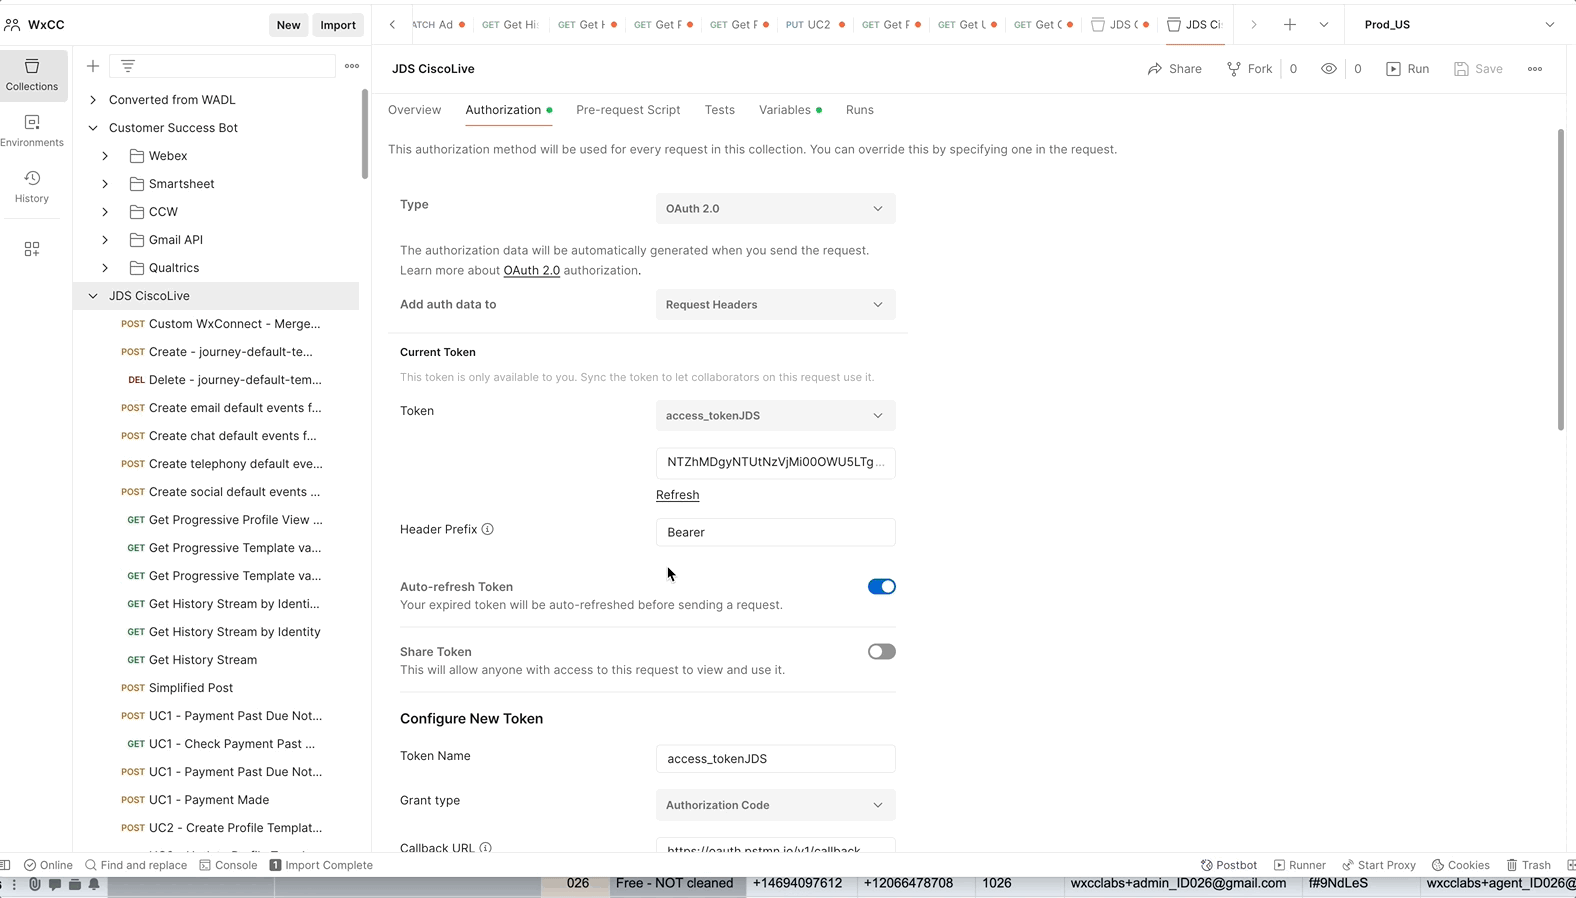
Step 3: In your Workspace, click on Collections -> your new uploaded collection (that you imported in previous Task). Select Authorization and in Type drop down list select OAuth2
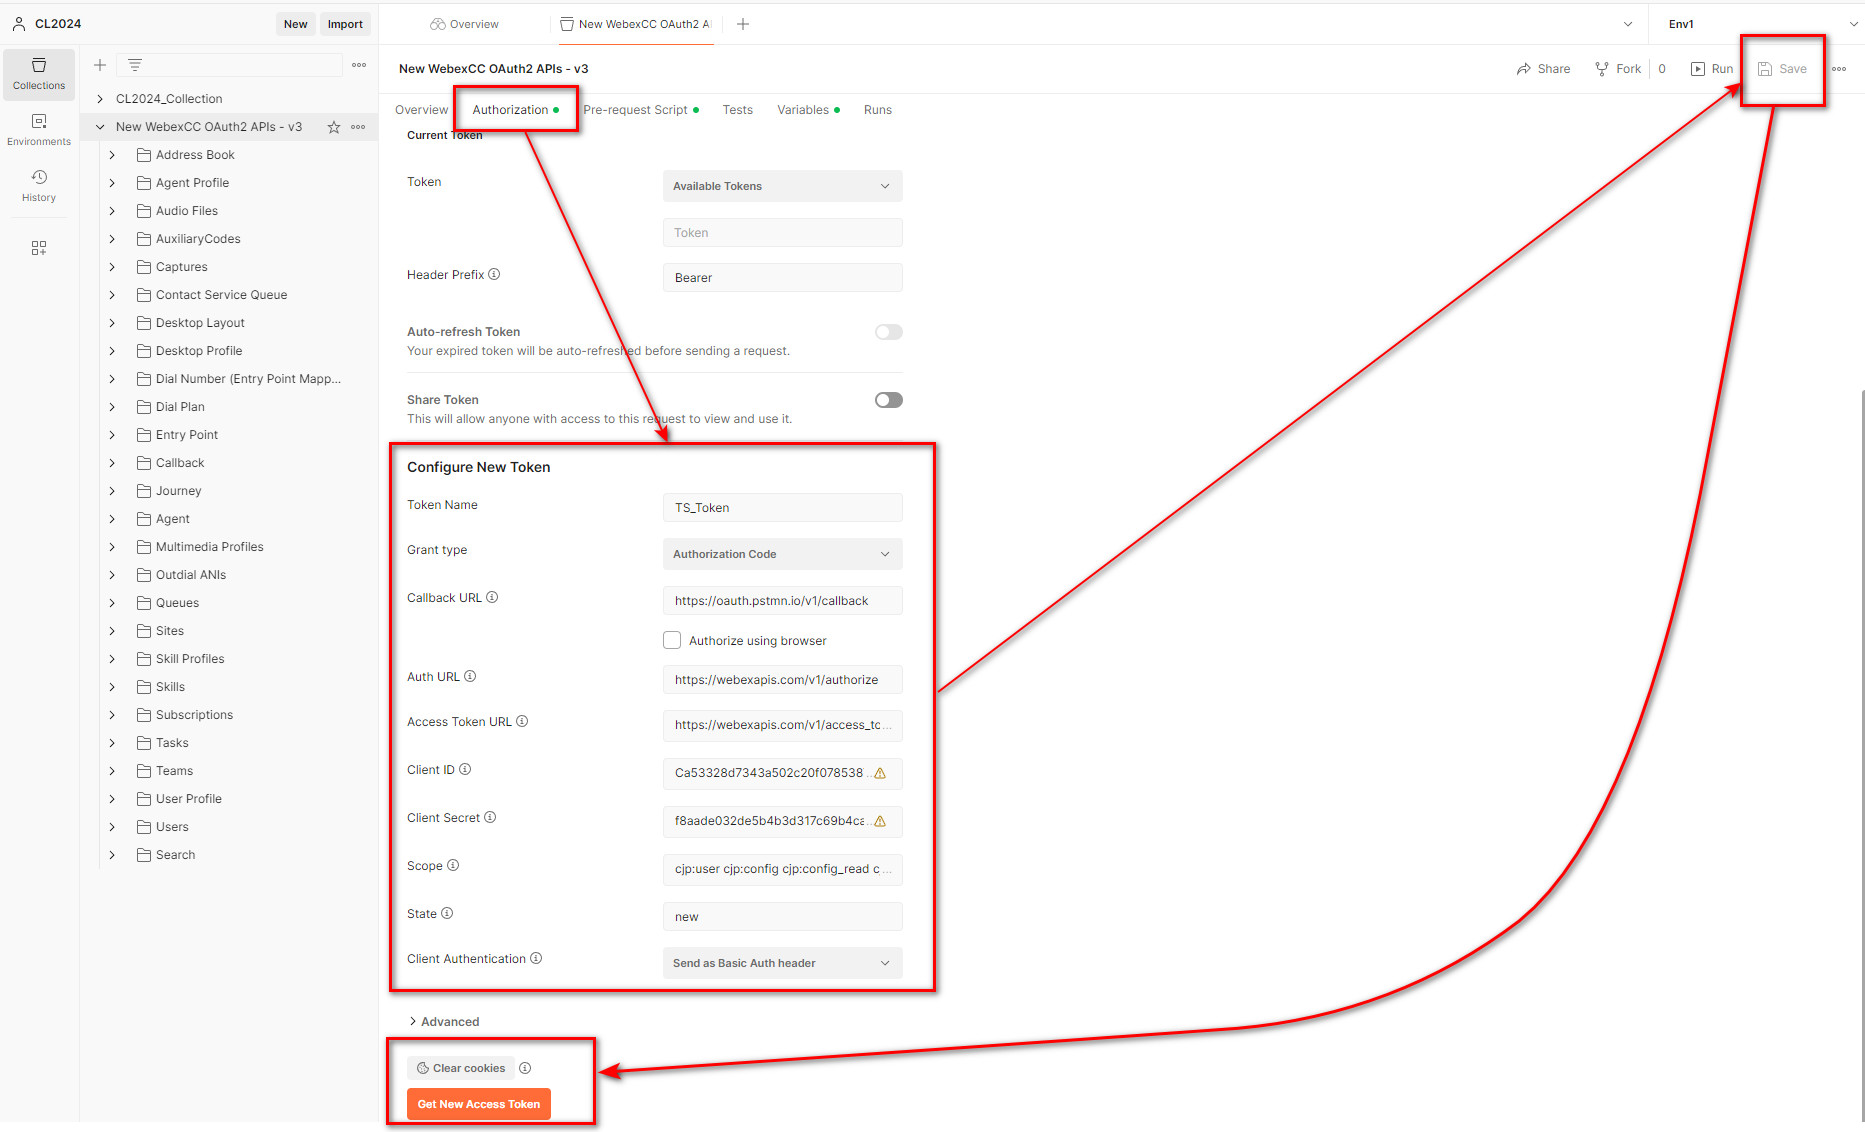
Step 4. Scroll down to Configure New Token section and complete configuration as follows, then click Save, Clear cookies and then Get New Access Token:
- Token Name: « Name »
- Grant type: Authorization Code
- Unset checkbox Authorize using browser
- Callback URL: https://oauth.pstmn.io/v1/callback
- Auth URL: https://webexapis.com/v1/authorize
- Access Token URL: https://webexapis.com/v1/access_token
- Client ID: «Your client ID created in Lab2:Task2:Step4»
- Client Secret: «Your Client Secret created in Lab2:Task2:Step4»
- Scope: cjp:user cjp:config cjp:config_read cjp:config_write
- State: New
- Client Authentication: Send Basic Auth Header
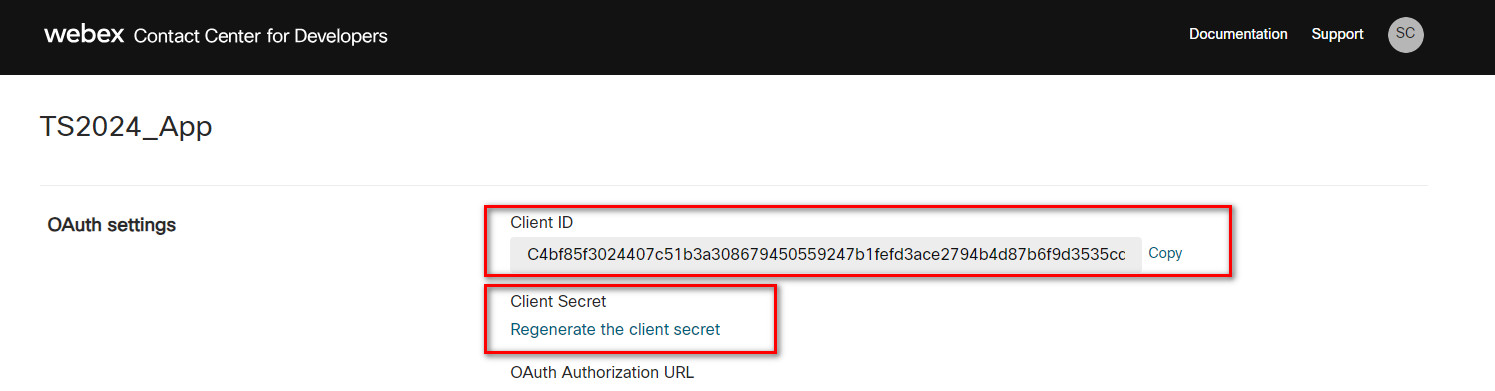
Note: If you haven’t saved Client ID and Client Secret go to https://developer.webex-cx.com/my-apps open your App, copy Client ID and Regenerate Client Secret. Do not disclose your production Client ID and Client Secret.
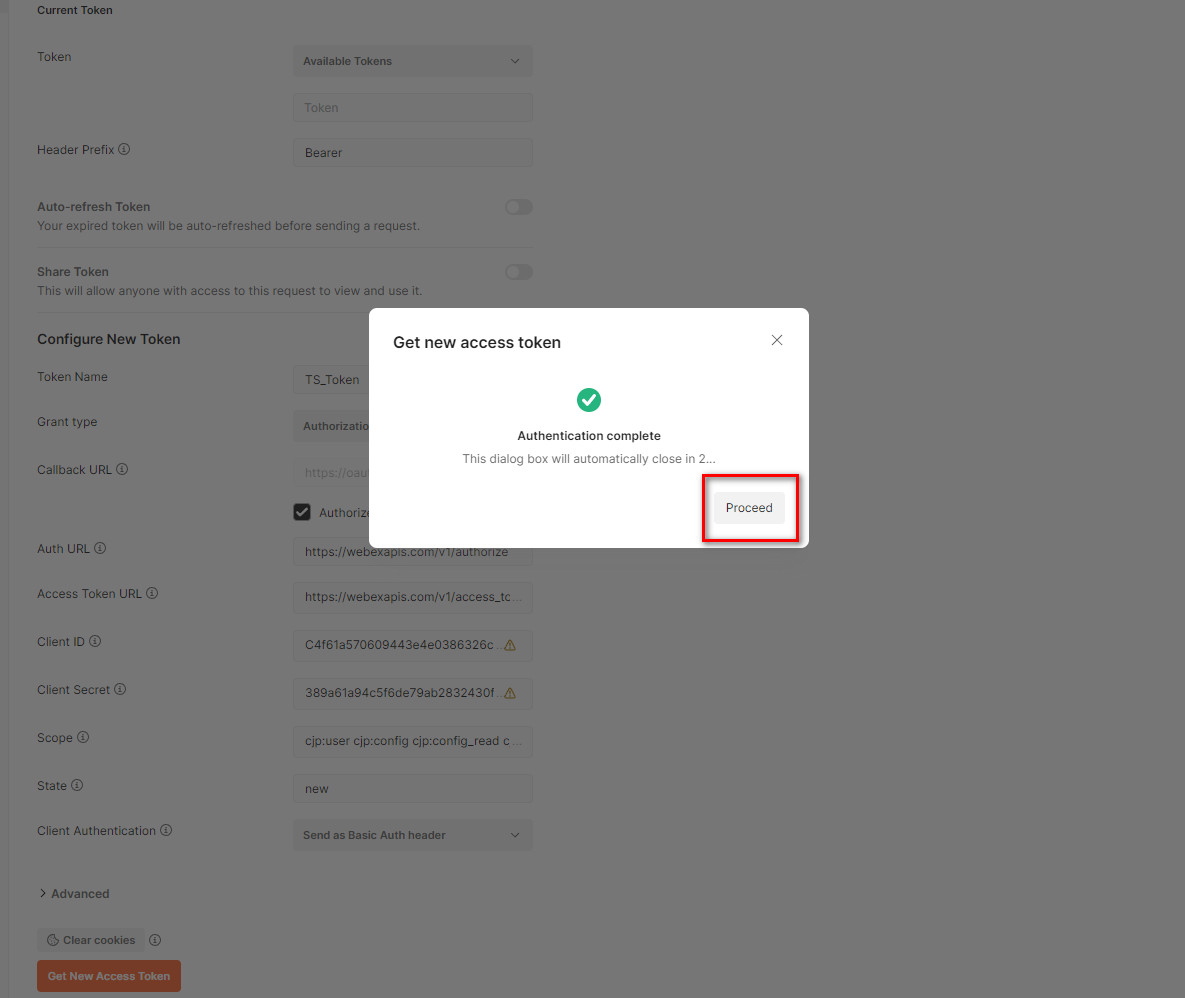
Step 5. You need to authenticate yourself in appeared window with your WxCC admin account.
Step 6. After successful authentication, click Proceed in Postman to finish the authentication.
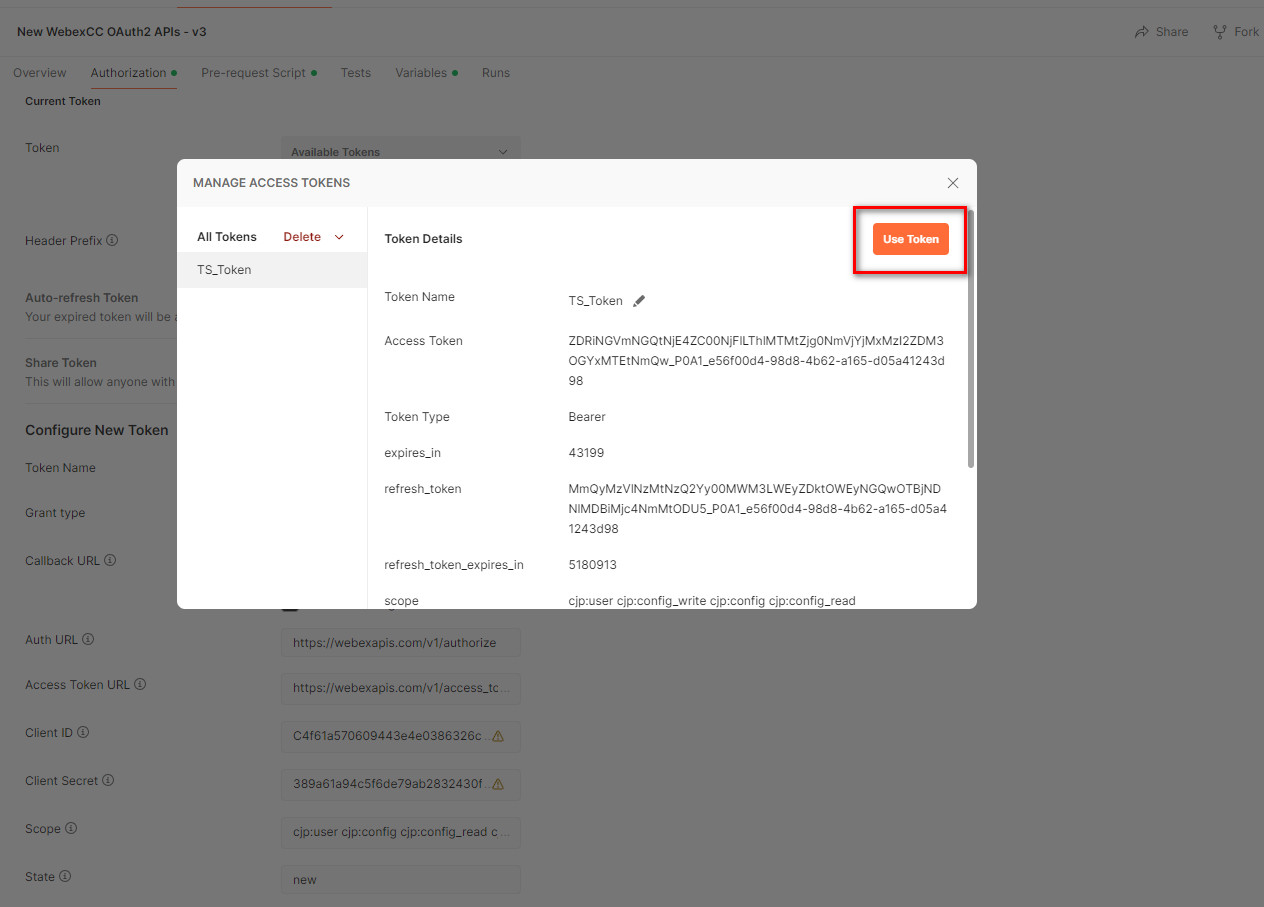
Step 6. Click on Use Token to apply this token for your collection.
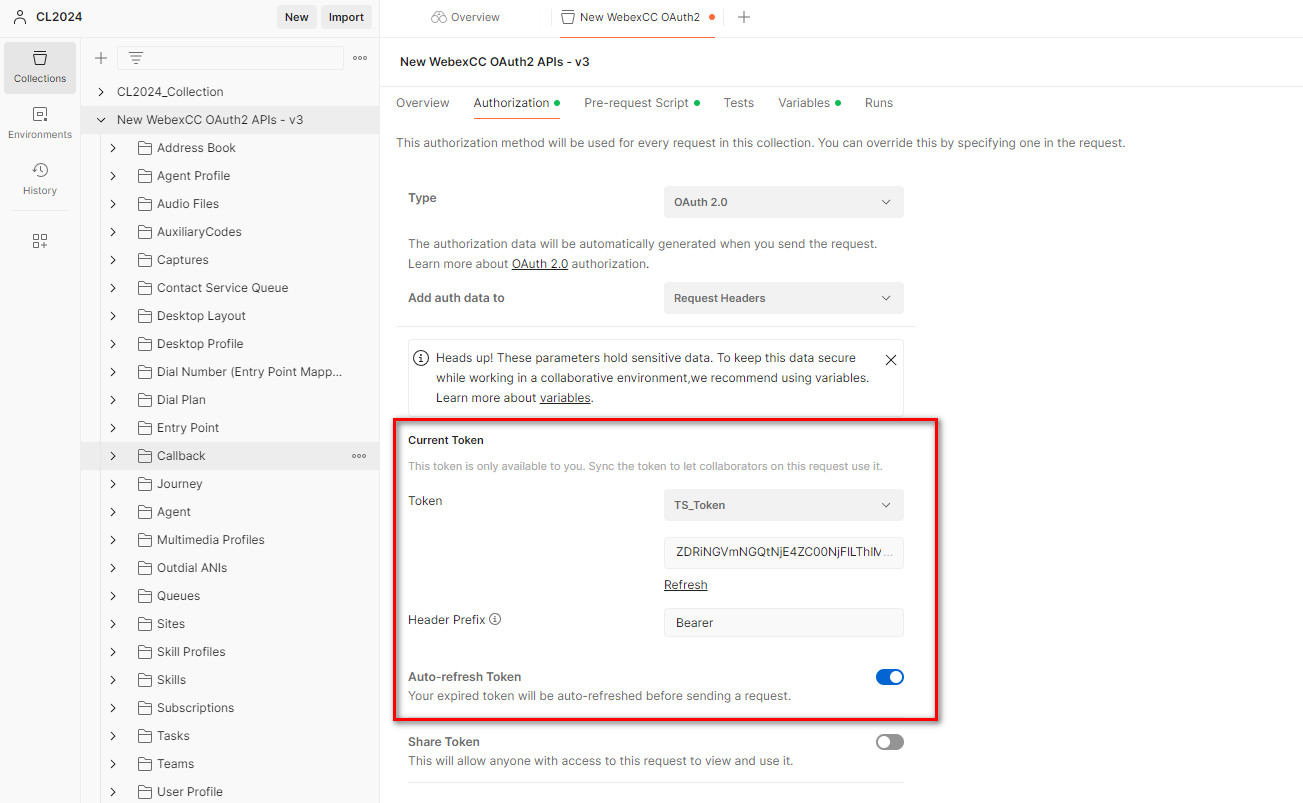
Step 6. Verify if new token is being set correctly in Current Token section. Also set Auto-refresh Token toggle to On
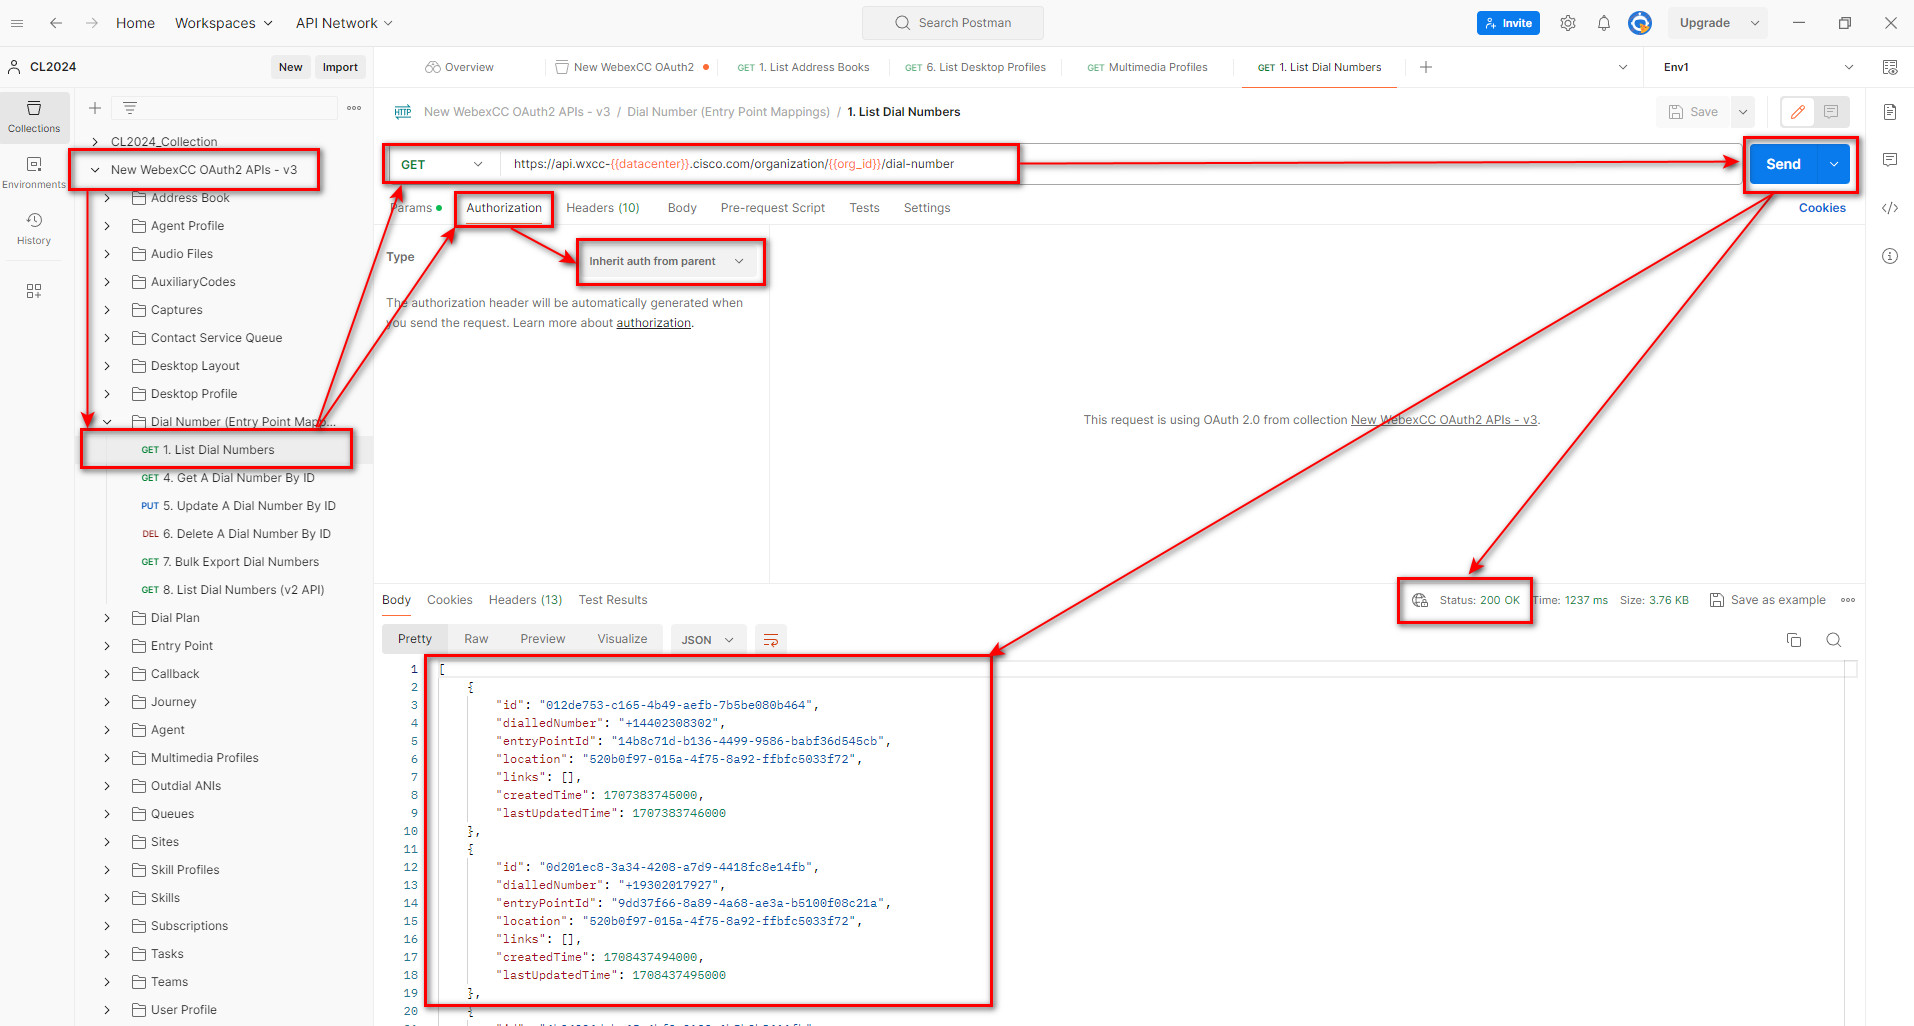
Step 7. To verify, go to your imported collection -> Dial Number (Entry Point Mappings), Click on List Dial Numbers GET request. Select Authorization tab and make sure the type set to Inherit auth from parent. Click Send. You should Status: 200 OK and list of configured dialed numbers with entry points and other data.
Congratulations!! You have finished this lab.
Lab 5 - Tasks, Queues, Activities and Search API (Optional)
Task 1. Postman - WxCC Tasks Management vias APIs
The Task resource represents a request or demand for work from agents. Concretely, a telephony Task is an incoming call. For chat, a Task is a chat session. For email, a Task is an email chain. This API returns a list of Tasks (open or closed) within a date range. The data range is provided in epoch time format.
The API is: /v1/tasks
And the required fields are from & to - filters tasks created between the given epoch timestamps (in milliseconds).
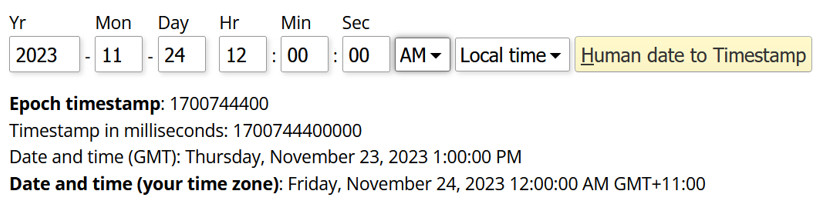
Step 1. Convert regular time to epoch time. Open a web browser and navigate tohttps://www.epochconverter.com. Specify the date that you want to convert and click Human date to Timestamp.
Note: Change the date to today’s and time as 12:00 AM as in example shown in the screen shot below.
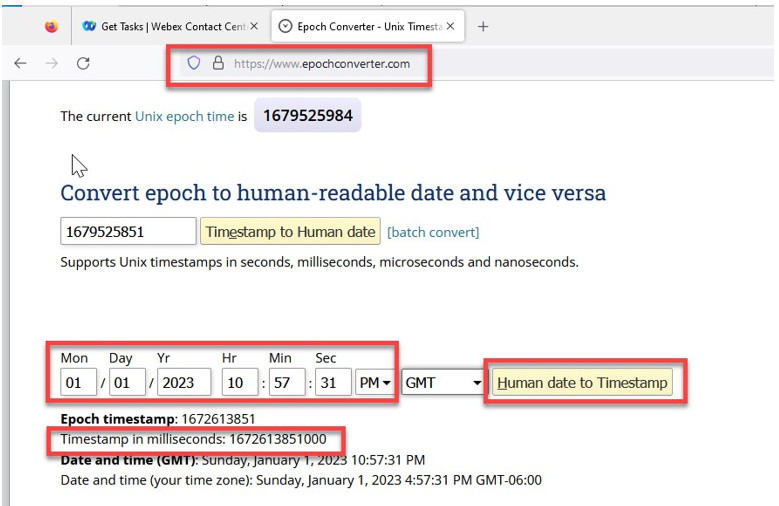
Step 2. Copy the Timestamp in milliseconds 
Step 3. Do the same for end of day today as in today’s date and 11:59 PM; example: 1700830799000; this is for the ‘to’ field. And save it in a notepad; It’ll be used later in a GET API request testing.
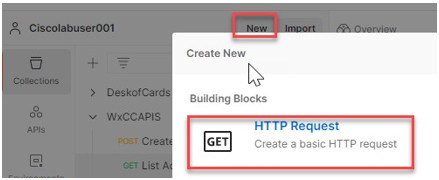
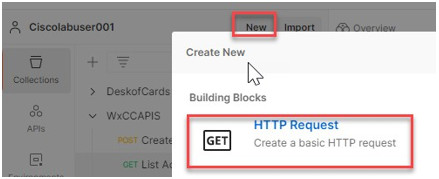
Step 4. In postman, request a list of all tasks from that specific epoch time. On Postman, click New and Create a New HTTP Request.
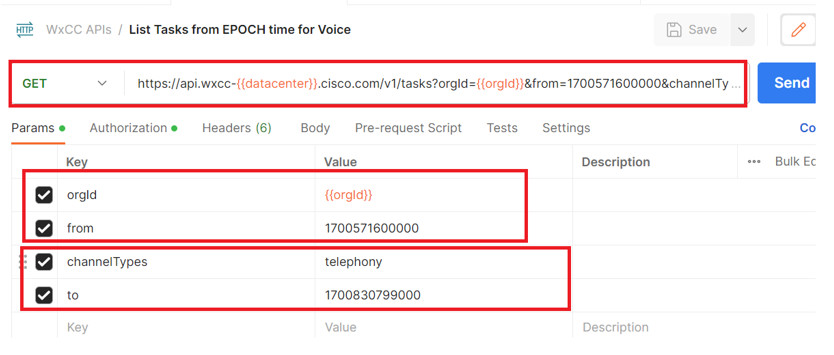
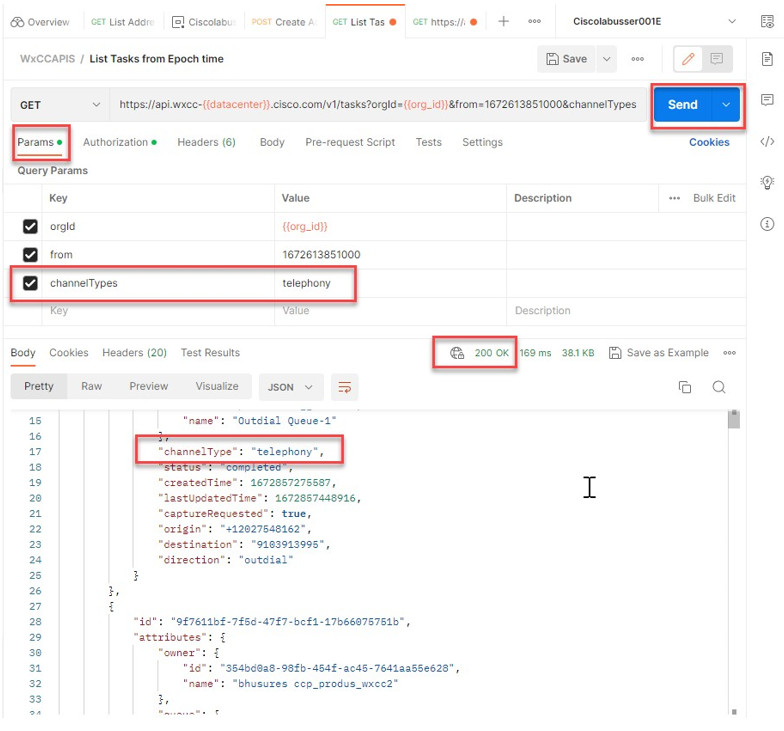
For the URI add: https://api.wxcc-{{datacenter}}.cisco.com/v1/tasks?orgId={{orgId}} and since from and to are required parameters, add a parameter “from” with the value of epoch time copied earlier and “to” fields.
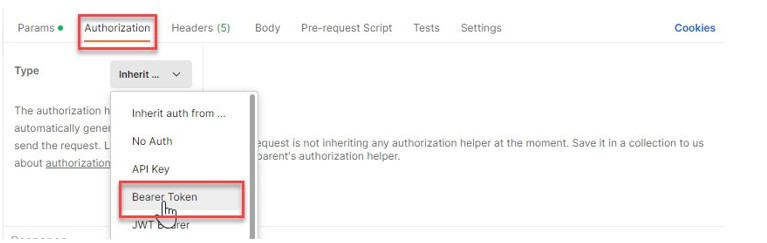
Step 4. Next step is to provide the authorization. On Postman click on the Authorization tab and select Bearer Token.
Now, copy the value from the Developers portal and paste it in the token field. Navigate to Developers portal Tasks APs section, select GET. Select the Try Out button and then copy the Authorization token.
Since the token was added in previous steps, you will see the token already there.
Step 5. Save this API in the WxCC APIs collection. Select Save As, then add the name of the request (List Tasks from Epoch time) and click save.

Step 6. Send a request for the task related to voice calls. Using the same GET TASK API, add a parameter call “channelTypes” with the value “telephony”. Click Send. You will see 200 OK response containing list of voice tasks only.
Task 2. Postman - WxCC Queue Statistics (Optional)
The Queue resource is the waiting line which holds Tasks from the time they are created, to the time they are either assigned to an Agent or abandoned by the customer. A Queue is tied to a certain channel type e.g., email, chat, or telephony, and will be summarized by number and time statistics for how Tasks pass through. Queue statistics show only for 24 hours and use the epoch time format.
The API request to obtain the task in queue for a 24-hour period is:
/v1/queues/statistics
Required parameters are: From: Start time for the query (in epoch milliseconds). To: End time for the query (in epoch milliseconds).
**Step 1. ** Open a web browser and navigate to https://www.epochconverter.com
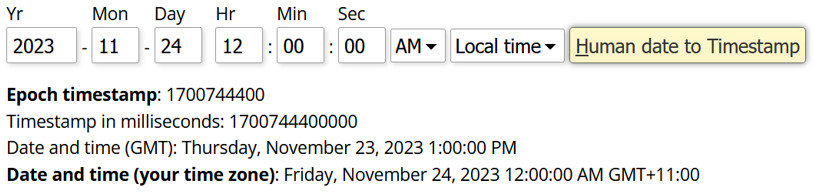
Specify the date and time that you want to convert for from and to queue range. Click Human date to Timestamp. Use 24 Nov 2023 as a date to return some data.
From epoch time
Copy the Timestamp in milliseconds. Example: 1700744400000 And save it in a notepad; It’ll be used later as a value for the “from” parameter in a GET API request testing.
To epoch time
Go back to epochconverter.com browser window and change the date/time so that it’s no more than 24 hrs than the previous time captured for the “from” parameter. Example 1700830799000

Copy the Timestamp in milliseconds. Example:1700830799000
And save it in a notepad; It’ll be used later as a value for the “to” parameter in a GET API request testing.
Step 2. In postman, request a list of all tasks in queue from and to the specific epoch time. On Postman, click New and Create a New HTTP Request.
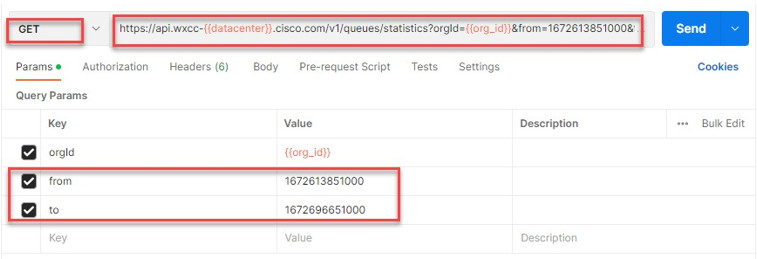
On the URI add: https://api.wxcc-{{datacenter}}.cisco.com/v1/queues/statistics?orgId={{orgId}} and since from and to are required parameters, add them with the epoch time you have copied before.
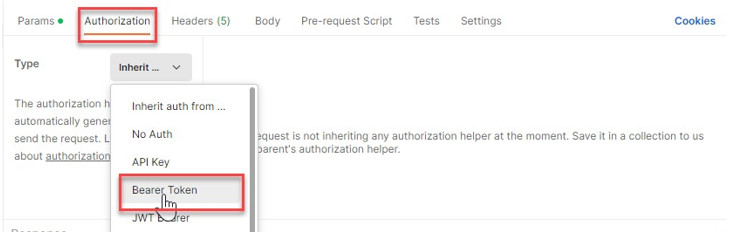
Step 3. Next step is to provide the authorization. On Postman click on the Authorization tab and select Bearer Token.
Now, copy the value from the Developers portal and paste it in the token field. Navigate to Developers portal Queue APIs section, select GET. Select the Try Out button and then copy the Authorization token.
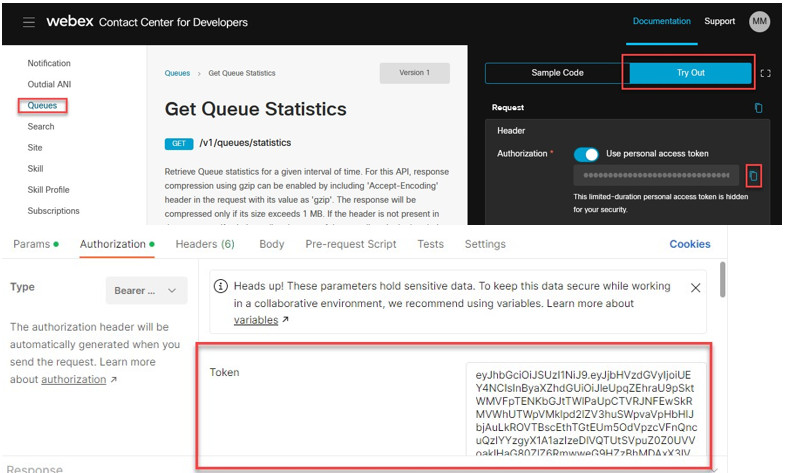
Since the token was added in previous steps, you will see the token already exists. Confirm that it is same as what you copied from the developer portal.
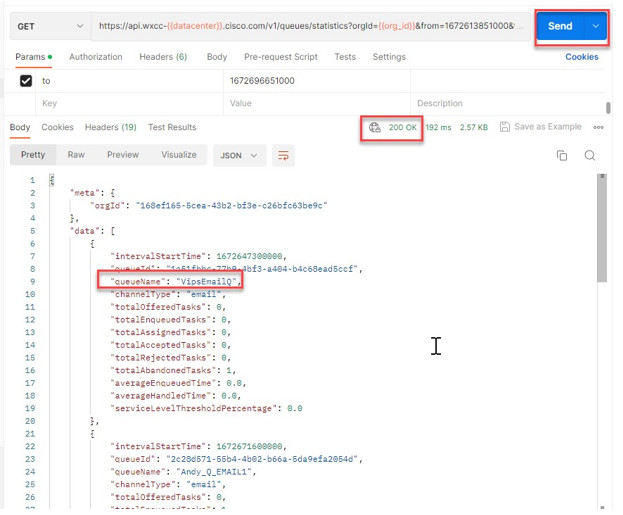
Step 4. Click Send. You see 200 OK response indicating that request was successful. Note that response lists statistics for various task queues.
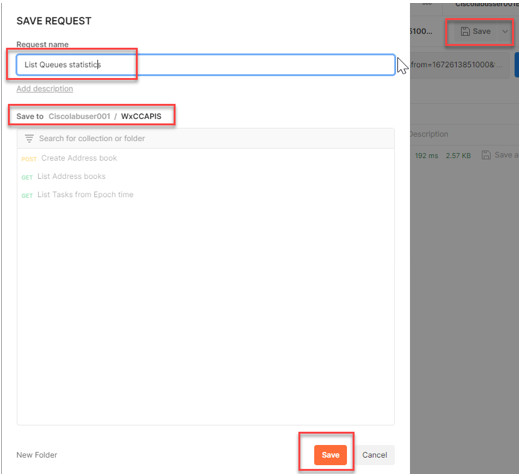
Step 5. Save this API in the WxCC APIs collection. Select Save As, then add the name of the request (List Queues statistics) and click save.
Task 3. Postman - WxCC Agent Activities (Optional)
The Agent activities API allows you to retrieve agent activities. Sorted by start time ascending. The API is /v1/agents/activities.
And the required field is only: From: Filters agent activities after the given epoch timestamp (in milliseconds).
Parameter “To” is optional but if used, it needs to be within 24hrs (86400000 msec) of “from” parameter.
Step 1. Convert regular time to epoch time. Open a web browser and navigate to https://www.epochconverter.com. Specify the date that you want to convert and click Human date to Timestamp.
Step 2. Copy the Timestamp in milliseconds for from and to from: 1700744400000 to: 1700830799000
And save it in a notepad; It’ll be used later as a value for the “from” parameter in a GET API request testing.
Step 3. In postman, request a list of all agent activities from that specific epoch time. On Postman, click New and Create a New HTTP Request.
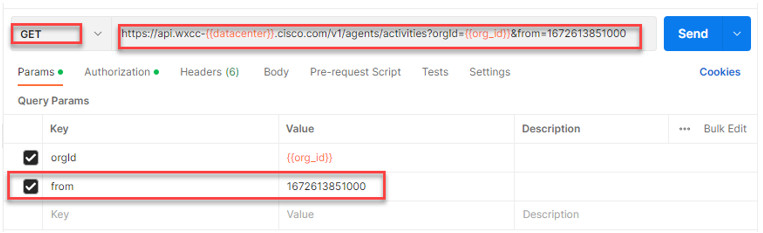
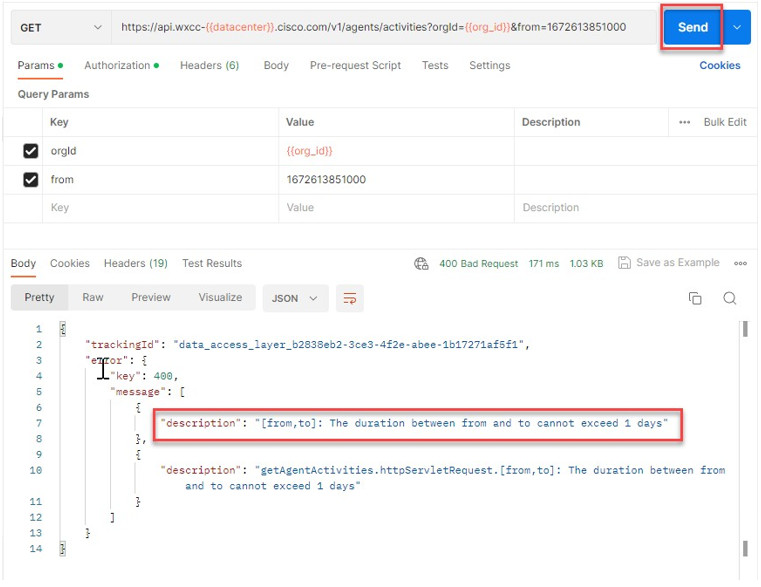
On the URI add: https://api.wxcc-{{datacenter}}.cisco.com/v1/agents/activities?orgId={{orgId}} and since from is a required parameter add the parameter from with the epoch time you have copied before.
Example screenshot (remember to include to field below from) – not in screenshot.
Step 4. Next step is to provide the authorization. On Postman click on the Authorization tab and select Bearer Token.
 Now, copy the value from the Developers portal and paste it in the token field. Navigate to Developers portal agent activities APIs section, select GET. Select the Try Out button and then copy the Authorization token.

Since the token was added in previous steps, you will see the token already there.
Step 5. Click Send. You see 400 bad requests because the from, to cannot exceed 1 day.
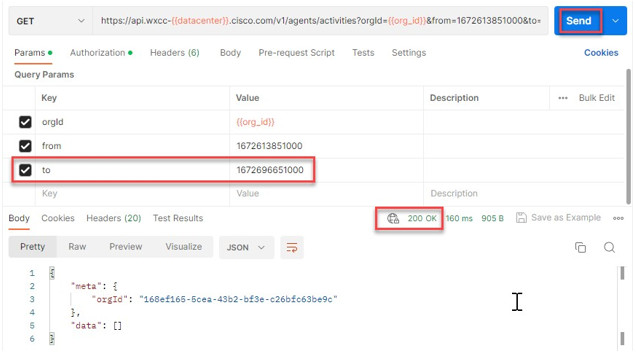
Step 6. Add the “to” parameter with less than 1 day. For example, use a timestamp from 1696165200000and to 1696251599000 – 1 Oct 2023. Click Send. You see 200 Ok, which means that the request was successful even though, there are no agent activities during this time.
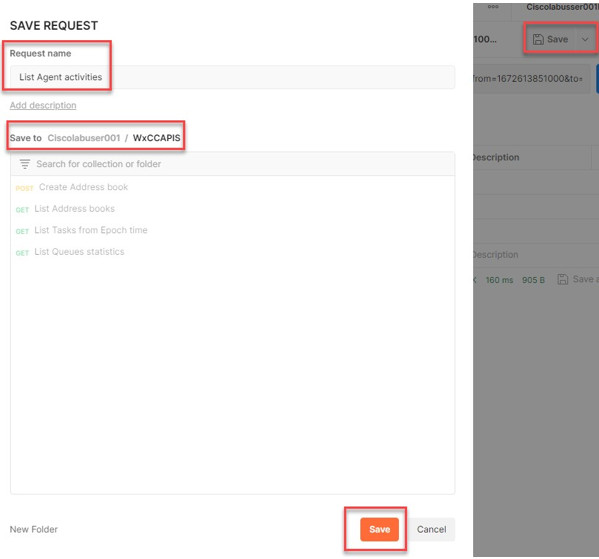
Step 7. Save this API in the WxCC APIs collection. Select Save As, then add the name of the request (List Agent activities) and click save.
Congratulations!! You have finished this lab.
===============================================================
Part 2: JDS APIs & Use Cases
Lab Objective
This lab is designed to teach you the concepts and functionalities of Customer Journey Data Services (JDS), both in regard to the JDS Widget that can be added in Agent Deskpulltop as well as the API capabilities of the solution, since JDS remains an API-first solution today. You will learn how to use the JDS widget, how to add new customers (identities) to your JDS database as well as how to use the JDS APIs to extract information and act upon it.
Pre-requisites
- You have Admin access to Control Hub
- You have completed Part 1: APIs on Webex Contact Center (WxCC)
Lab 1: Exploring JDSs APIs & Widget
JDS Desktop Widget provides agents with an interface that shows the end customer’s complete journey with the agent’s business, aggregated metrics of their experience as well as the customer’s unique identifiers (aliases).
- Identity / Person: A unique customer, all the events that the same customer (e.g. call, chat, email, visit website) creates are marked under the same identity.
- Alias: Different ways we can identify the same customer/person (e.g. email, phone number, Customer ID). Customer must have at least one alias.
- Profile Template: A profile template defines the kind of aggregation technique we want to see for a customer (e.g. contacts within last 24 hours).
- Progressive Profile: The values that correspond to an identity’s profile template at that particular moment of time (e.g. contacts within last 24 hours = 10).
Task 1: Adding a new identity for the JDS project
Note 1: For this task, you must have an admin account with the “Full admin” permissions.
Note 2: To save time, we will be skipping the below exercise. Please read it and go to the next task.
-
Add a new identity for yourself to JDS project. Navigate to Control Hub with your administrator credentials.
-
Navigate to Customer Journey Data under Monitoring.
-
A project (named Lab Tenant) has already been created for the purposes of this lab. Click on it to check its configuration.
-
Click on the Identities tab. Identities are all the end-customer profiles created to be tracked by this specific JDS project.
-
Click on Add Identities button. In the UI you can only add identities by uploading a CSV file. To check the expected format of the CSV, click on Download to download the sample template.
-
Open the file. You see the expected format is the following:
Id,First Name,Last Name,Email Addresses,Phone Numbers,Customer Ids -
Enter a row with your details keeping in mind the following: • Id field should be left empty. • If you want to add multiple email addresses, phone numbers or customer IDs, you need to use the pipe “|” delimiter between them. For example, try to add your phone number both with and without a plus sign. • Customer ID is a unique ID given by the JDS administrator to each customer. Make sure to use a large number to avoid conflicts with existing customer IDs.
-
Based on the above, your new line should look similar to this:
-
Save the file and go back in Control Hub, click on Choose a file and select the file you created. Click on Next. If all is good, you will see the Import Status as Completed. In case of errors, you will get the message Completed with Errors and the option to download the error file to understand what you need to fix.
-
Click on Close button. You should now be able to see your created identity in the list.
Task 2: Adding JDS to the Desktop layout
The process to add the JDS Widget is also thoroughly explained on the GitHub page, including a video walkthrough.
-
Download the default JSON Layout from the Control Hub -> Contact Center -> Desktop Layouts -> Global Layout
-
Within the downloaded default desktop layout JSON file, search for the data property “visibility”: “IVR_TRANSCRIPT” under the agent section. Find the following code block associated with that.
Note: IVR_TRANSCRIPT may appear a few times, please find the last appearance of “visibility”: “IVR_TRANSCRIPT”
- Copy the JDS Widget code block below:
{
            "comp": "md-tab",
            "attributes": {
              "slot": "tab"
            },
            "children": [
              {
                "comp": "slot",
                "attributes": {
                  "name": "WXM_JOURNEY_TAB"
                }
              }
            ],
            "visibility": "WXM_JOURNEY"
          },
          {
            "comp": "md-tab-panel",
            "attributes": {
              "slot": "panel",
              "class": "widget-pane"
            },
            "children": [
              {
                "comp": "customer-journey-widget",
                "script": "https://cjaas.cisco.com/widgets/customer-journey-9.0.0.js",
                "attributes": {
                  "base-url": "https://api-jds.prod-useast1.ciscowxdap.com",
                  "logs-on": "true",
                  "project-id": "65171e0682b7f52b9209b39d",
                  "template-id": "journey-default-template1",
                  "icon-data-path": "https://wxcc-widgets.s3.us-west-1.amazonaws.com/icons.json",
                  "limit": "50",
                  "time-frame": "All",
                  "live-stream": "true"
                },
                "properties": {
                  "interactionData": "$STORE.agentContact.taskSelected",
                  "bearerToken": "$STORE.auth.accessToken",
                  "organizationId": "e56f00d4-98d8-4b62-a165-d05a41243d98"
                },
                "wrapper": {
                  "title": "Customer Journey Widget",
                  "maximizeAreaName": "app-maximize-area"
                }
              }
            ]
          },
For this lab, the Project ID is 65171e0682b7f52b9209b39d. Project ID can be found in the Customer Journey Data tab in Control Hub.
- If in the Default Desktop Layout the WxM widget is already presented, make sure that the following section is removed
{ "comp": "md-tab", "attributes": { "slot": "tab" }, "children": [ { "comp": "slot", "attributes": { "name": "WXM_JOURNEY_TAB" } } ], "visibility": "WXM_JOURNEY" }, { "comp": "md-tab-panel", "attributes": { "slot": "panel", "class": "widget-pane" }, "children": [ { "comp": "agentx-wc-cloudcherry-widget", "properties": { "userModel": "$STORE.app.userModel", "spaceId": "", "metricsId": "", "ani": "$STORE.agentContact.taskSelected.ani", "isDarkMode": "$STORE.app.darkMode" }, "wrapper": { "title": "Customer Experience Journey", "maximizeAreaName": "app-maximize-area" } } ], "visibility": "WXM_JOURNEY" }, - For test purposes, let’s add the same widget to the Navigation panel as a page. This will help us to test the widget even when an agent is not on a call. For this find the navigation area in your Layout and add that code
{ "nav": { "label": "JDS System Widget", "icon": "https://static.thenounproject.com/png/508797-200.png", "iconType": "other", "navigateTo": "CustomNav6", "align": "top" }, "page": { "id": "customNav6", "widgets": { "right": { "comp": "customer-journey-widget", "script": "https://cjaas.cisco.com/widgets/customer-journey-9.0.0.js", "attributes": { "base-url": "https://api-jds.prod-useast1.ciscowxdap.com", "logs-on": "true", "project-id": "65171e0682b7f52b9209b39d", "template-id": "journey-default-template1", "icon-data-path": "https://wxcc-widgets.s3.us-west-1.amazonaws.com/icons.json", "limit": "50", "time-frame": "All", "live-stream": "true" }, "properties": { "interactionData": "$STORE.agentContact.taskSelected", "bearerToken": "$STORE.auth.accessToken", "organizationId": "e56f00d4-98d8-4b62-a165-d05a41243d98" }, "wrapper": { "title": "Customer Journey Widget", "maximizeAreaName": "app-maximize-area" } } }, "layout": { "areas": [["right"]], "size": { "cols": [1], "rows": [1] } } } }, - Save the desktop Layout that now has your customer journey widget code.
The modified JSON file (4 steps above) can be downloaded here
-
Go to Control Hub -> Contact Center -> Desktop Layouts and Create a new Desktop Layout.
-
In the name section set your ID_JDS_Layout (example: 140_JDS_Layout). Click on Replace file, assign the Layout to your team, and click Create.
Task 3: Agent Desktop Login
Note: To log in to the agent desktop, use either a different web browser or a new incognito web page. This will prevent the browser caching issues with admin and agent credentials. Depending on your tenant’s location the agent ULR link can be different. The example below is for the tenant in the US datacenter.
-
Navigate to https://desktop.wxcc-us1.cisco.com/ in the chrome browser with the incognito mode.
-
Enter the agent’s email ID which you created in the previous task.
-
Enter the Password for the appropriate username.
-
In the Station Credentials pane, select “Desktop”.
-
Select the team
Your_Attendee_ID _Team1. -
Click Submit button. The browser may ask you to confirm use the microphone from the browser.
-
Make sure that you are successfully logged in to the Agent Desktop.
-
Go to the 3rd icon in the navigation panel and type dbokatov@cisco.com in the Lookup User field
Task 3: Downloading the JDS Postman collection
As JDS is an API-first solution, there is a very wide range of APIs available. To make the introduction to them easier, Cisco has created a JDS API Collection that you can download and import in your API tool (e.g. Postman) and start playing around, in conjunction with various use cases.
-
Download the JDS Postman collection, by going to the GitHub samples page
-
Click on Download raw file
-
Open the Postman app on your laptop and click on Import button.
-
Select the downloaded JSON file in the appeared window
- Once the JDS collection is imported, select the root folder of the imported collection in the left menu, then navigate to the Variables, and define the values
Note: reuse the same values as it was in the API lab (client ID, client Secret and org ID). The workspaceId is your project ID which is 65171e0682b7f52b9209b39d
-
Once the values are defined, click Save button
- Go to Authorization and click on Get New Access Token button. The Postman will redirect you to the Auth page where you need to define your Admin account which was used for the App creation in the dev portal. As a result, you should get the message Authentication complete. Click Proceed and on the next page click on Use Token button
Task 4: Exploring the JDS APIs & Creating new events
This video shows you how to use various API’s to manage JDS profiles and templates.
-
Let’s try to create a new event via API. Let’s start with the default-generated events such as email and chat.
-
In the Postman, navigate to the Create email default events for journey-default-template
- Change identity and “origin” to “dbokatov@cisco.com”. Your API body should look like:
{ "specversion": "1.0", "type": "task:new", "source": "wxcc", "id": "", "identity": "dbokatov@cisco.com", "identitytype": "email", "datacontenttype": "application/json", "data": { "taskId": "", "origin": "dbokatov@cisco.com", "channelType": "email" } } -
Click on Send button and verify the response status. It should be 202 Accepted
-
Now do the same step 3 with chat by clicking on Create chat default events for journey-default-template
- Go back to the JDS widget in the Agent Desktop and verify the result. You can refresh the page if the events have not appeared. Now you should see new events in the right panel
Note: We can create any kind of Event and add it to the customer’s journey (e.g. customer visited our webpage).
-
Now let’s do a custom event by duplicating the existing API request and customizing the body. Click on
...in front of Create chat default events for journey-default-template. - As the result the new HTTP record is created. Now change the body by copying the code below and replacing in the created request:
{ "id": "TEST", "specversion": "1.0", "type": "test", "source": "test", "identity": "+3227045654", "identitytype": "phone", "datacontenttype": "application/json", "data": { "phone": "+3227045654", "status": "New Booking", "origin": "WEB - FLY HIGH", "channelType": "Payment Complete", "topic": "Paradise destination", "channelBreakout": "Web Page Visit" }} - Click on Send button and check the new event at the agent desktop.
Note: The
data.channelTypedefines a particular icon of every incoming journey event. The entire mapping list can be found on GitHub: https://github.com/CiscoDevNet/cjaas-widgets/blob/jds-widget-9.0.0/CustomerJourney/README-VERSION-9.0.0.md
Lab 2: Use Case: Journey Based Queue Priority
A customer has contacted his travel service several times in the last couple of days. The next incoming call could be prioritized if a specific threshold is met (for example: the number of contacts on a particular reservation in the last 2 days greater than 2)
Task 1: Getting the total number of requests for the X days/hours
- The journey profile template aggregates the values and provides you with the total number of events for a specific time. Make sure that your journey profile template has the right view which includes lookBackPeriod for the last 48 hours. In the layout, we have already defined the template with the specific name
"template-id": "journey-default-template1", -
For verifying the profile view go to the Postman API Get Progressive Profile View - journey-default-template2 and change the URL parameter from
journey-default-template2tojourney-default-template1. As the result you should get /admin/v1/api/profile-view-template/workspace-id//template-id/journey-default-template1. -
Run this GET API and verify that it includes settings for the last 48 hours.
- If you are using a different tenant, you need to create the template with the name defined in the layout. In order to do it, go to Create - journey-default-template2 API in Postman and replace the body with this code
{
    "name": "journey-default-template1",
    "attributes": [
        {
            "version": "0.1",
            "event": "task:new",
            "metaDataType": "string",
            "metaData": "origin",
            "limit": 100,
            "displayName": "No of times contacted in the last 24 hours",
            "lookBackDurationType": "hours",
            "lookBackPeriod": 24,
            "aggregationMode": "Count",
            "rules": null,
            "widgetAttributes": {
                "type": "table"
            },
            "verbose": true
        },
        {
            "version": "0.1",
            "event": "task:new",
            "metaDataType": "string",
            "metaData": "origin",
            "limit": 200,
            "displayName": "No of times contacted in the last 48 hours",
            "lookBackDurationType": "hours",
            "lookBackPeriod": 48,
            "aggregationMode": "Count",
            "rules": null,
            "widgetAttributes": {
                "type": "table"
            },
            "verbose": true
        },
        {
            "version": "0.1",
            "event": "task:new",
            "metaDataType": "string",
            "metaData": "origin",
            "limit": 700,
            "displayName": "No of times contacted in the last 7 days",
            "lookBackDurationType": "days",
            "lookBackPeriod": 7,
            "aggregationMode": "Count",
            "rules": null,
            "widgetAttributes": {
                "type": "table"
            },
            "verbose": true
        },
        {
            "version": "0.1",
            "event": "task:new",
            "metaDataType": "string",
            "metaData": "origin",
            "limit": 100,
            "displayName": "No of times contacted in the last 7 days via email",
            "lookBackDurationType": "days",
            "lookBackPeriod": 7,
            "aggregationMode": "Count",
            "rules": {
                "logic": "SINGLE",
                "condition": "task:new,channelType,string,Value EQ email"
            },
            "widgetAttributes": {
                "type": "table"
            },
            "verbose": true
        },
        {
            "version": "0.1",
            "event": "task:new",
            "metaDataType": "string",
            "metaData": "origin",
            "limit": 100,
            "displayName": "No of times contacted in the last 7 days via chat",
            "lookBackDurationType": "days",
            "lookBackPeriod": 7,
            "aggregationMode": "Count",
            "rules": {
                "logic": "SINGLE",
                "condition": "task:new,channelType,string,Value EQ chat"
            },
            "widgetAttributes": {
                "type": "table"
            },
            "verbose": true
        },
        {
            "version": "0.1",
            "event": "task:new",
            "metaDataType": "string",
            "metaData": "origin",
            "limit": 100,
            "displayName": "No of times contacted in the last 7 days via telephony",
            "lookBackDurationType": "days",
            "lookBackPeriod": 7,
            "aggregationMode": "Count",
            "rules": {
                "logic": "SINGLE",
                "condition": "task:new,channelType,string,Value EQ telephony"
            },
            "widgetAttributes": {
                "type": "table"
            },
            "verbose": true
        }
    ]
}
-
Now let’s get the person-id, by running Get Identity API. Modify the URL in Postman and put the number +3227045654 after the alias. You should get
GET /admin/v1/api/person/workspace-id//aliases/3227045654 -
Save in notepad the person ID, which is “65ad476d01e91d3fe3f65e5c”. You will need it for the next API
-
Go to Get Progressive Template values against user and modify the URL by defining the person-id and right template name. It should be:
/v1/api/progressive-profile-view/workspace-id//person-id/65ad476d01e91d3fe3f65e5c/template-name/journey-default-template1 -
Run the API and check the response for the last 48 hours. The result is the total number of events for the last 2 days. We will use that value for the routing decision in the next task.
Task 2: Adding JDS API Request to the Flow Designer
In order to achieve that use case, we will need to use 2 JDS APIs:
- Get the person-id API - https://developer.webex-cx.com/documentation/journey/v1/search-for-an-identity-via-aliases
- Get Progressive Template values against user - https://developer.webex-cx.com/documentation/journey/v1/historic-progressive-profile-view-using-template-name
-
By using your admin account, go to the Control Hub -> Webex CC -> Flows https://admin.webex.com/wxcc/routing-flows/flows
-
Open the flow which was created during the Fundamental lab
Note: Alternatively, you can create a new Flow and map your Entry Point and DN to that Flow.
- In Postman, go to the JDS root folder -> Authorization -> Token and copy the access token to the notepad
Note: For this task, we will use the temporary access tokens which will expire after 8-12 hours. Soon we will be releasing the Webex CC API Connector, which will allow you to generate OAuth2 access tokens directly from the Flow Designer.
- Go back to the Flow Designer, you will need to create the following logic
4a. Click on the main canvas and add 2 Flow Variables:
- Identity with type String
- Total_Requests with the type Integer
4b. Add the HTTPRequest_1 activity with the following Settings:
- Request URL: https://api-jds.prod-useast1.ciscowxdap.com/v1/api/person/workspace-id/65171e0682b7f52b9209b39d/aliases/{{NewPhoneContact.ANI}}
- Method: GET
- HTTP Request Headers Key: Authorization
- HTTP Request Headers Values: Bearer + Your access token from Postman
- Content Type: Application/JSON
- Parse Settings Content Type: JSON
- Parse Settings Output Variable: Identity
- Parse Settings Path Expression: $.data[0].id
4c. Add the HTTPRequest_2 activity with the following Settings:
- Request URL: https://api-jds.prod-useast1.ciscowxdap.com/v1/api/progressive-profile-view/workspace-id/65171e0682b7f52b9209b39d/person-id/{{Identity}}/template-name/journey-default-template1
- Method: GET
- HTTP Request Headers Key: Authorization
- HTTP Request Headers Values: Bearer + Your access token from Postman
- Content-Type: Application/JSON
- Parse Settings Content-Type: JSON
- Parse Settings Output Variable: Total_Requests
- Parse Settings Path Expression: $.data[0].attributes[1].result
4d. Add the Condition activity with the following Settings:
- Expression: {{ Total_Requests > 2 }}
4e: Add 2 queue activities Queue Contact with different priorities in the General Settings (as shown in the screenshot above)
4f: Publish the Flow by clicking on Validation toggle, Publish Flow button and selecting the Live tag.
Task 3: Making a test call and checking the restul
-
Make your agent available for that queue
-
Make 3 test calls to the agent
-
Open DEBUG tool in the Flow Designer by clicking on DEBUG button and verify though which queue the 3rd call was delivered
Congratulations, you have completed this lab! You can continue with the next one.
