Lab 1 - Fundamental
Last modified: Sat, 24 Feb 2024
Webex Contact Center Provisioning
This is a supportive videos that do not require any actions since your tenant is already provisioned. Videos demonstrate the initial provisioning tasks for New Webex Contact Center as well as applying production subscriptions to existing organizations.
Table of Contents
| Topic | Lab Type | Difficulty Level | Estimated length |
|---|---|---|---|
| Part 0: Control Hub User Management Tasks | Watch & Understand | EASY | 5 min |
| Part 1: Contact Center Provisioning | Practical | EASY | 15 min |
| Part 2: Basic Flow configuration | Practical | EASY | 20 min |
| Part 3: Agent user experience | Practical | EASY | 20 min |
| Part 4: Supervisor user experience | Practical | EASY | 15 min |
Introduction
Lab Objective
- This lab is designed to help you do the initial setup and configuration of the tenant.
- The lab contains multiple exercises on Control Hub (Admin Portal) to make you comfortable with the Webex Contact Center application.
Pre-requisites
- You got the credentials to the different Webex CC portals: Control Hub, Management Portal and Agent Desktop
- For the use of WebRTC as Agent endpoint, you will need to have “Google Chrome” browser installed in your laptop
- You have Webex App installed or some other endpoint to make and receive test calls
Quick Links
Control Hub: https://admin.webex.com Agent/Supervisor Desktop: https://desktop.wxcc-us1.cisco.com
Part 0: Control Hub User Management Tasks
On interest of time, this part is already configured for you, you don’t need to complete the described tasks. However, we recommend you reviewing the steps, so you understand how the configuration looks like.
Add agent and supervisor users and set the calling extensions
-
Login to Control Hub with the Administrator account.
-
In the left navigation pane go to Management > Users.
-
Click on
Manage Usersbutton. -
Select
Manually add users. -
Set the agent’s First name, Last name and input the Email addresses of the agent.
-
Click on
+sign and add the supervisor in the same way. -
Assign license for users select Webex Calling (Professional) & Contact Center (Premium Agent).
-
On the next page, make sure that the Location is selected under Assign Numbers. The correct value should be already selected by default.
-
The Phone Number left as
None. -
On the same page, enter the correct Extension under Assign Numbers. The correct Extensions should be provided to you with the admin credentials.
-
Review verify the data and click
Add users. -
On the next page, you should get confirmation “2 users added”. Confirm the same by pressing
Close. -
Now, select the supervisor user and modify his role to Premium Agent - Supervisor by clicking the
Edit Licensesbutton in the Licenses section. -
Click
SaveandCloseto confirm the changes. -
Validate the users by going to the email account. Open the Control Hub validation email and follow the Cisco Webex instructions to activate the both accounts.
-
Refresh the Users page in the Control Hub, make sure that both users are in Active status.
Part 1: Contact Center Provisioning
Step 1: Verify the created config
The following configuration entities are already created for you:
TS_Site,TS_OutdialQueue,TS_OutdialChannel,TS_DesktopProfile,TS_Skills,TS_MMP,TS_BusinessHours.
Please don’t create or modify the same configuration entities.
-
Navigate to each configuration entity and see how they are configured.
-
Special attention on Desktop Profile, explore the options of different tabs: General, Idle/Wrap-up Codes, Collaboration, Dial Plans, Voice Channel options, Agent Statistics, Desktop Timout.
-
We also recommend you to watch this Vidcast about Business Hours configuration.
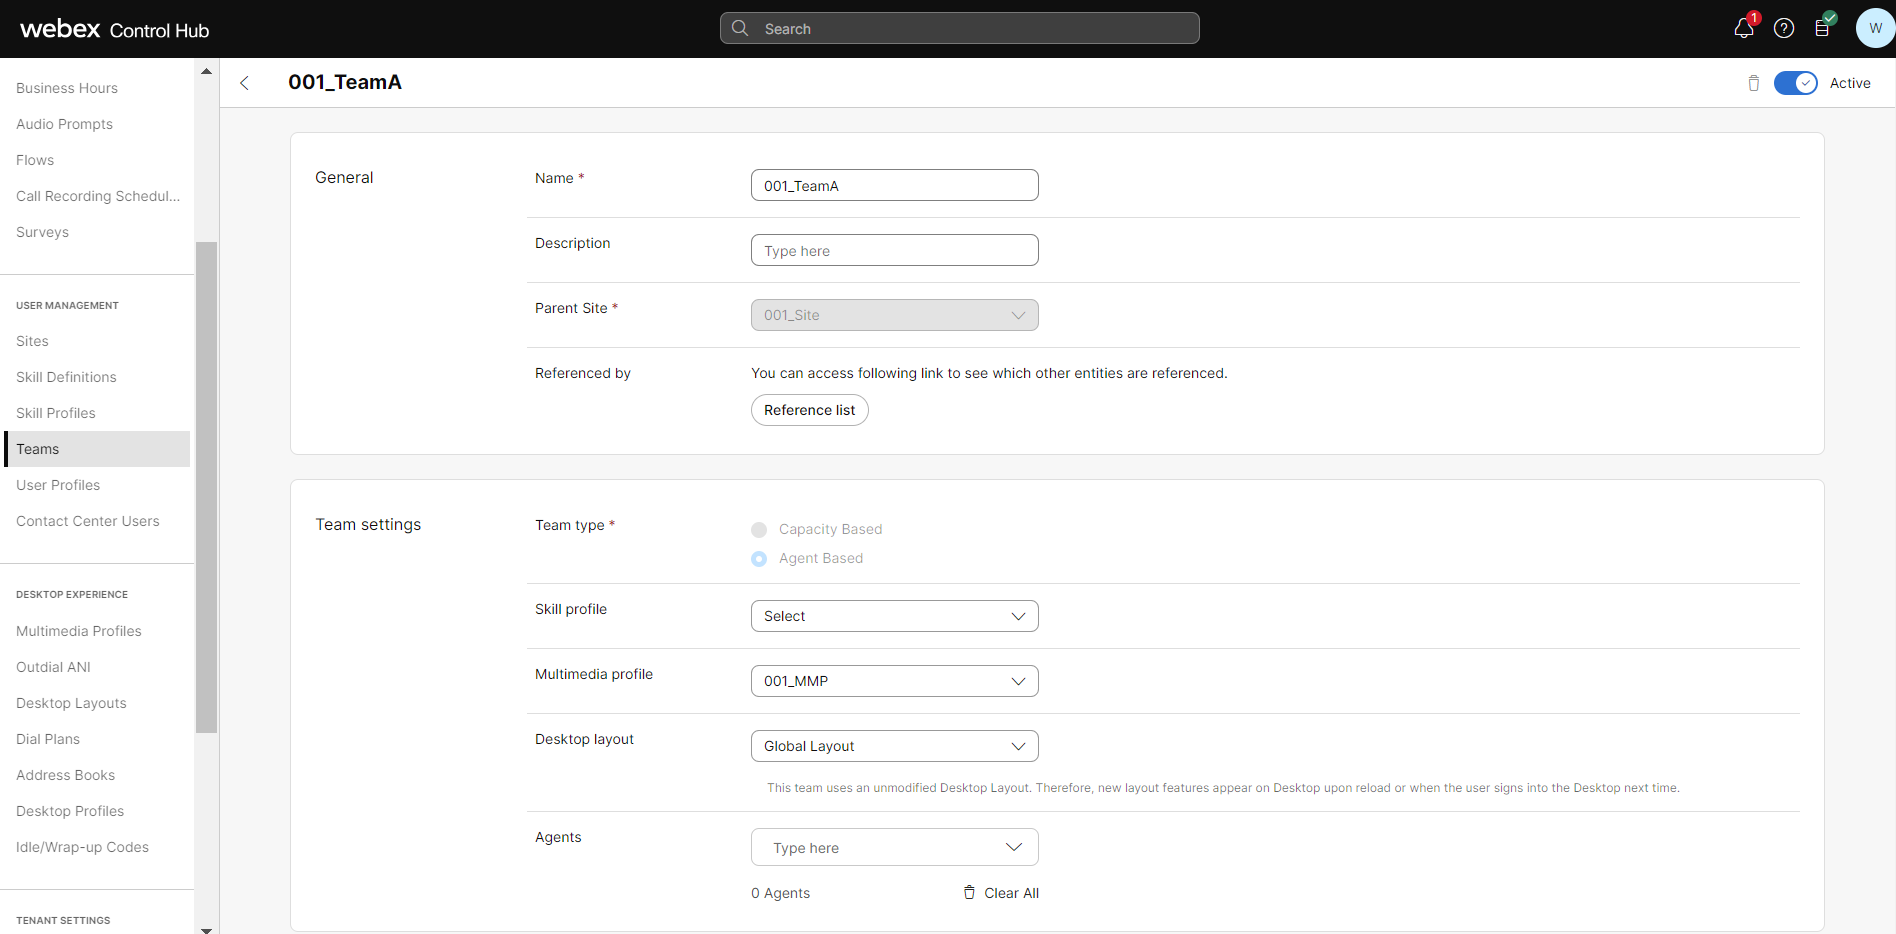
Step 2: Create Team
-
Navigate to Teams under USER MANAGEMENT.
-
Click on
Create Team. -
Input Name as yourPrefixID_Team1.
-
Select your site from the Parent Site drop-down.
-
Select the team type
Agent Based. -
Select
TS_MMPMultimedia profile. -
Left as a default value
Global Layoutin the Desktop layout drop-down and click onCreate button.
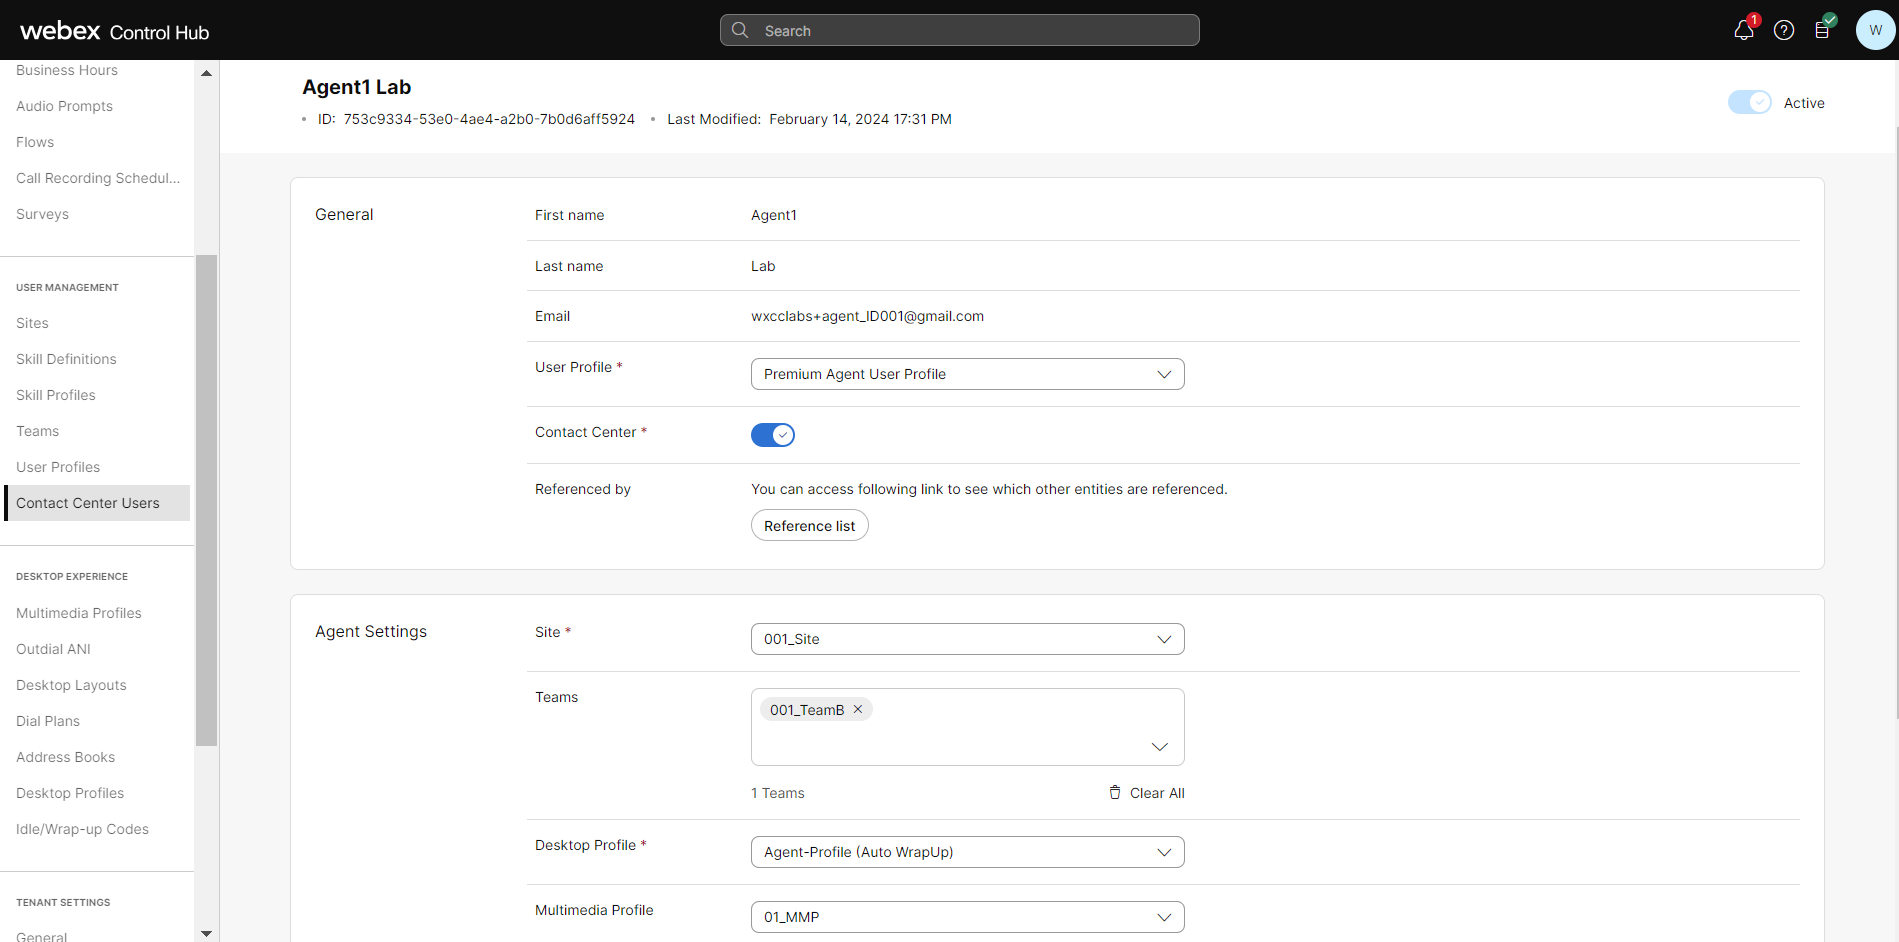
Step 3: Activate Contact Center Settings for Users
-
Navigate to *Contact Center Users under the USER MANAGEMENT.
-
Find your and select the agent, to launch the Edit view for a particular User configuration.
-
Click on Contact Center Enabled toggle to move it to On.
-
In the Agent Settings section, select
TS_Sitein the Site drop-down. -
Click the Teams area and select your team
-
Select the default
TS_DesktopProfilein the Desktop Profile drop-down list. -
Choose
TS_MMPas Multimedia Profile and hitSave. -
In Agents setting, select your users.
-
In the User’s table make sure that the agent is now shown with the Contact Center Enabled flag as Yes and Status as Active.
Step 4: Create Queue
-
Navigate to Queues under CUSTOMER EXPERIENCE.
-
Click on
Create Queue. -
Input Name as yourPrefixID_VoiceQueue.
-
Select
Inbound Queueas Queue Type. -
Choose
Telephonyas Channel Type. -
For Queue Routing Type, select the Longest Available Agent option.
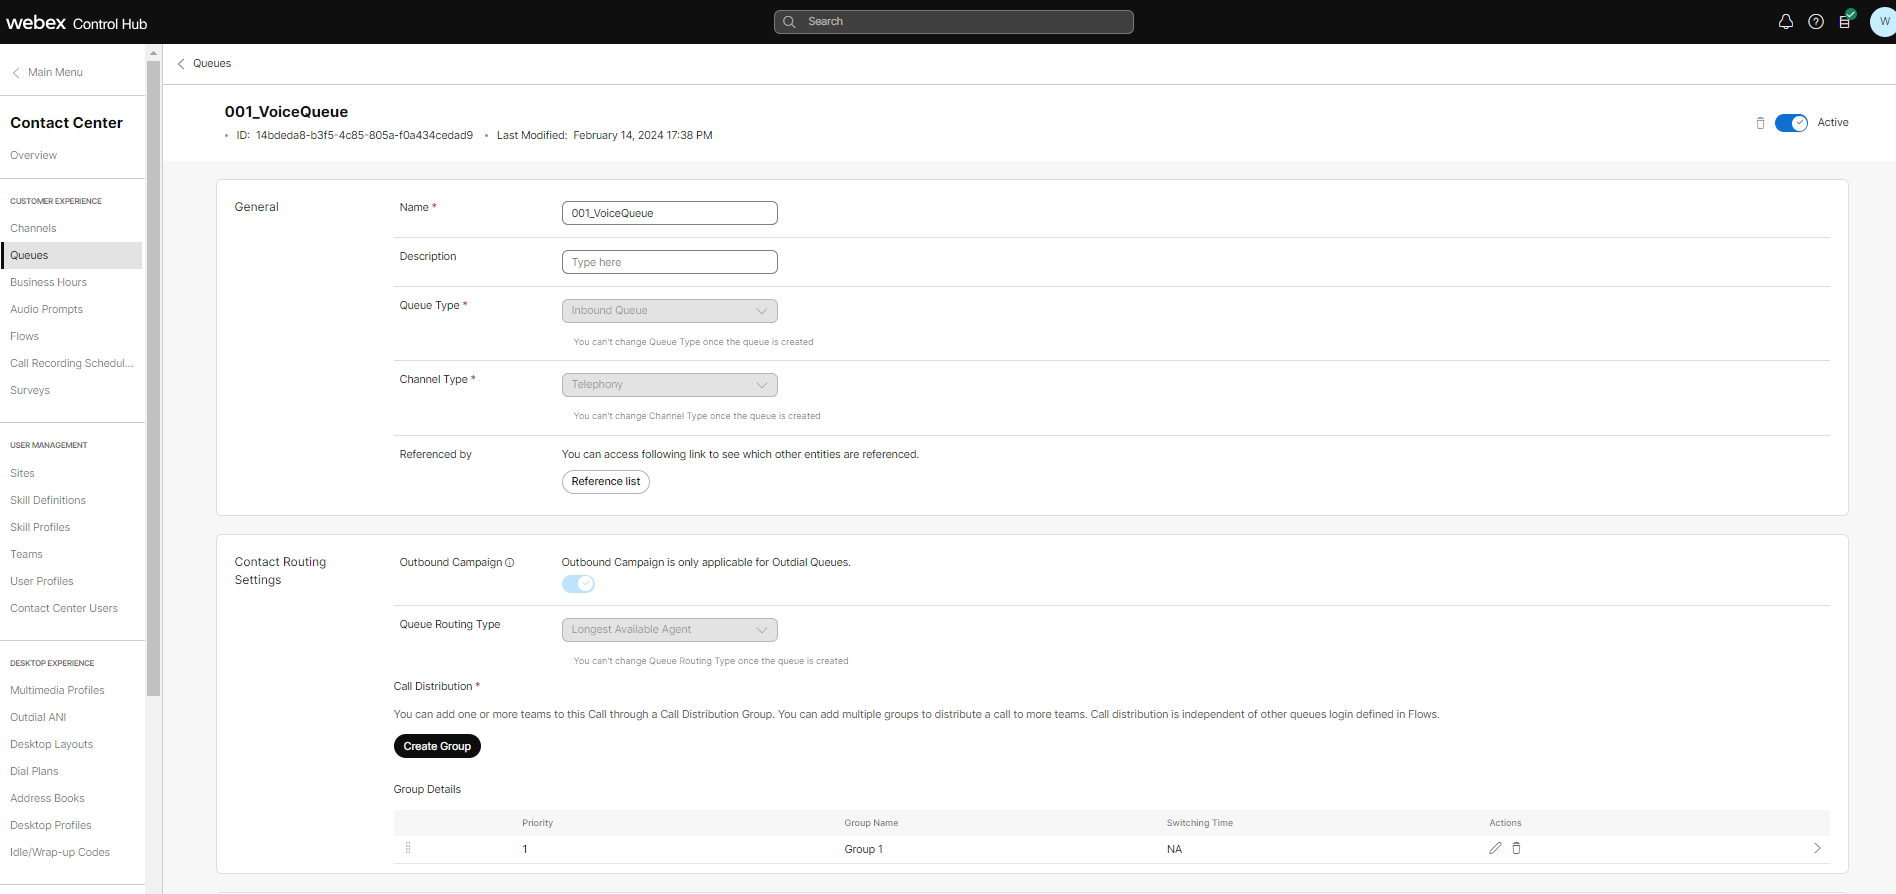
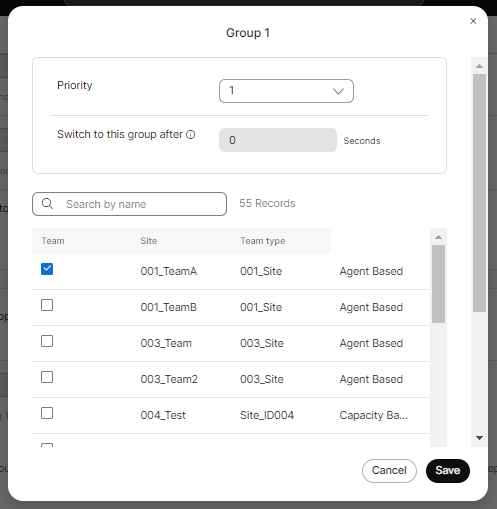
- Create the Call Distribution, selecting yourPrefixID_Team1 as Group as click on
Save.
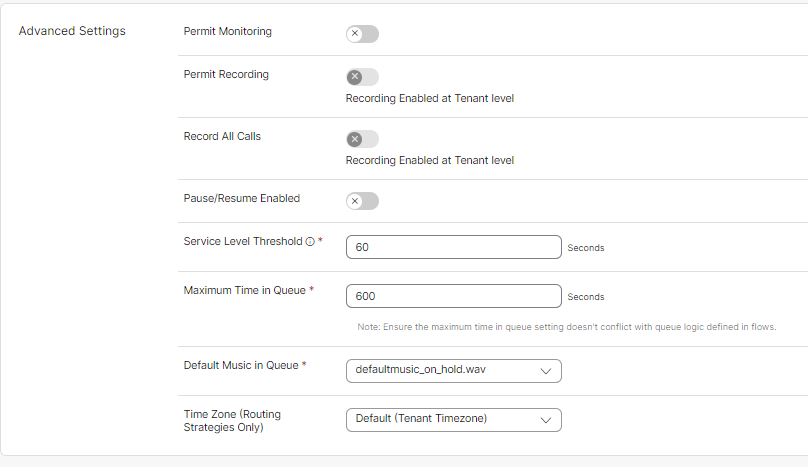
- In Advanced Settings , set these values:
Service Level Threshold: 60 Maximum Time in Queue: 600 Default Music in Queue: defaultmusic_on_hold.wav
- Hit
Saveto complete the Queue creation.
Additional options: Bulk Upload
You can also use Bulk Upload or API for creating entities. This feature provides greater speed and efficiency to deploy and configure Webex Contact Center systems.
Bulk Operations are available for the following configuration object types: Entry Point, Auxiliary Code, Queue, Agent Profile, Outdial Entry Point, Address Book, Outdial Queue, Outdial ANI, Site, Skill Definition, Team, Skill Profile, Users, Entry Point Mappings, User Profiles, Audio Files, Work Types, Global Variable.
-
In Control Hub, navigate to Contact Center > Tenant Settings > Bulk Operations.
-
Click Create Bulk Operations button in the right upper corner.
-
Select the configuration object you want to create from the drop-down list.
-
In the Export section enter the name of the configuration object and click
Nextbutton. -
Once the task is completed click on
Download exportfile button under the Action and open the csv file in the notepad. -
The first line is the headers, it is mandatory to have it during the import process. Remove all lines from the CSV file except the first line with headers and the second line with the team.
-
Go back to the Bulk Operations menu and click Create Bulk Operations button again.
-
Select the configuration object from the drop-down list and import the CSV file by dragging it into the Import section.
-
Click Next button and wait the results. The status should be shown as Completed.
-
Navigate to Configuration object you created and verify that the imported object is created.
Part 2: Basic Flow configuration
Step 1: Flow creation and Business Hours definition
-
Navigate to Flows under the CUSTOMER EXPERIENCE.
-
Click
Manage Flows > Create Flows. -
Name it as Flow_yourPrefixID.
-
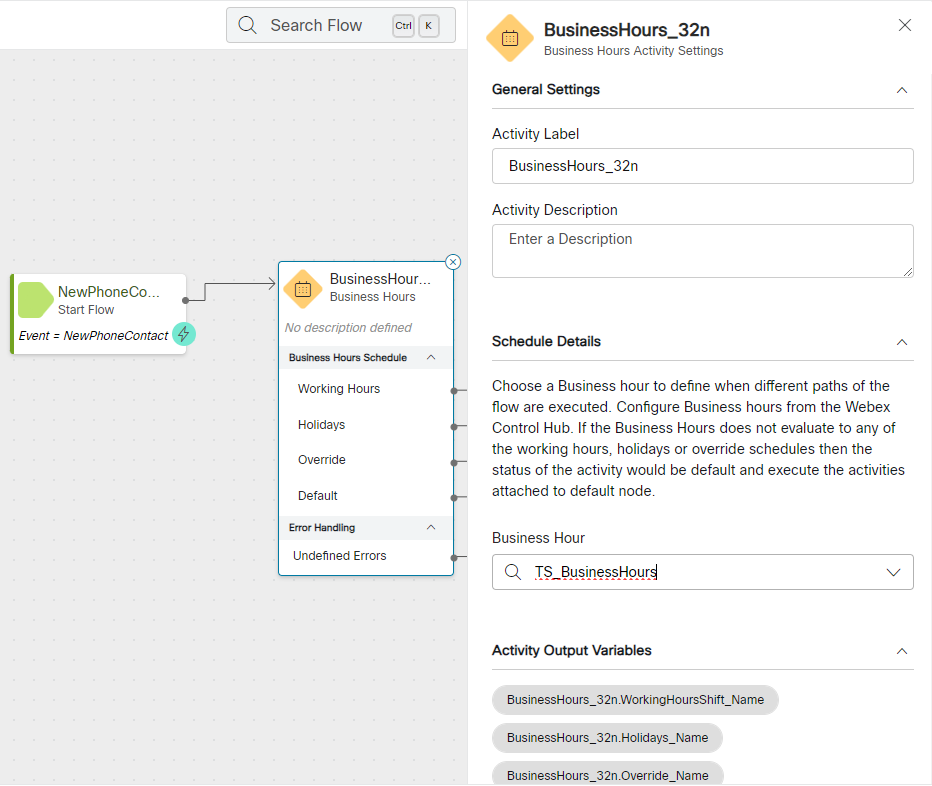
Take Business Hours node and link it with NewPhoneContact node.
-
On Business Hours node, choose
TS_BusinessHoursunder Schedule Details.
-
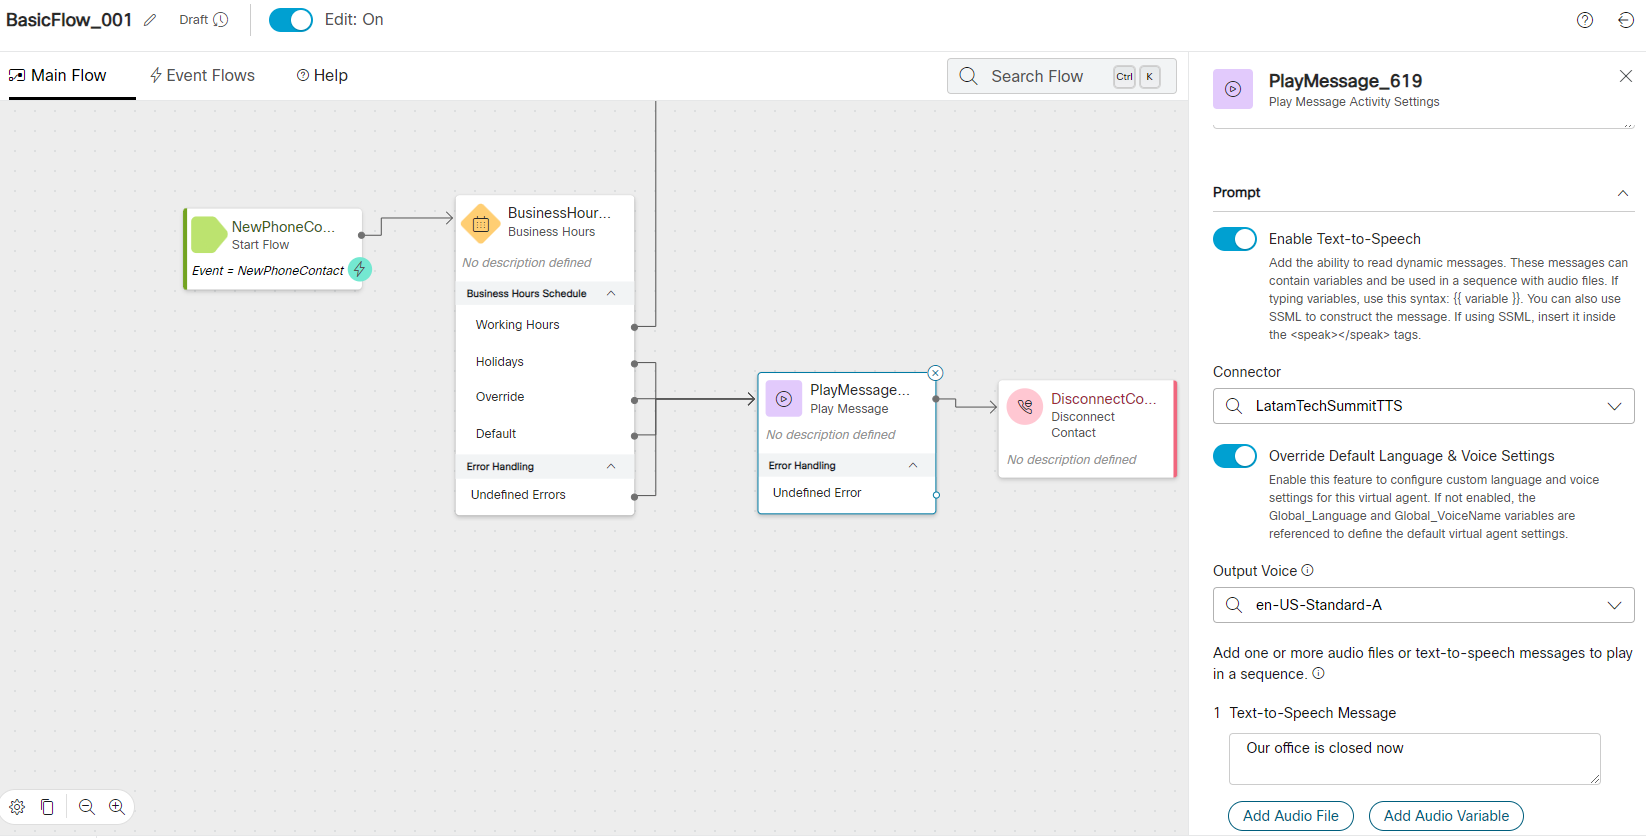
Drop the Play Message node and connect it with Holidays, Overrides and Default edges from Business Hours node.
-
Open the Play Message node and toggle
Enable Text-to-SpeechON. ChooseLatamTechSummitTTSas Connector and choose any english option as Output Voice. -
Write the message you want to play for the office closed hours. It can be something like:
We're sorry, but our offices are closed now. Please try to call in a different moment. -
Link the Play Message node with a Disconnect Contact node.
Step 2: Queue contact
-
Drop a Queue Contact node and connect it with the Working Hours edge from Business Hours node.
-
Open Queue Contact node, select
Static Queueand choose the Queue you created in Part 1. -
Link the Queue Contact node with a Play Music node. Define the music file and the duration you want to play. Connect the output edge of the node with the entry edge, so the music will be playing until the call is forwarded to an agent.

Step 3: Create EP Mapping and map it to flow
-
Go back to Control Hub and navigate to Channels, under CUSTOMER EXPERIENCE.
-
Click on
Create Channel. -
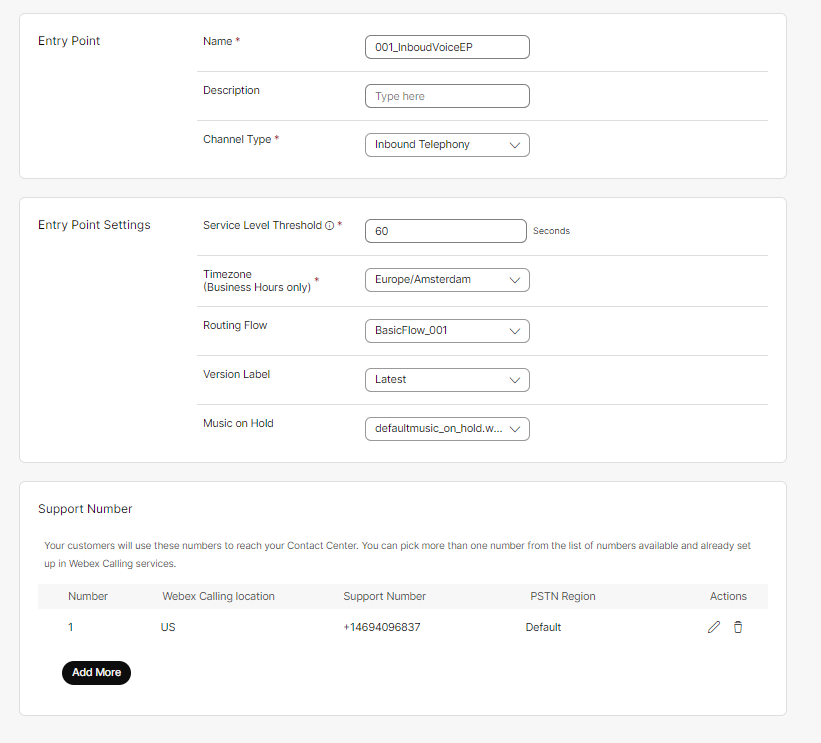
Input Name as yourPrefixID_VoiceEP.
-
Select
Inbound Telephonyas Channel Type. - Set the following Entry Point Settings:
Service Level Threshold: 60 seconds Timezone: Europe/Amsterdam Routing Flow: Flow_yourPrefixID Version Label:
LatestMusic On Hold:defaultmusic_on_hold.wav - In Support Number section, click on
Addand input the following:Webex Calling Location:
USSupport number: Search for the DN assigned to your prefix PSTN Region:Default - Click the check mark and then
Save.
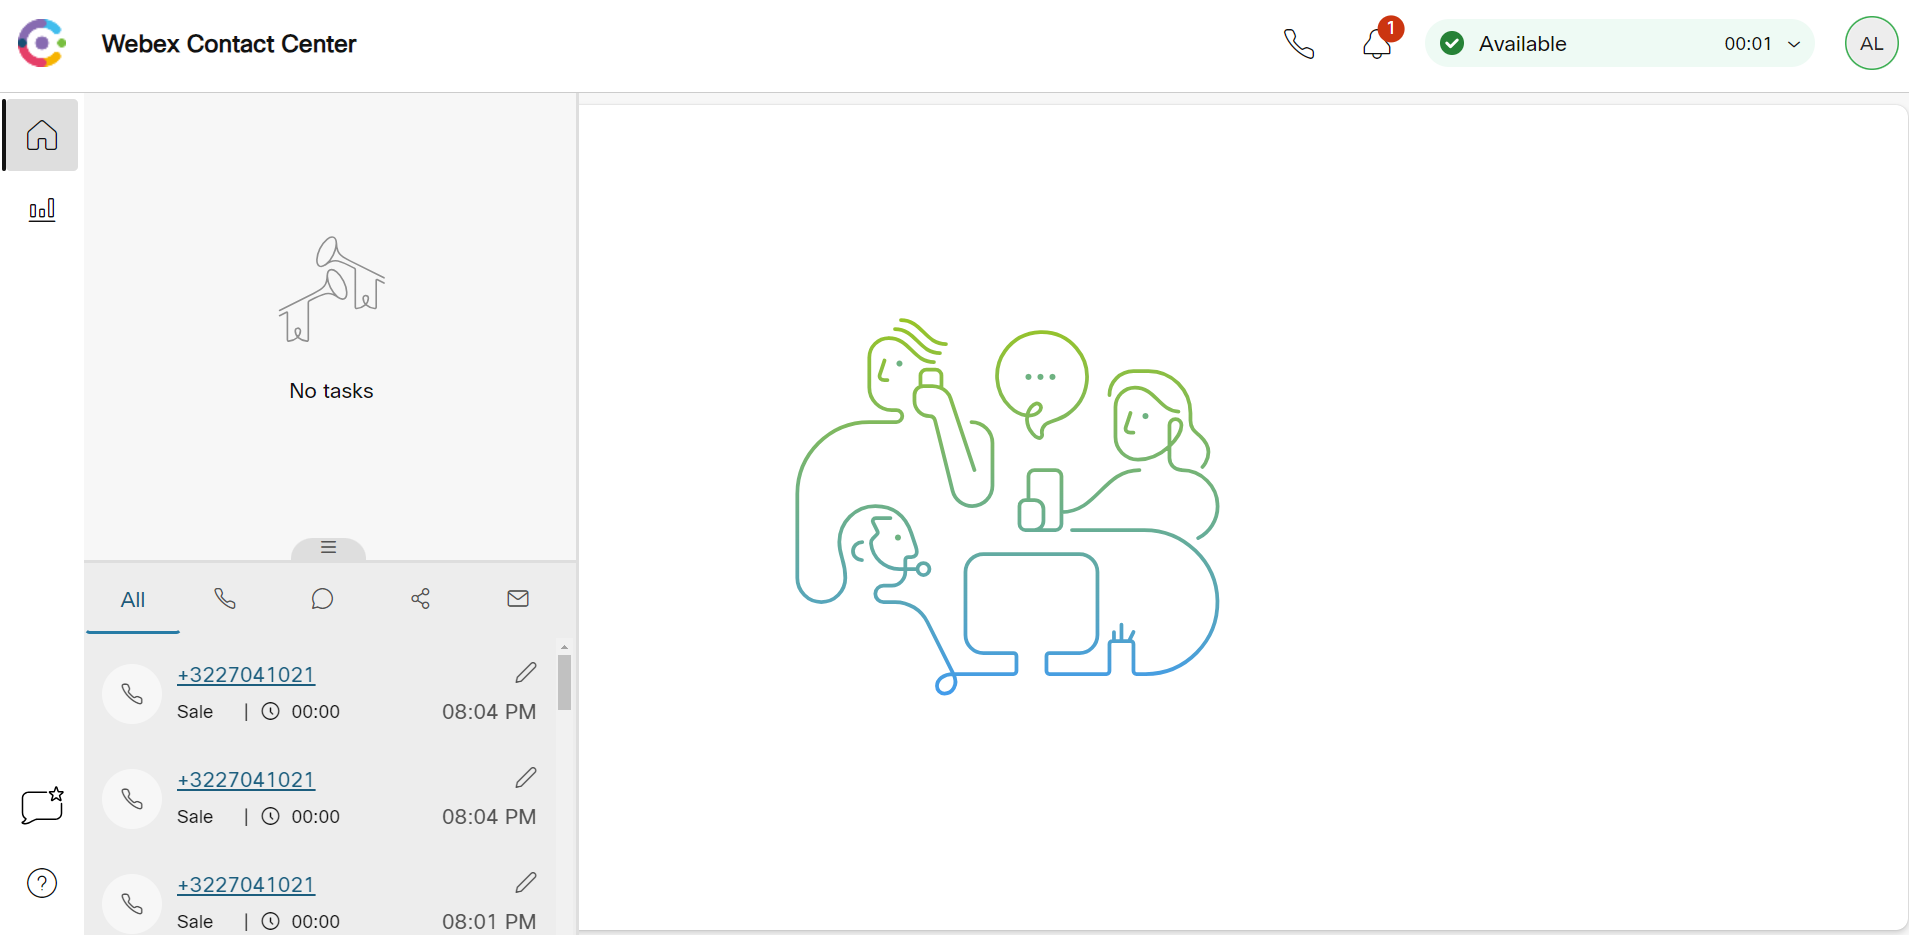
Part 3: Agent user experience
Step 1: Access to Agent Desktop
Be aware that currently only “Google Chrome” browser is supported for WebRTC option.
-
Login to Agent Desktop with your wxcclabs+agent_yourPrefixID@gmail.com agent user credentials. Be aware that it’s under SSO.
-
Select Desktop as telephony option.

-
Under User Profile > User Settings, click on
Speaker and Microphoneto set and test them. -
Under Help, click on
Test Your Networkoption, to check your internet connectivity speed, latency and jitter. -
Now move your Availability state to
Available, so you can start receiving calls.
Step 2: Place and accept an inbound call
-
Login Webex App with the your wxcclabs+suprv_yourPrefixID@gmail.com supervisor user credentials.
-
Make a call to the assigned Support number of the Channel created in Part 2.
-
For making the call, we suggest to use the Webex App, where the calling service is enabled for your wxcclabs+suprv_yourPrefixID@gmail.com Supervisor user. If you prefer, you could also do it from your phone number directly.
-
You will receive the incoming call request
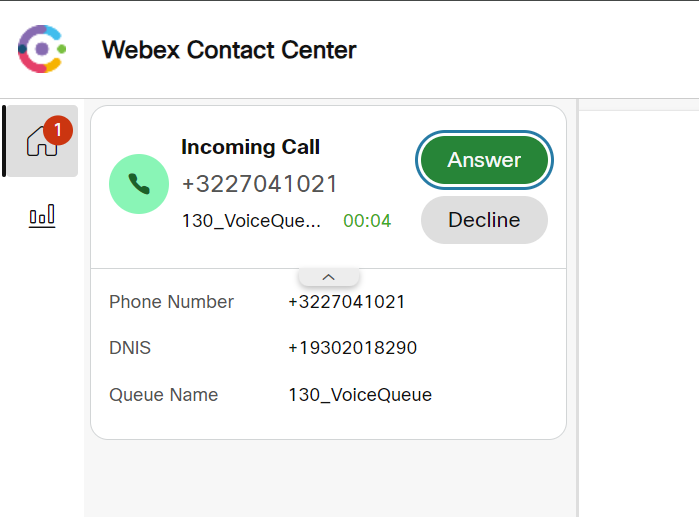
- Click on
Acceptand the call will be established. You will see now the different call control options (Consult, Transfer, End…) and some other info about the call.
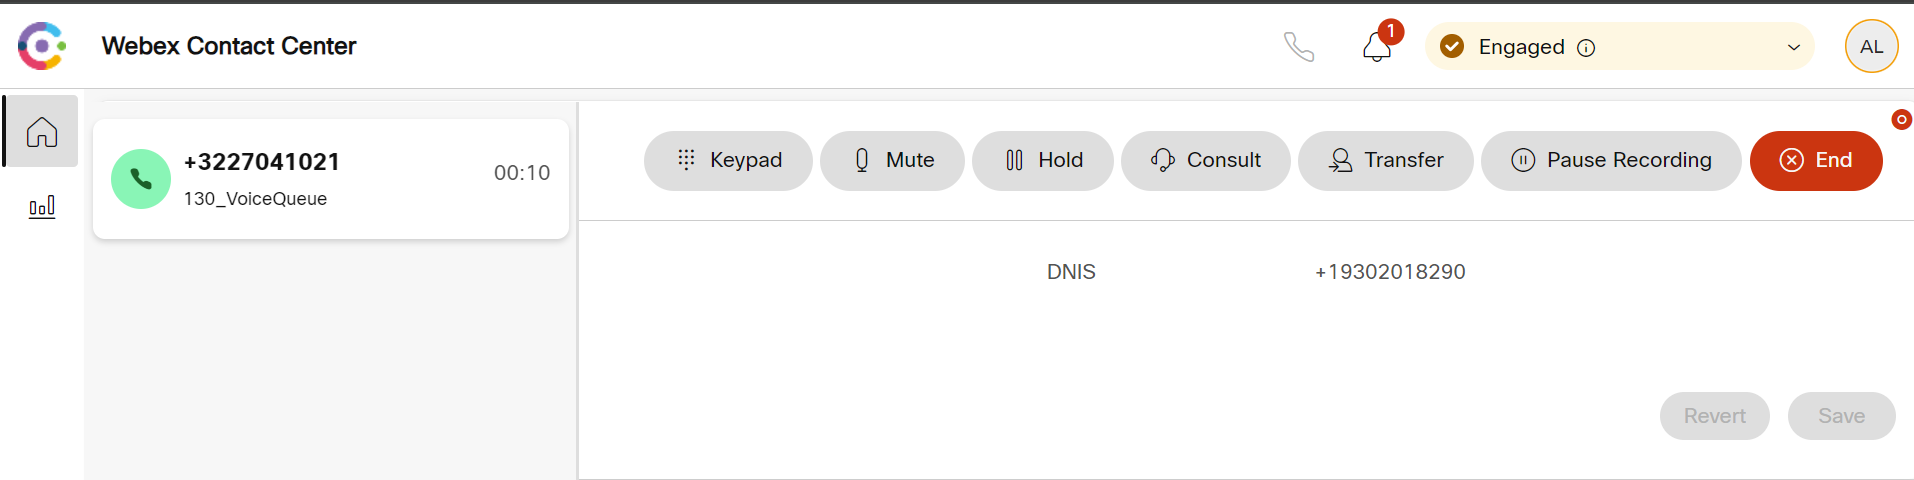
-
When you want to finish the call, either end it from the customer endpoint or from Agent Desktop by clicking on
End. -
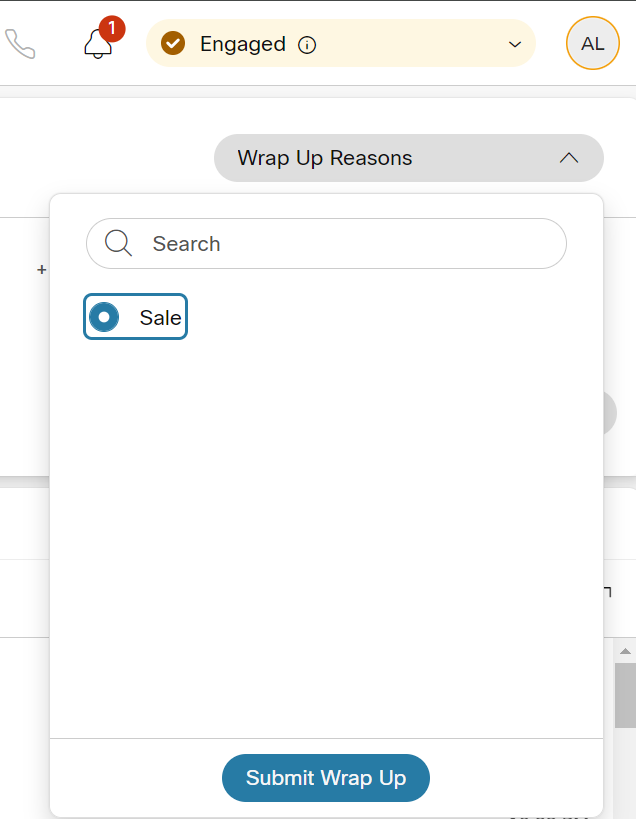
Select any of the availables WrapUp codes and click on
Submit.
Step 3: Verify the Flow Debugger functionality
-
Now let’s review how the configured flow was executed and the path it followed.
-
Go back to Control Hub, navigate to Flows (under the CUSTOMER EXPERIENCE) and open your flow.
-
Click on the Debug option, in the bottom of the page. The Flow Debugger pane will be open and you will see a list with all the latest interactions.
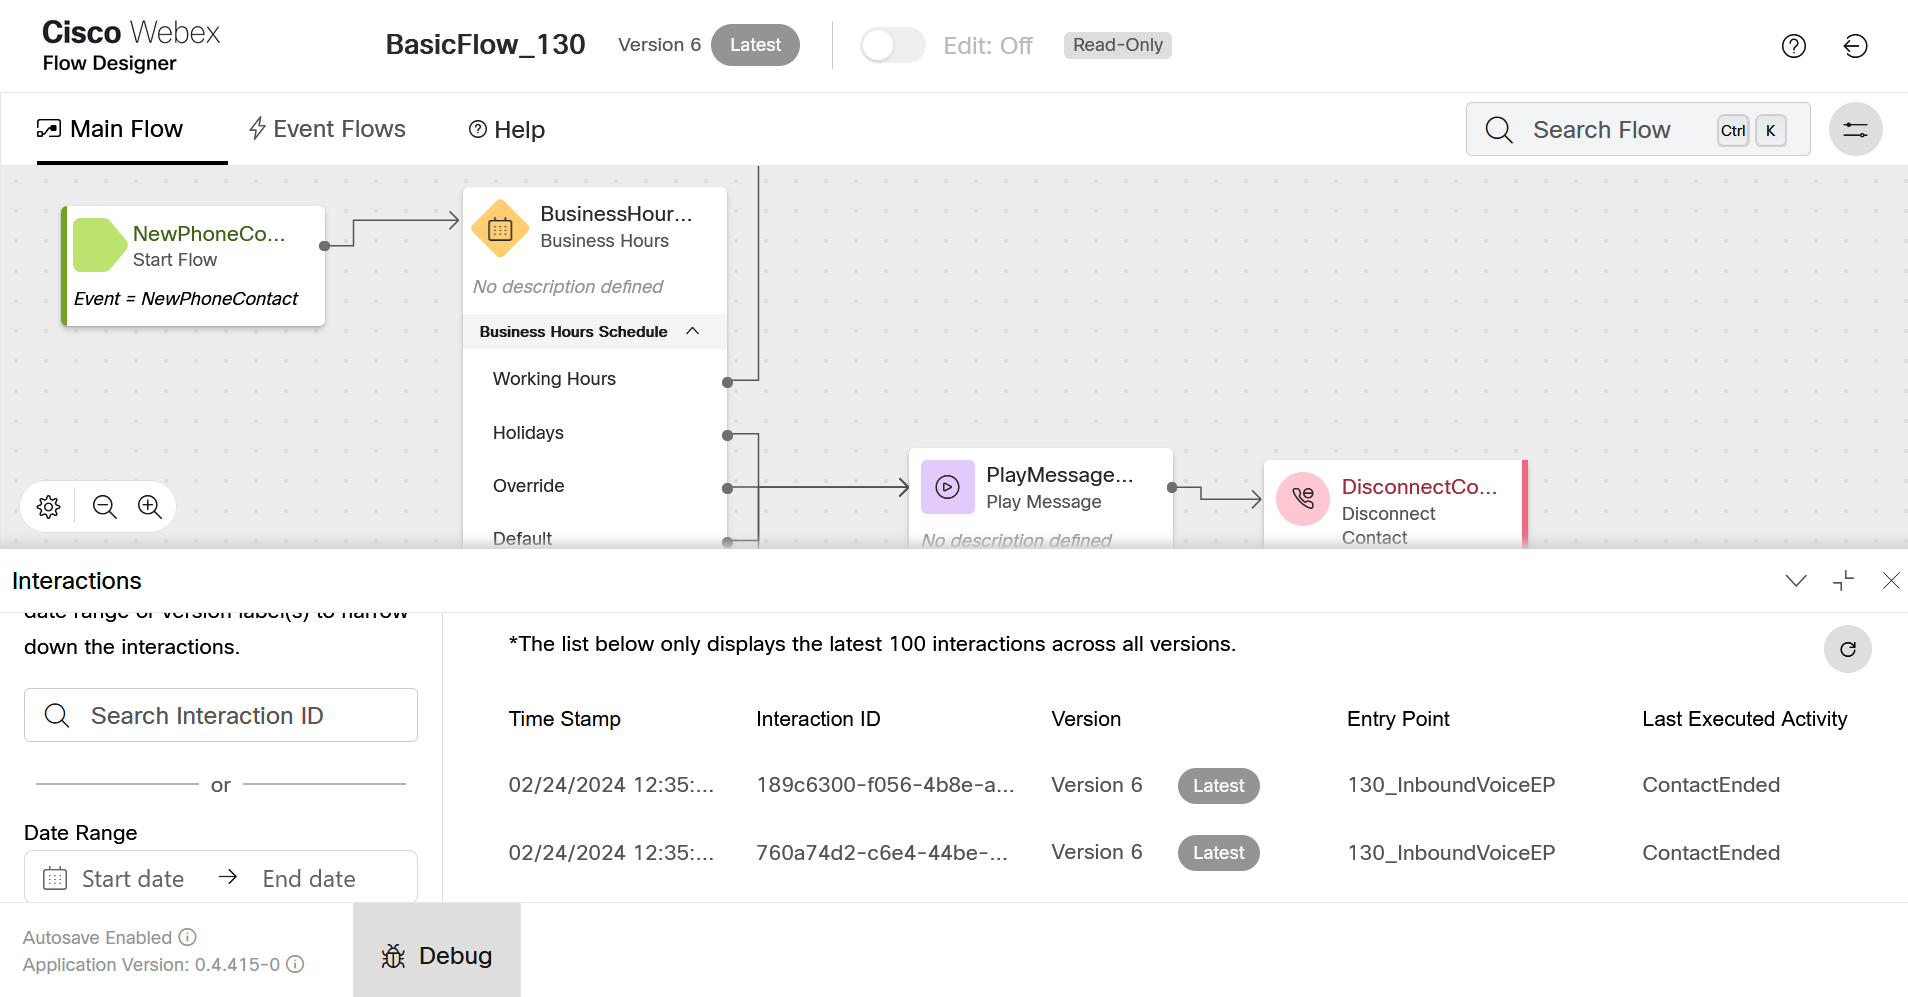
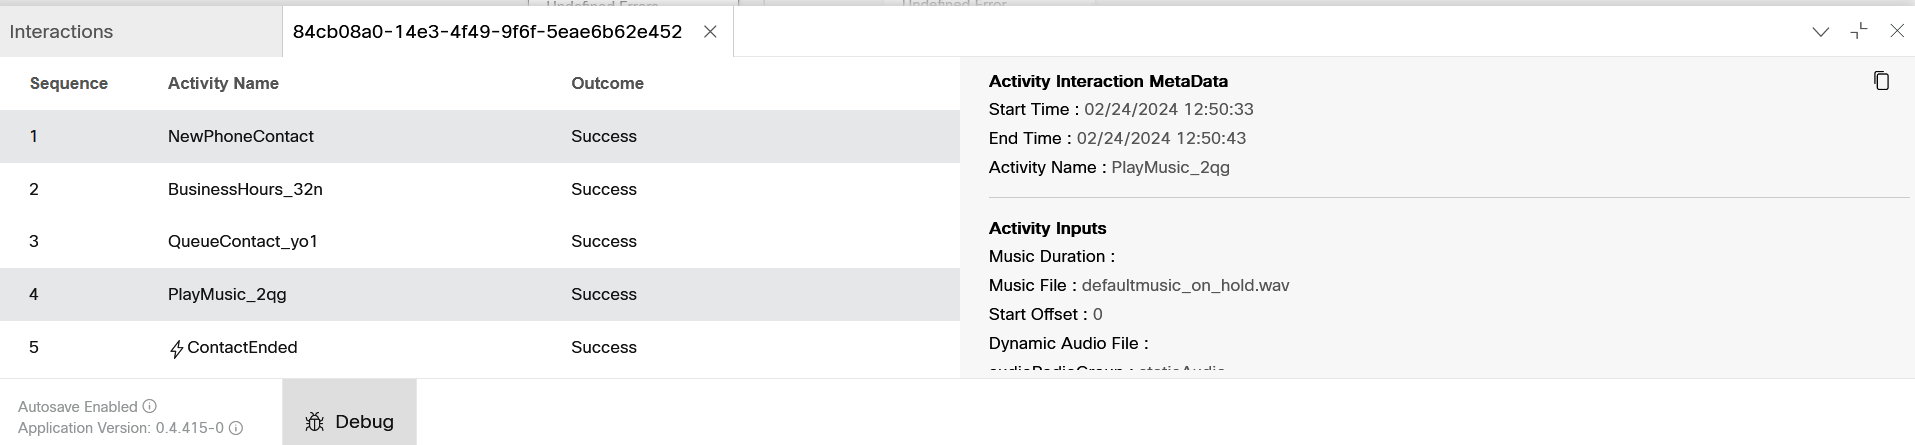
- Select the latest interaction and review the activities sequence followed. You can click on each activity to get more details.
Step 4: Outdial call
We have already set for you all the configuration for Outdial calls. You would need an Outdial Telephony Channel, Outdial Queue and Outdial Flow. You can review this config in TS_OutdialEP.
Outdial must also be enabled at Desktop Profile level. You can check how this is configured in TS_DesktopProfile*.
-
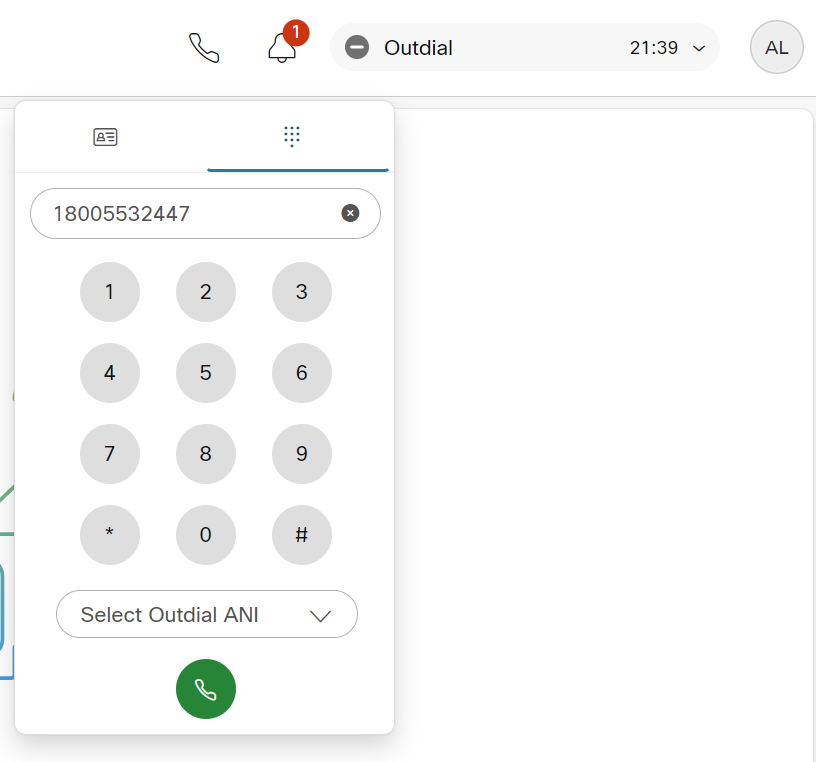
To conclude with the Agent user experience, let’s learn how to place an Outdial call
-
Click on the telephone icon on the desktop top horizontal header. The Outdial pad will be opened.
-
Input the number you want to call. For security purposes, this tenant international calls are not allowed, so you will need to call to US number. For example, you can use TAC support number:
1 800 553 2447. -
The call will be initiated and you will receive the Outdial request at agent desktop. As you’re using WebRTC, the call will be automatically accepted, but for rest of endpoints you will need to take the call in the phone.
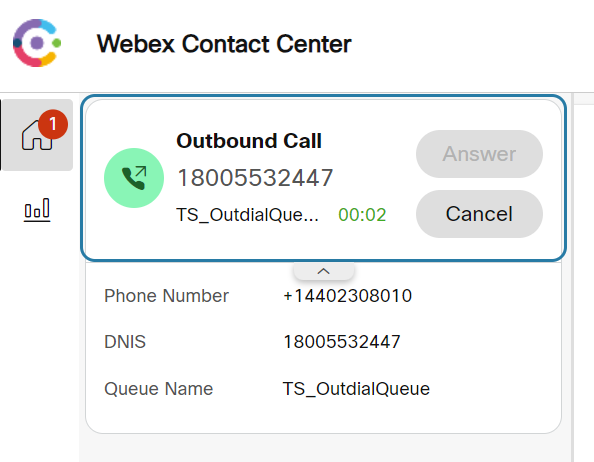
- When the call is connected, the behavior is the same as inbound calls. You can decide to Transfer/Consult/Conference the call and click on
Endto finish the call.

- As additional settings, you can also create your Address Book or customize the Outdial ANI displayed to end customer.
Part 4: Supervisor user experience
Step 1: Set the config to enable Supervisor Desktop
The User Profile used by supervisors has already been created. Here is where the user privileges (Change Agent State, Sign Out agents, Call monitoring, …) and access rights (EP, Queues, Sites and Teams you manage) are defined. You can review the config in TS_SupervisorProfile.
-
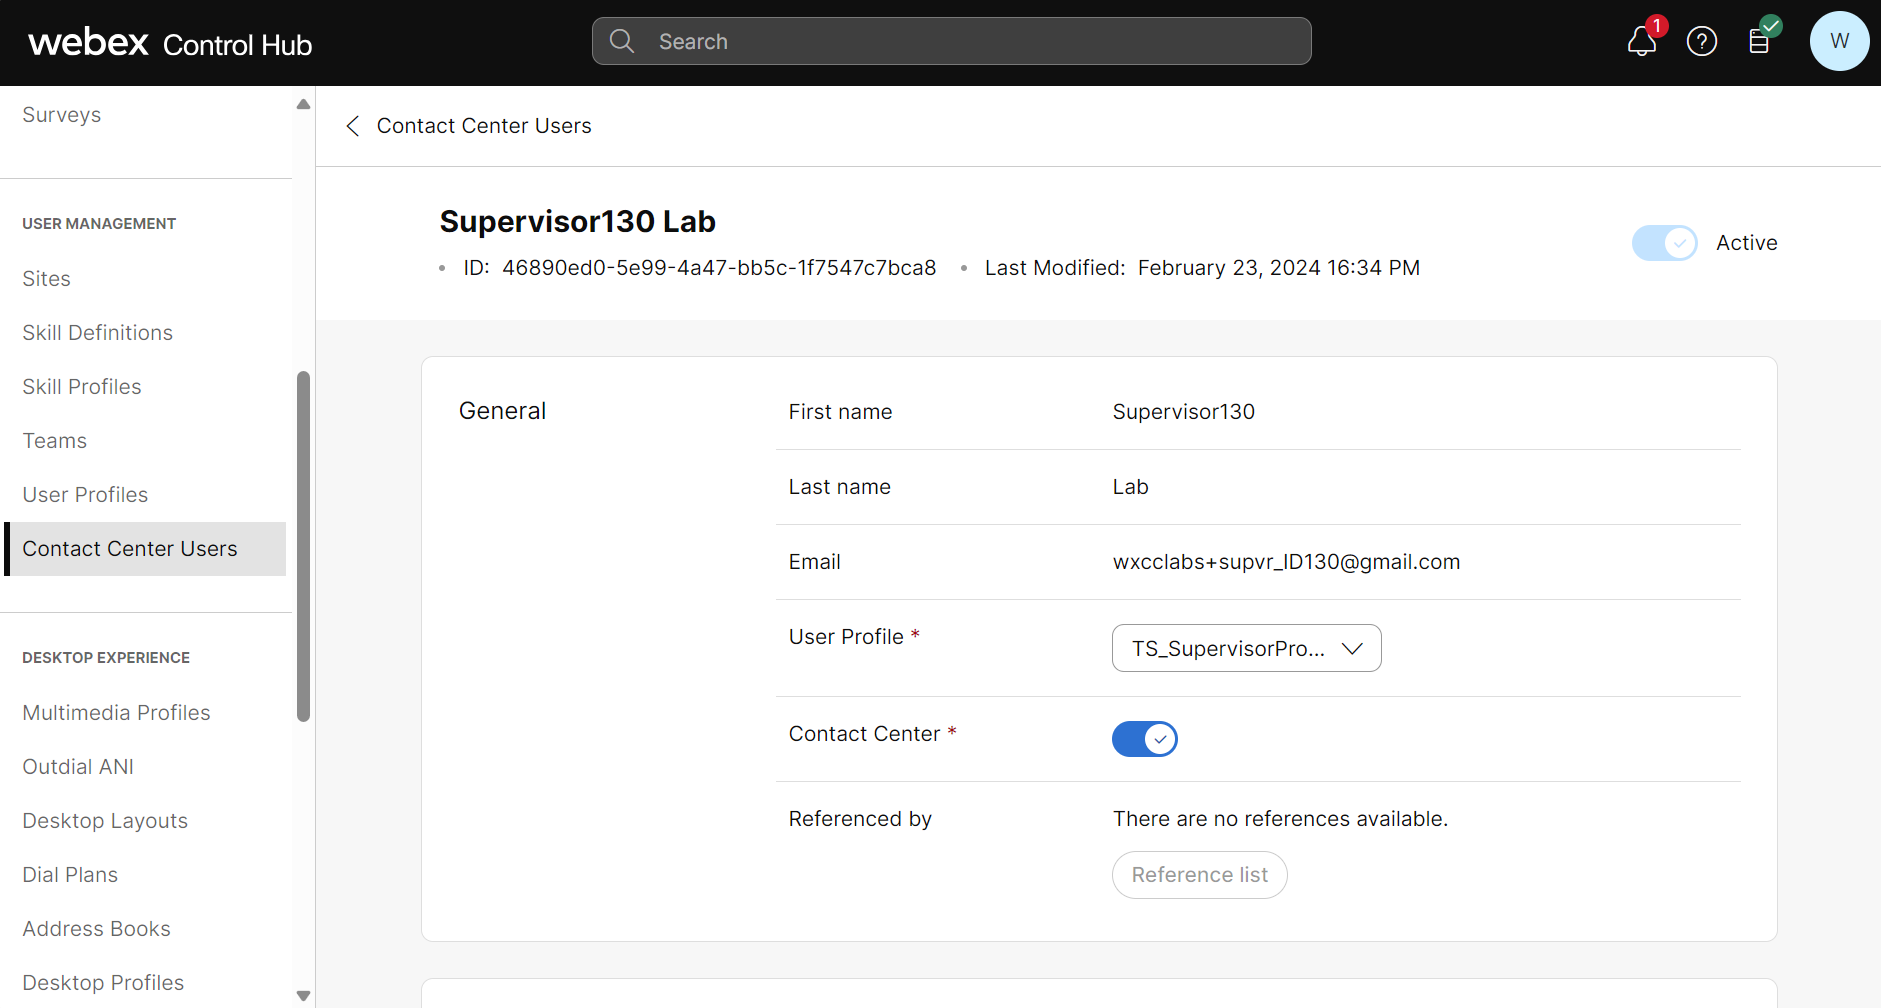
In Control Hub, navigate to Contact Center Users, under the USER MANAGEMENT.
-
Search for your wxcclabs+suprv_yourPrefixID@gmail.com supervisor user and open it.
-
Select
TS_SupervisorProfileas *User Profile and toggle the Contact Center ON.
-
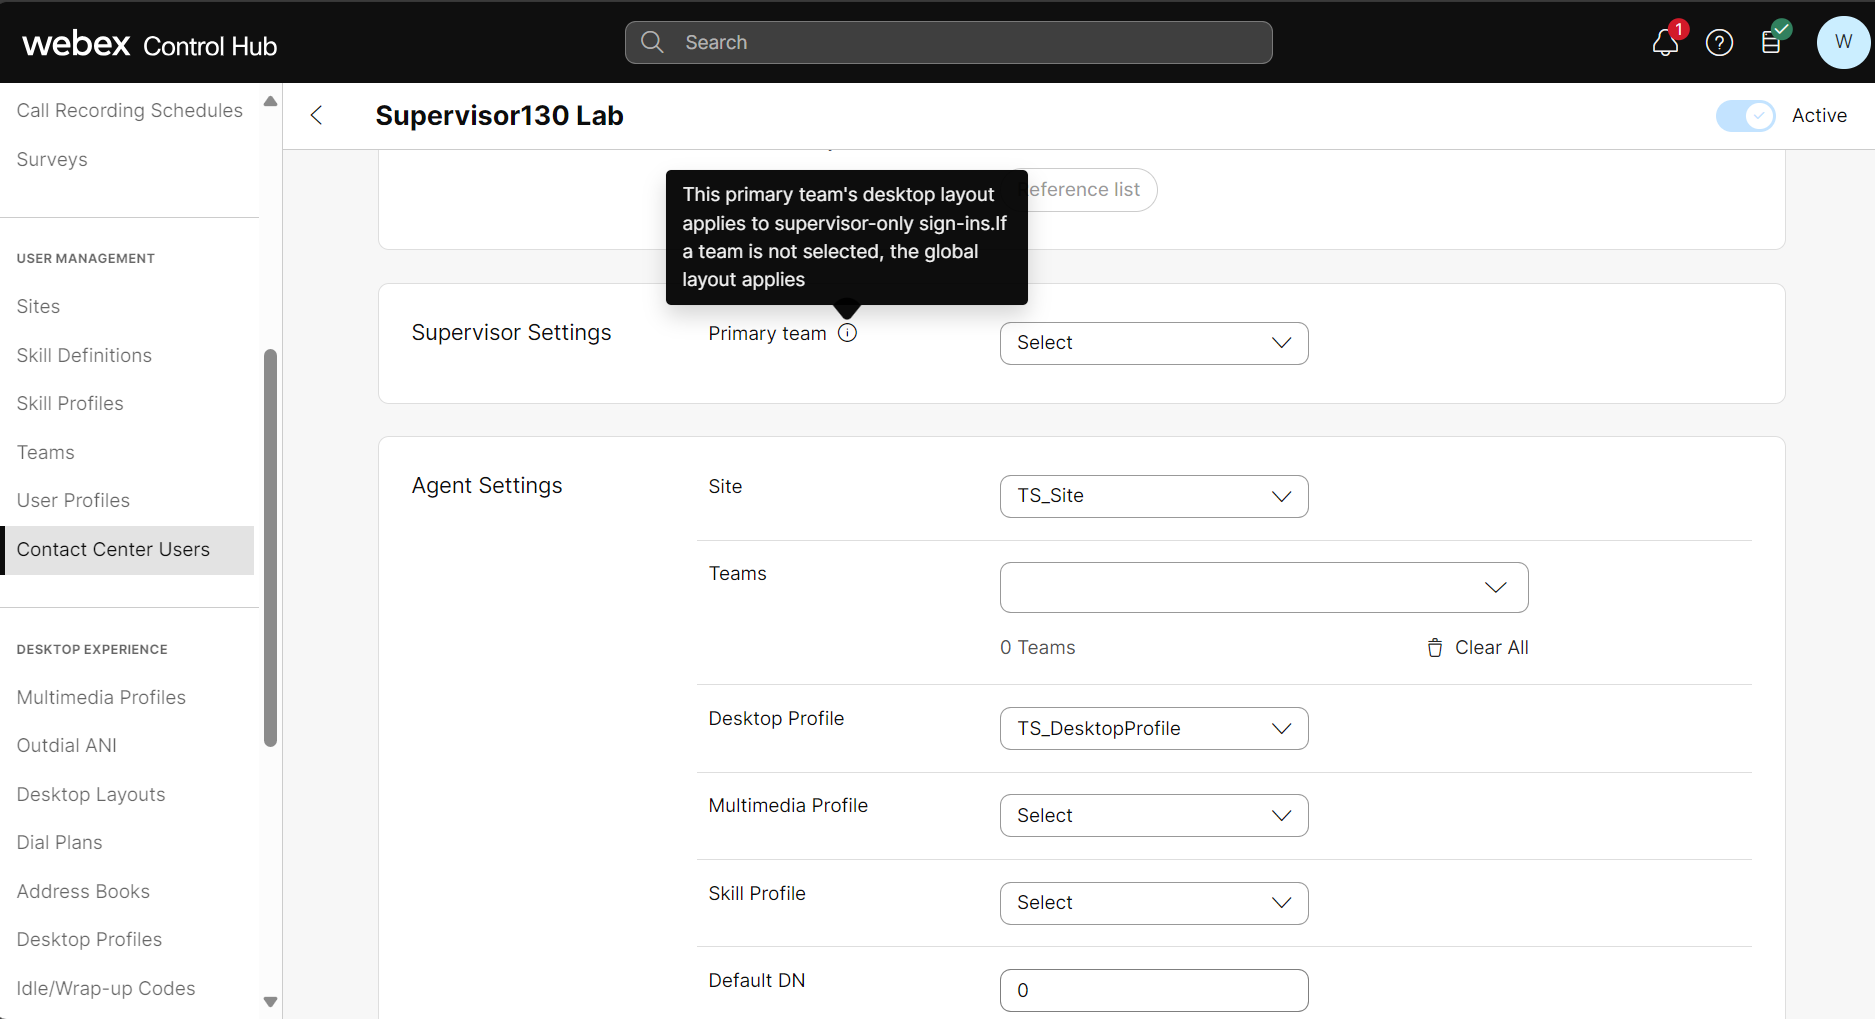
On Supervisor Settings, you need to specify the Primary team. This setting is just used to apply the Desktop Layout assigned to that team. For this lab, leave that value empty. If a team is not selected, the global supervisor layout will be applied.
-
In case you want to have double role and behave as Supervisor & Agent, you can define the agent related parameters on Agent Settings. In this case, you can leave most of the settings empty and you just need to set the followings:
Site:
TS_SupervisorProfileDesktop Profile:TS_DesktopProfileMultimedia Profile:TS_MMP
Step 2: Login in Supervisor Desktop and overview
-
Browsers usually keep session cookies on their different tabs. That’s why, in order to login in the Supervisor Desktop, you must open the desktop in a new browser.
-
The Supervisor Desktop URL is the same as the Agent Desktop: https://desktop.wxcc-us1.cisco.com
-
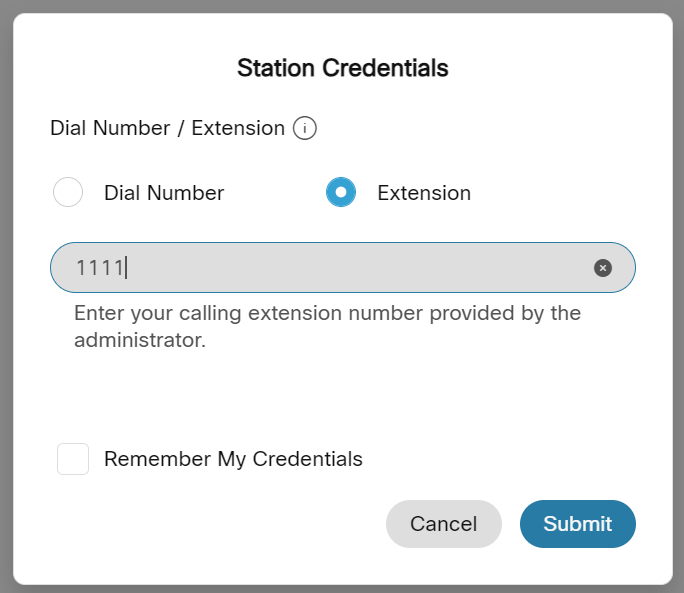
Login with your wxcclabs+suprv_yourPrefixID@gmail.com supervisor user credentials, input any number as Extension and Submit. In this lab, we’re not going to monitor any call, so that number doesn’t not matter.
-
You will be logged in the Supervisor Desktop, take some time to explore the different views and options.
-
In order to see more data in the dashboards, in the Home page, Select All the options for Queue Name, Channel Type and Managed Teams.

- Explore the available statistics cards and dashboards.
Step 3: Agent state change and play recording
-
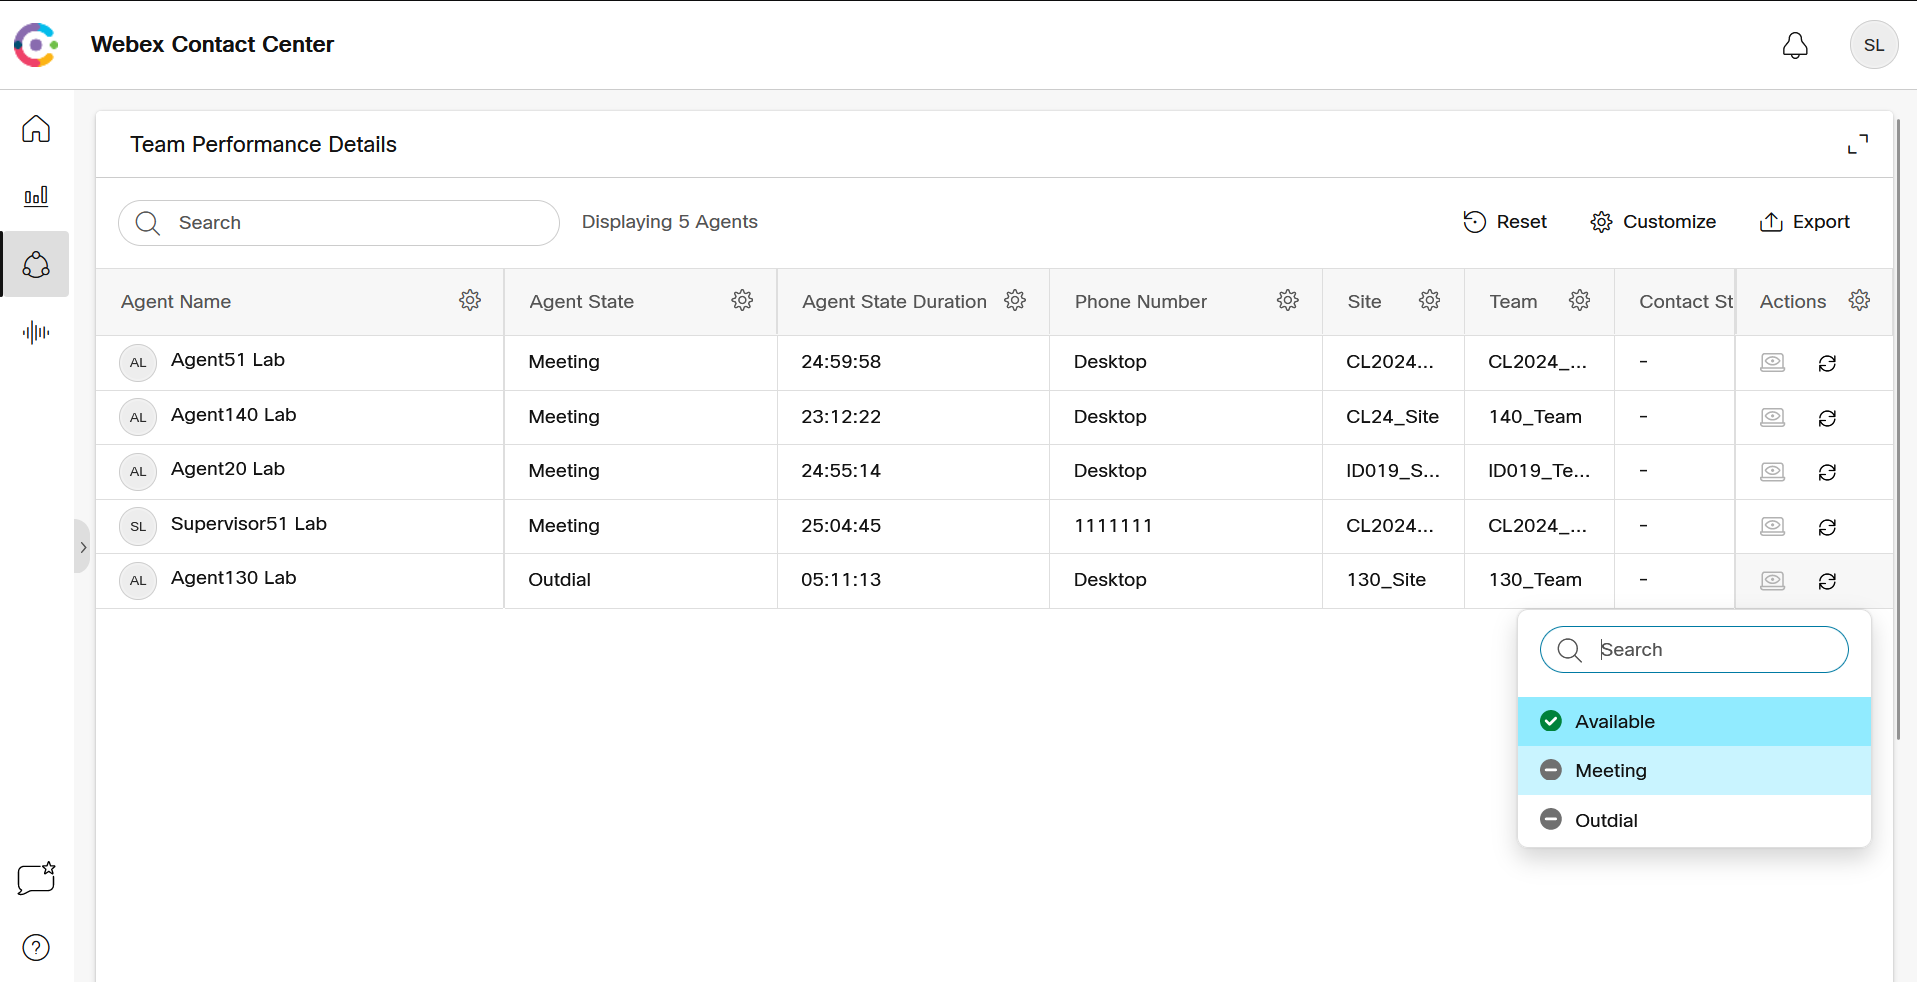
Navigate to Team Performance Details and you will see a list of all logged agents accross the Managed Teams.
-
Find your agent user and in the Actions column, click on
Change Agent Stateand choose the state where you want to move your agent.
- If you switch to Chrome browser, where you’re logged as an agent, you will see a notification message in the top.

- Now let’s see the recordings. Navigate to Recordings and you will see the list of all available recordings.
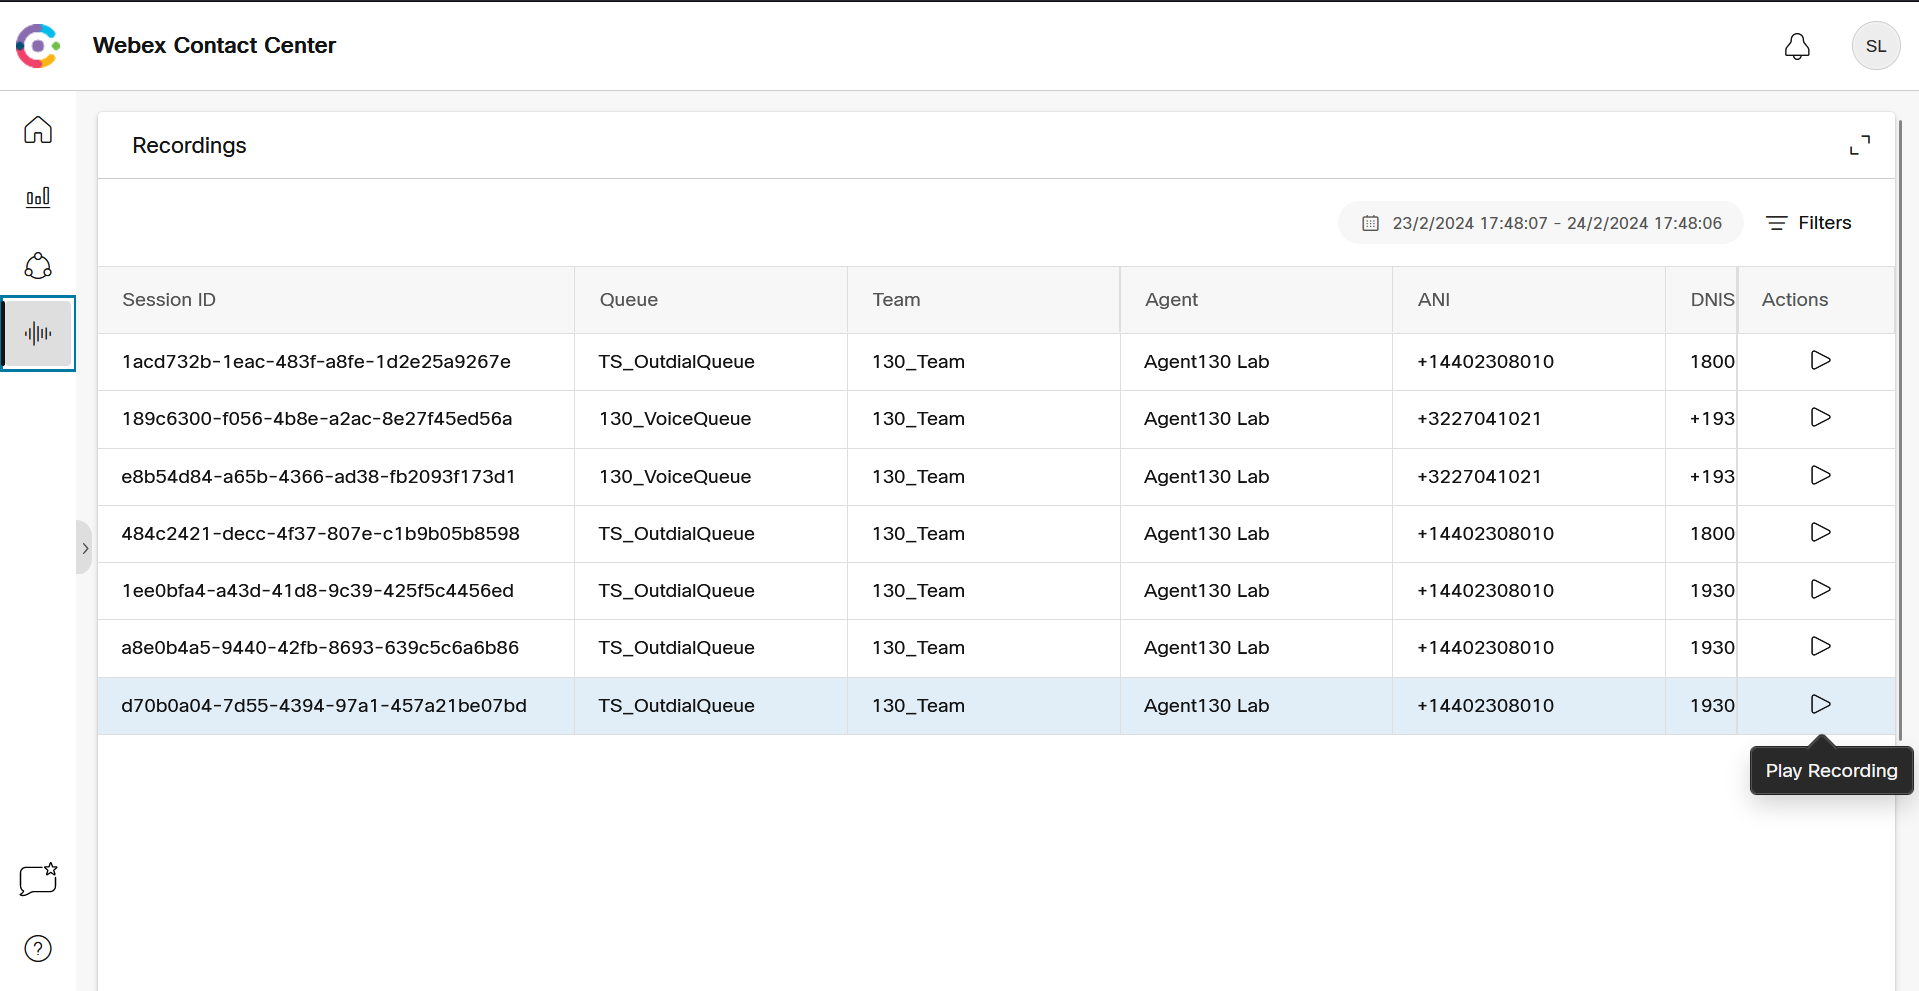
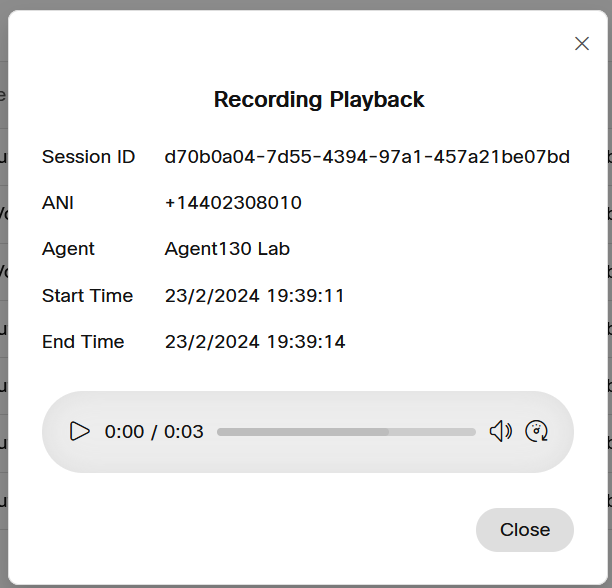
- Select any recording and in the Actions column, click on
Play Recording.
Congratulations, you have completed this lab! You can continue with the next one.
