CoreTrack Mission1
🚨 Important Lab Dependency
This mission requires configuration created in the following missions:
NO DEPENDENCY
Note
The input in the images that follow are only examples. They do not reflect the input you need to use in the lab exercises. In some cases, the input in the images may not follow the same attendee or pod ID from previous images. They are for representation only
Story
Imagine calling a contact center, seeking quick, personalized help. Behind the scenes, a flow smoothly routes your call based on your needs.
Call Flow Overview
- A new call enters the flow. (This initiates the interaction and triggers the defined call-handling process.)
- The flow determines the caller's language preference and plays a preconfigured Text-to-Speech (TTS) prompt. (This ensures the caller receives information in their preferred language.)
- The call is routed to the appropriate queue. (This directs the caller to the right team on the flow logic.)
Mission Details
Your mission is to:
- Configure key flow elements for efficient caller journeys.
- Explore Flow Templates to streamline flow creation.
- Set up routing with conditions, such as language preference.
- Gain the skills to design flows for real-world scenarios.
Why Flow Templates? [Optional]
Flow Templates in Webex Contact Center are an essential feature for flow developers, offering a range of benefits that streamline the development process and enhance the efficiency and consistency of flow creation. Here’s what they bring to the table:-
Consistency and Standards: Templates ensure that flows adhere to best practices, creating consistent experiences across multiple projects.
-
Time Savings: Prebuilt structures reduce the need to start from scratch, enabling faster setup and allowing more focus on customization.
-
Reduced Errors: Using tested templates lowers the risk of mistakes and minimizes troubleshooting.
-
Easy Onboarding: New developers or partners can learn quickly by using templates as guides.
-
Scalability: Templates allow developers to replicate and adapt solutions efficiently across different flows or deployments.
-
Innovation: Developers can spend more time on unique features and integrations rather than reconfiguring basics.
Flow Templates are designed to empower developers, speed up the development lifecycle, and maintain high-quality standards across flows, making them a core asset in Webex Contact Center flow design.
Build
-
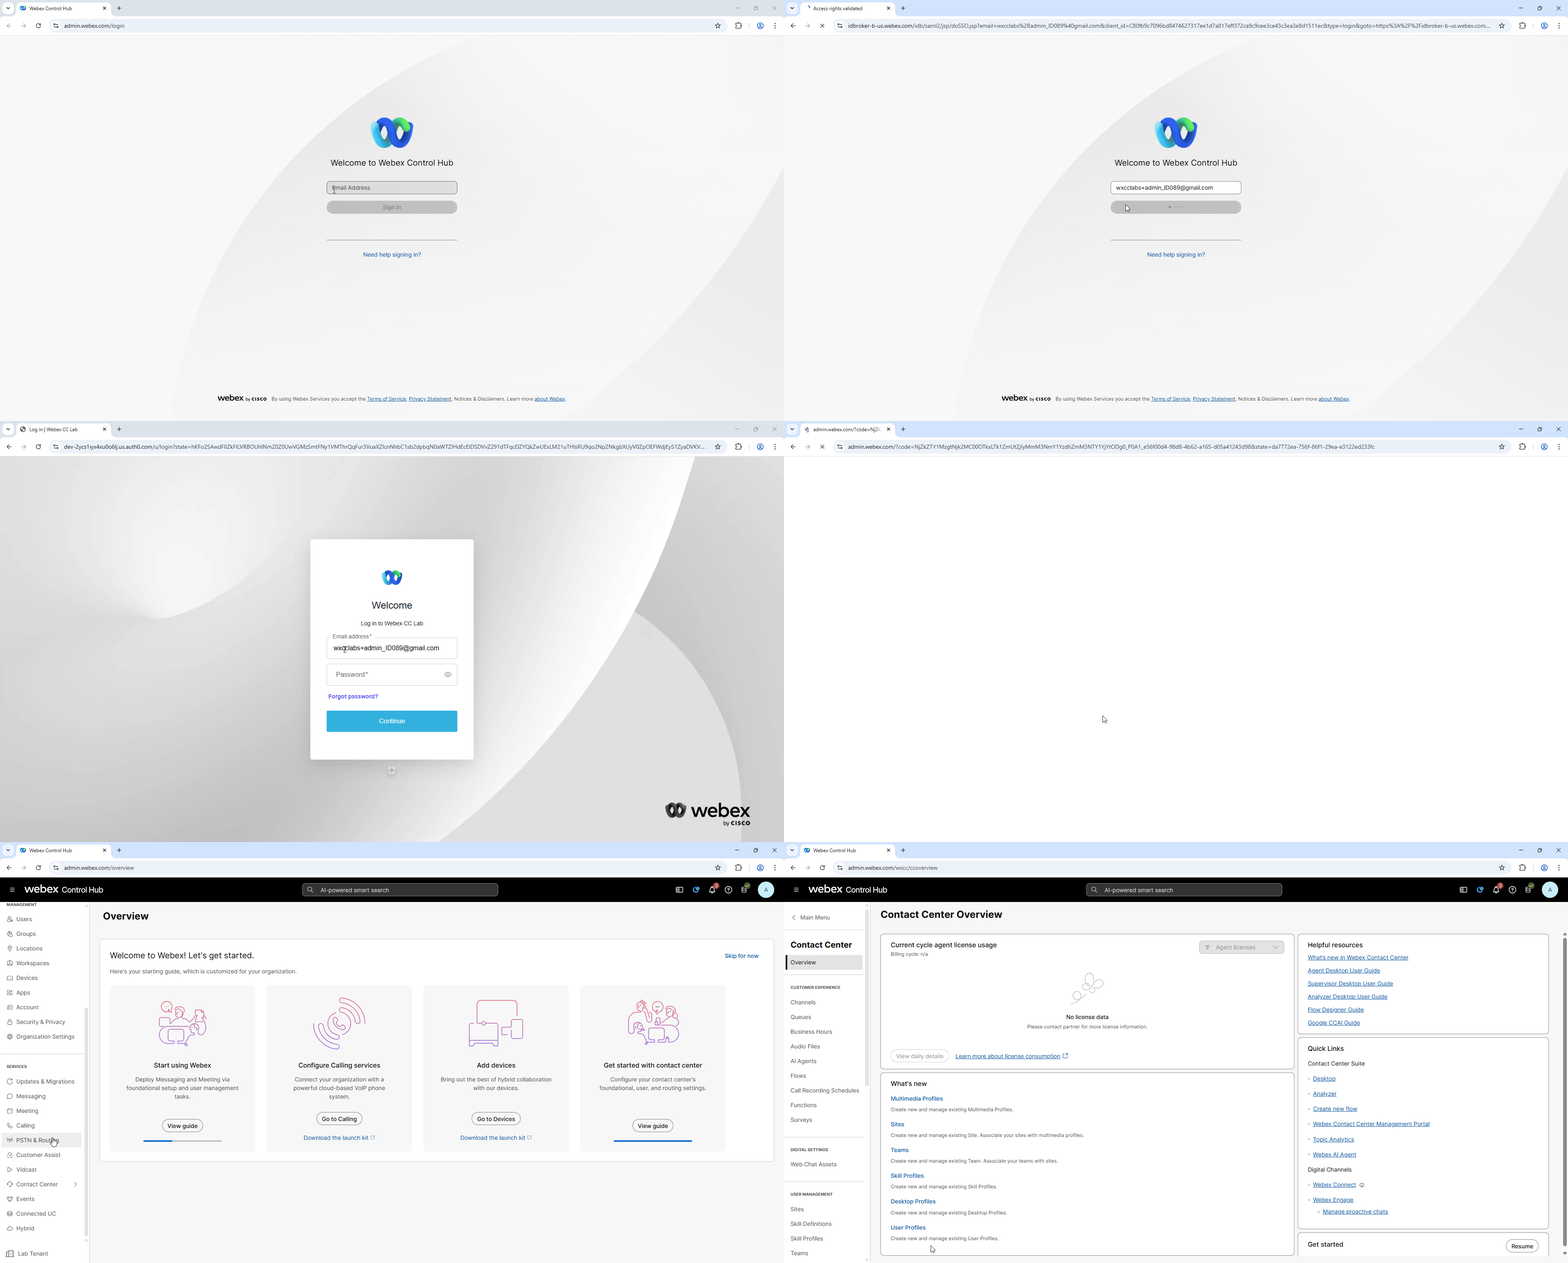
Login into Webex Control Hub by using your Admin profile. Your login will be of the format wxcclabs+admin_IDYour_Attendee_ID@gmail.com. You will see another login screen with Webex logo on it where you may need to enter the email address again and the password provided to you.
Note
Remember to take up the offer from Chrome to save your password
-
This is the Administration interface for Webex Contact Center and is also known as the Control Hub. Look for the contact center option in the left pane under SERVICES – Contact Center and click on it.
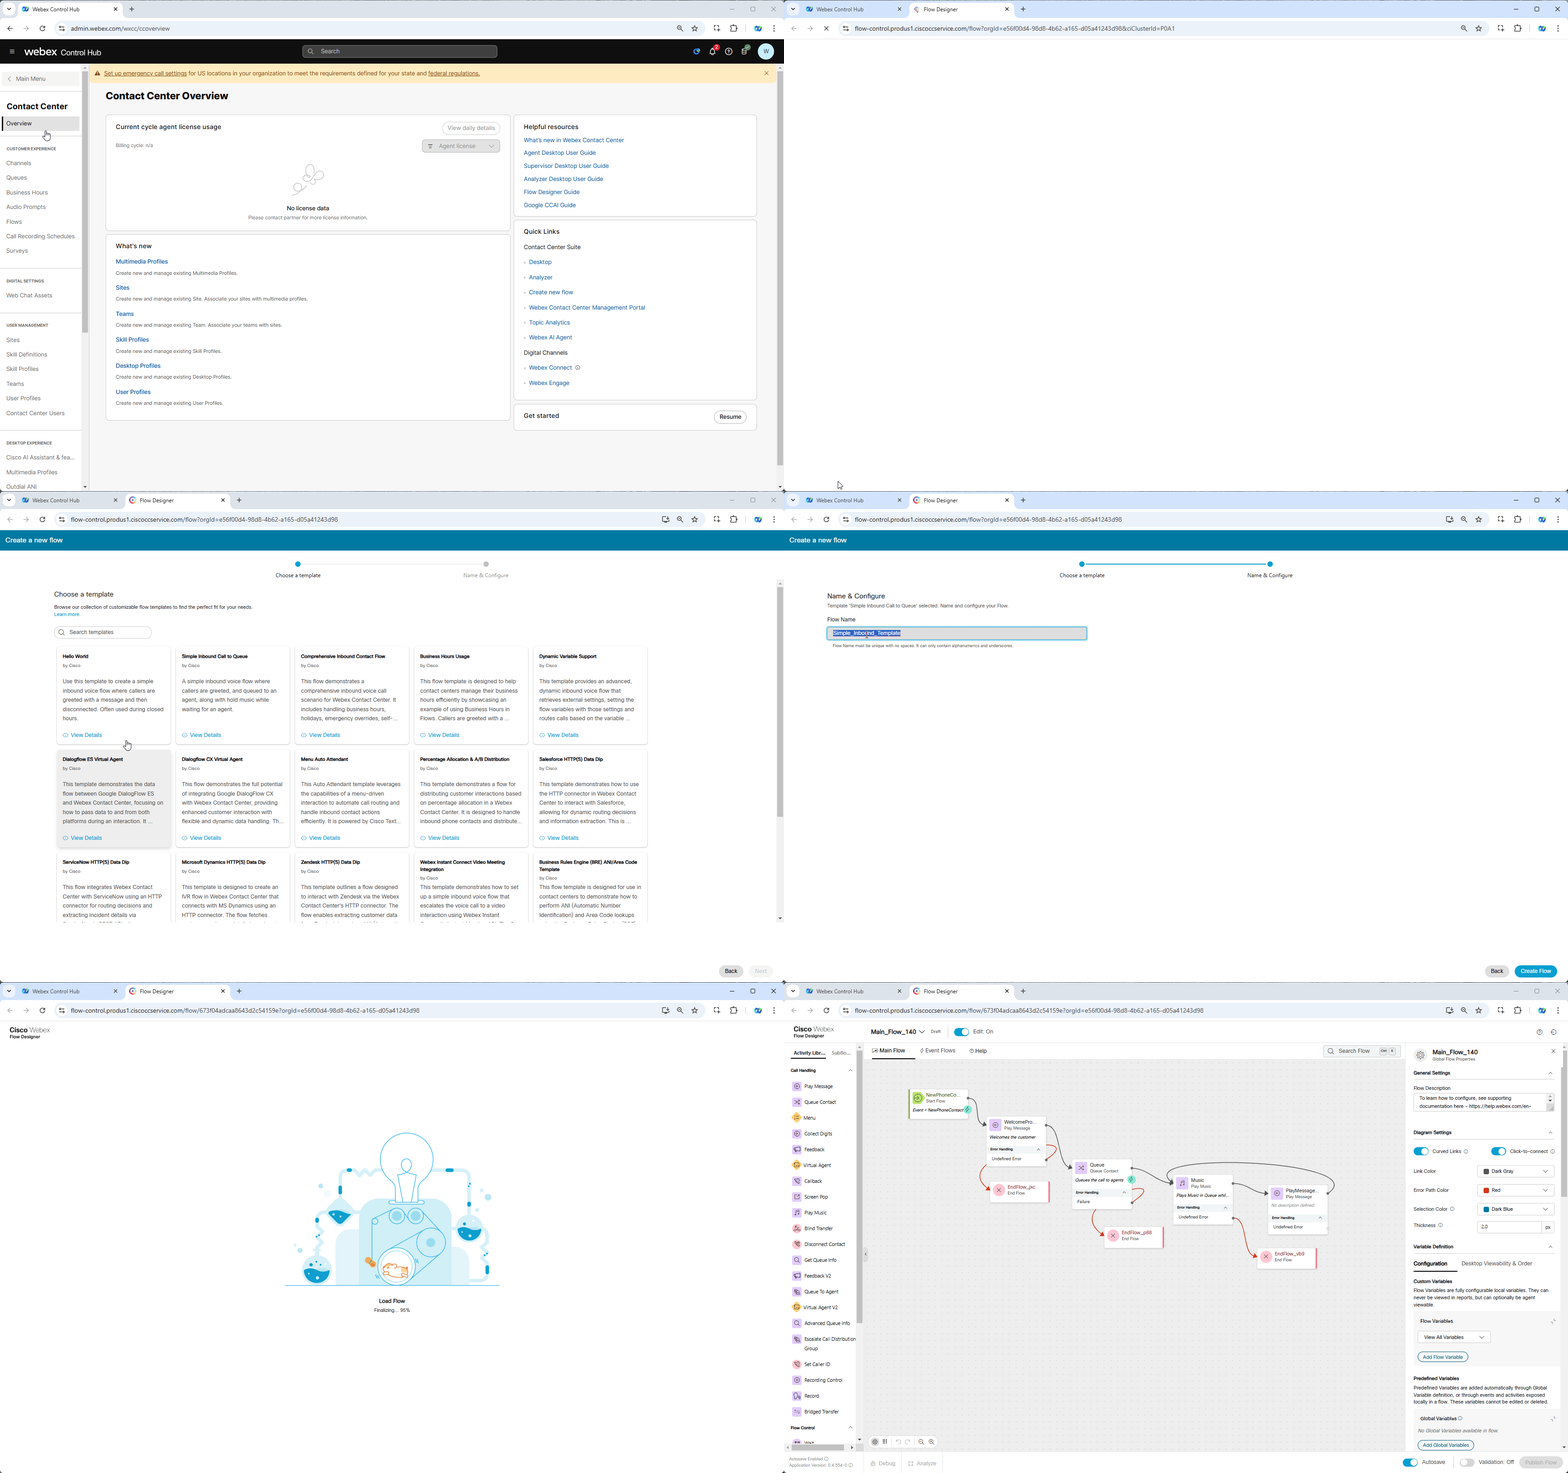
- Navigate to Flows, click on Manage Flows dropdown list and select Create Flows.
- Create a new flow tab will be opened. Navigate to Flow Templates.
-
Choose Simple Inbound Call to Queue template and click Next.
Note
You can press View Details link under the template name to observe flow structure and read flow description before proceeding with the template.
-
Name your flow as Main_Flow_Your_Attendee_ID Then click on Create Flow.
-
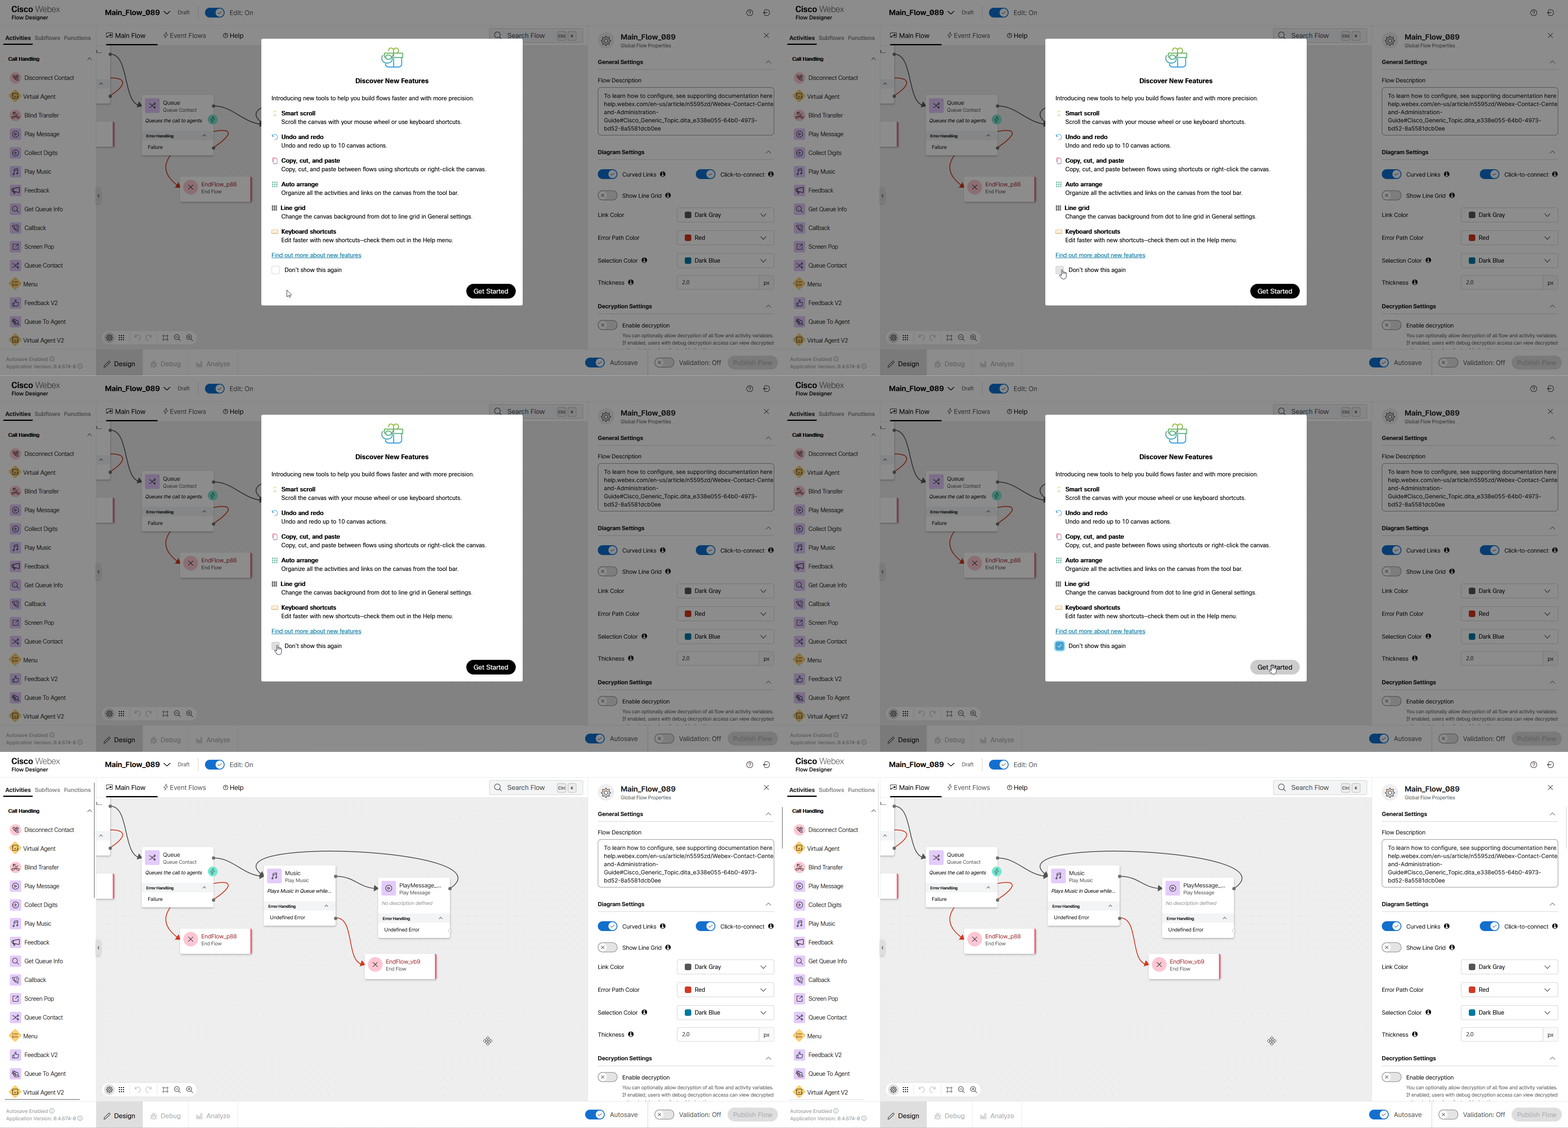
If Discover New Features popup window appears in front of flow canvas, set the checkbox Don't show this again at the bottom and press Get Started button to close it and and go to the flow designer.
Note
Edit should be set to On when you create new flow, but if not switch it from Edit: Off mode to Edit: On at the top of the page.
-
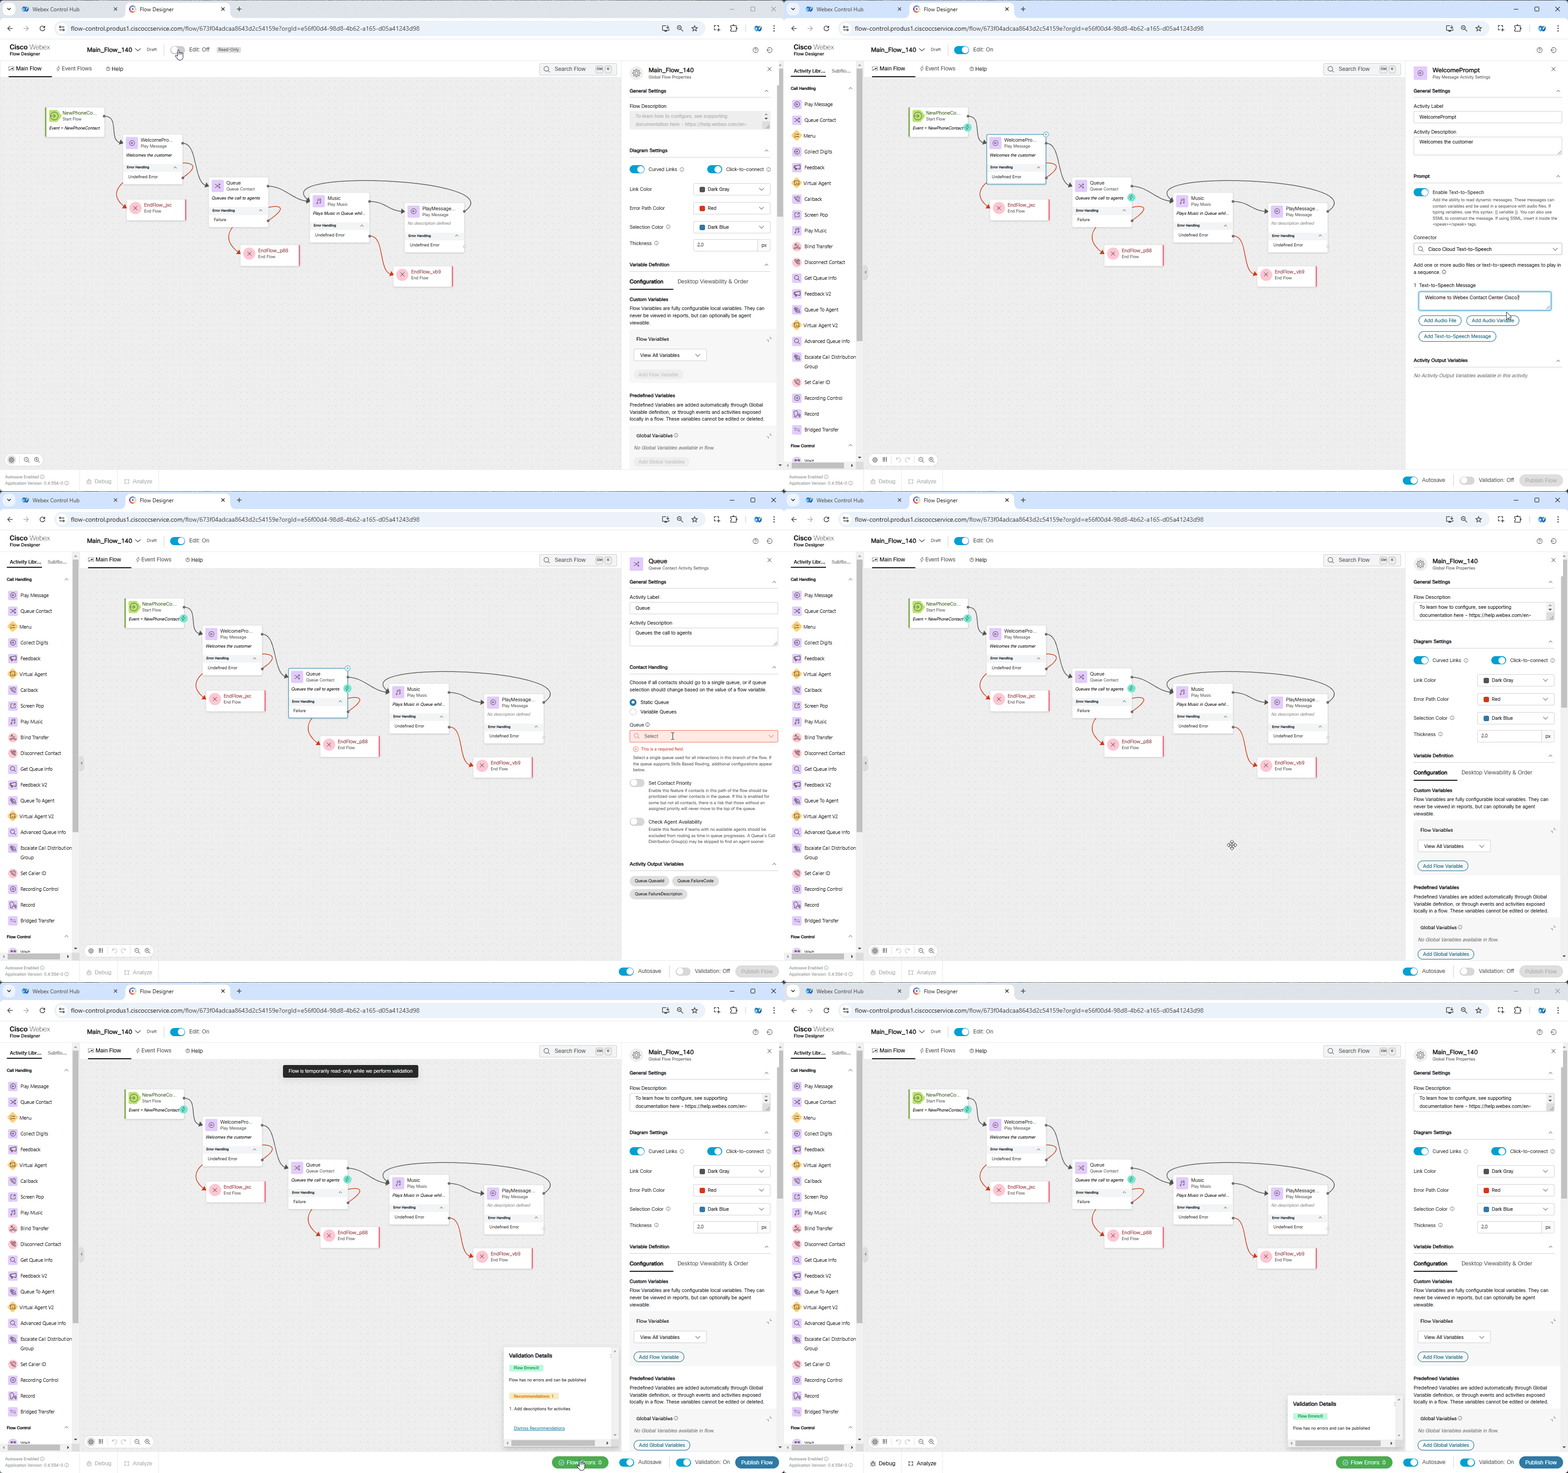
Select Play Message node with label WelcomePrompt and on the node settings modify Text-to-Speech Message to any greetings you like. This message will be the first message you hear while calling to your script.
-
Select Queue node. On the General settings keep Static Queue checked and select queue Your_Attendee_ID_Queue from the dropdown list
Note
As mentioned in Getting Started, all queues have been preconfigured so you don't need to change them at current step.
-
[Optional] Select Play Message node (the one which goes after Queue and Play Music nodes) and on the Node settings modify Text-to-Speech Message to any message you like. This message will be played while the caller is waiting in the queue.
-
Validate and publish the flow:
-
Enable the Validation toggle in the bottom right corner of the flow designer window to check for any potential flow errors and recommendations.
-
If there are no Flow Errors after validation is complete, click on Publish Flow next to it.
-
In the pop-up window, ensure that the Latest label is selected in the Add Version Label(s) list, then click Publish Flow.
-
-
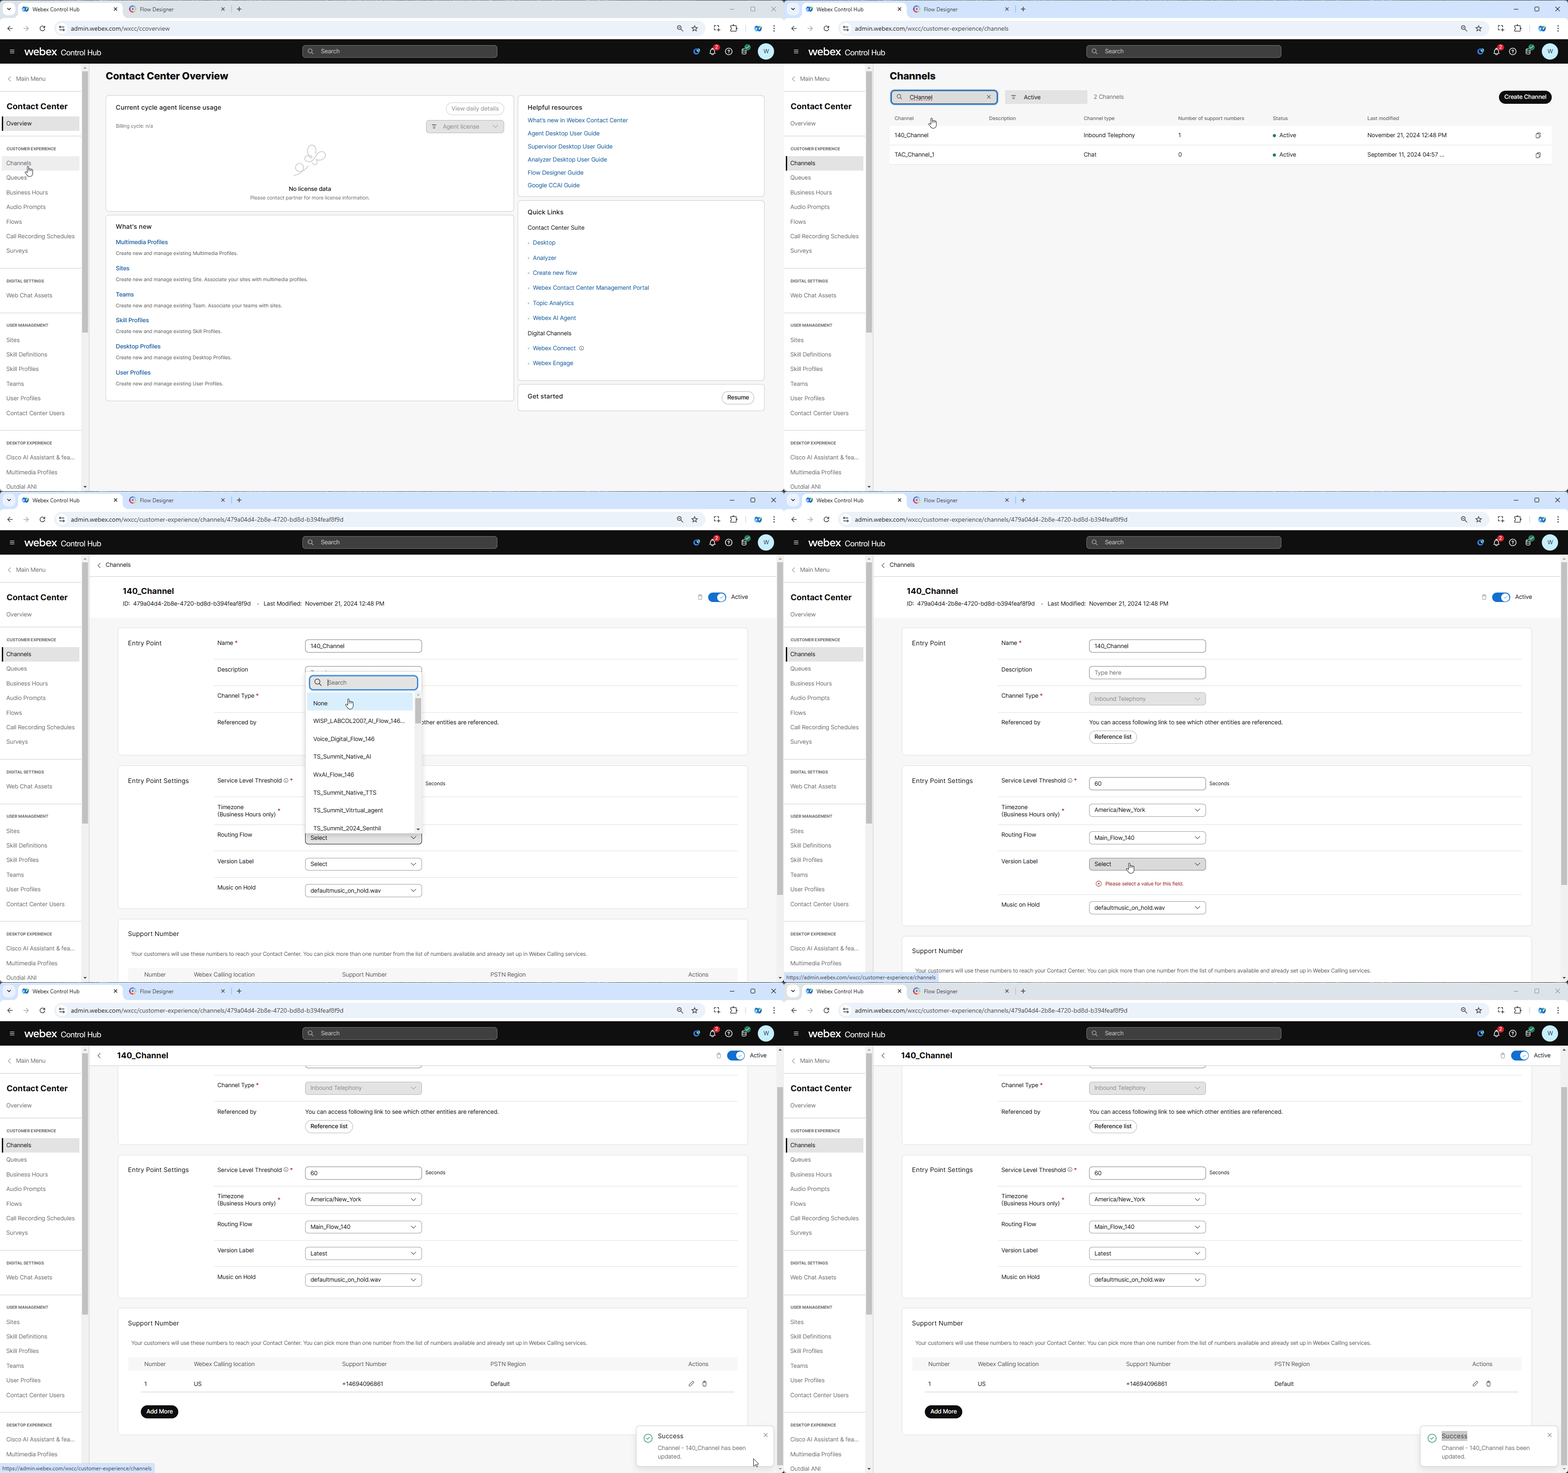
Return to Control Hub to assign the Flow to your Channel (Entry Point). Go to Channels, search for your channel Your_Attendee_ID_Channel
- Click on Your_Attendee_ID_Channel
-
In Entry Point settings section change the following, then click Save button:
-
Routing flow: Main_Flow_Your_Attendee_ID
-
Music on hold: defaultmusic_on_hold.wav
-
Version label: Latest
-
Checkpoint Test
-
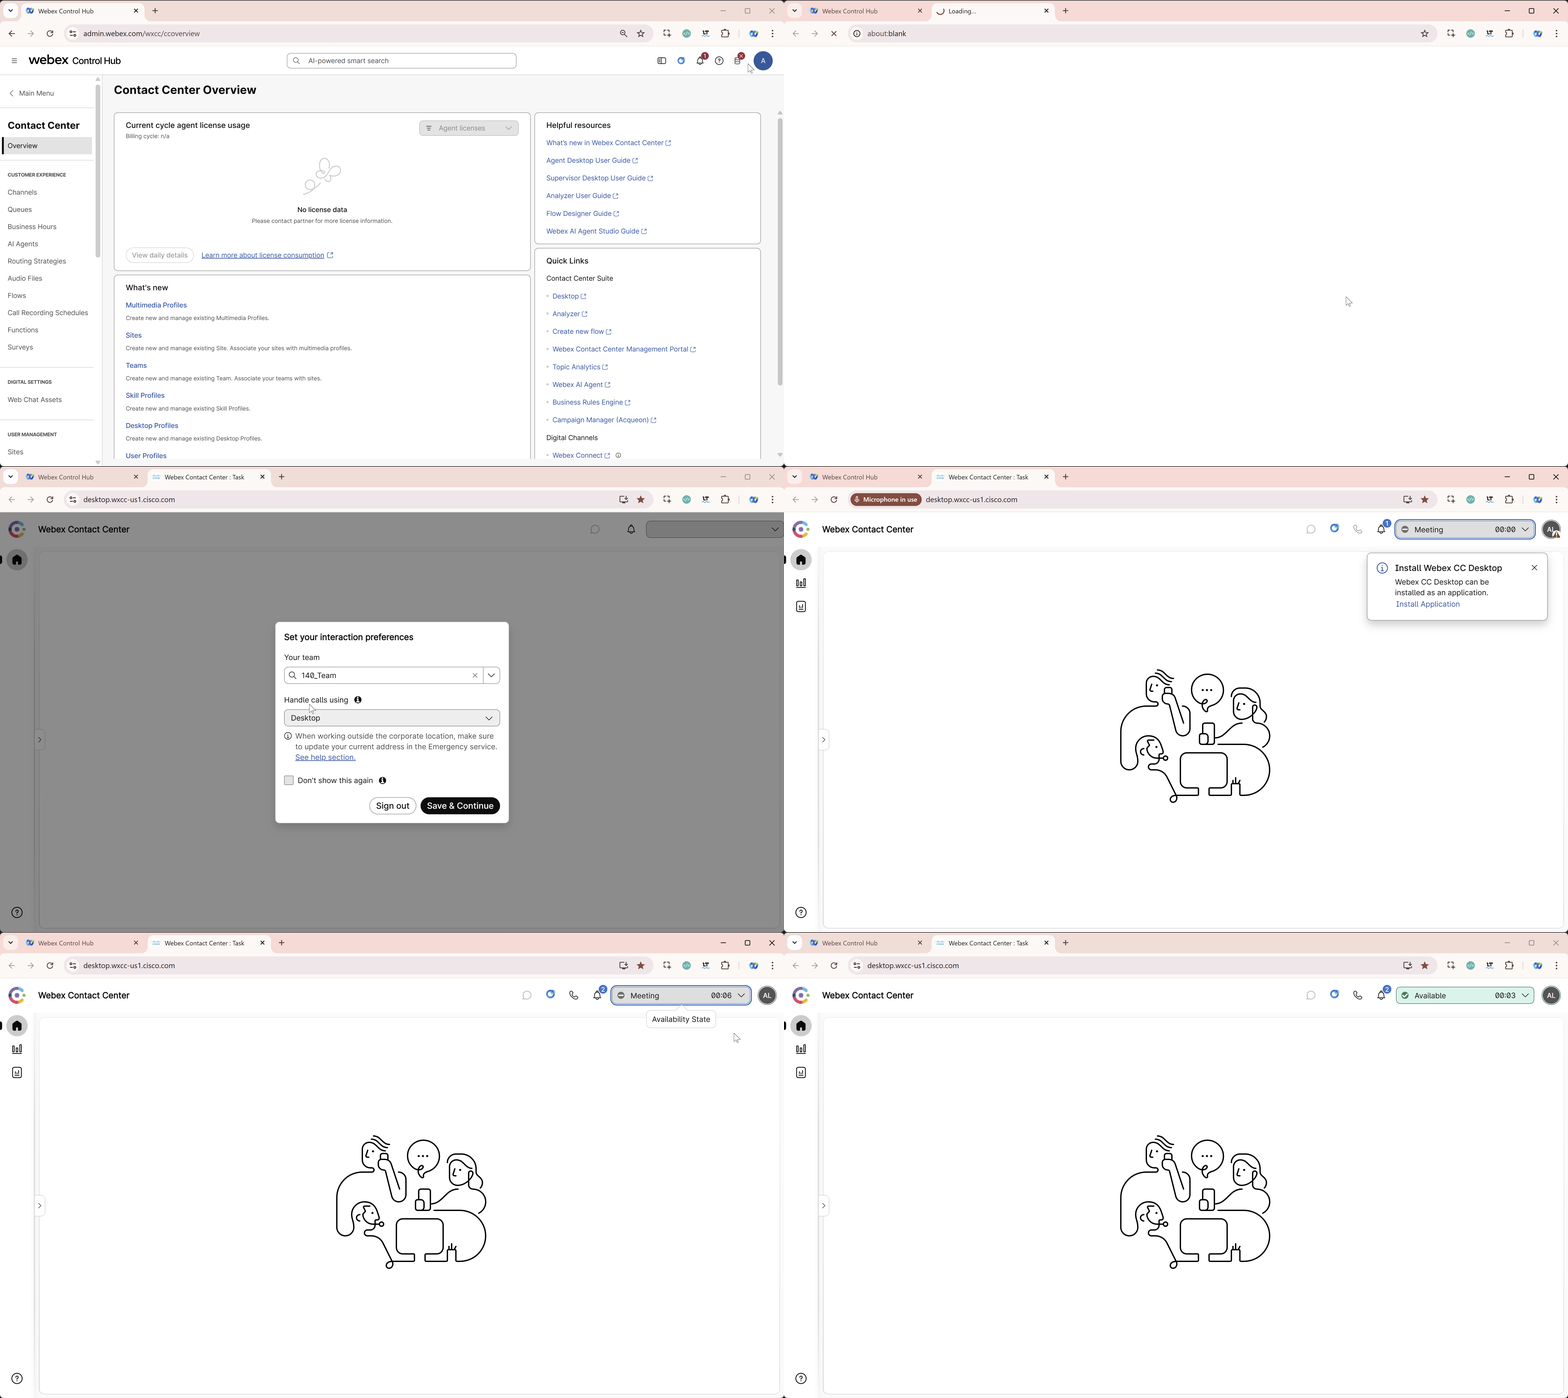
Launch Webex CC Desktop by clicking on Desktop cross-launch link in Control Hub.
-
Select Team Your_Attendee_ID_Team. Click Submit.
-
Allow notifications and browser to access Microphone by clicking Allow in the relevant pop-up prompts.
-
Make your agent Available and you're ready to make a call.
Note
-
Remember that your wxcclabs+admin_IDYour_Attendee_ID@gmail.com admin user has a Premium Agent license assigned, hence can play 2 roles in your lab.
-
This is the only time during the lab when you need to log in to Webex Contact Center Desktop. The system is configured to keep your agent session active for the entire duration of the lab.
-
If you are logged out for any reason (for example, due to a network issue, manual logout, or closing the browser tab), launch Desktop using the cross-launch link from Control Hub, as described above.
-
-
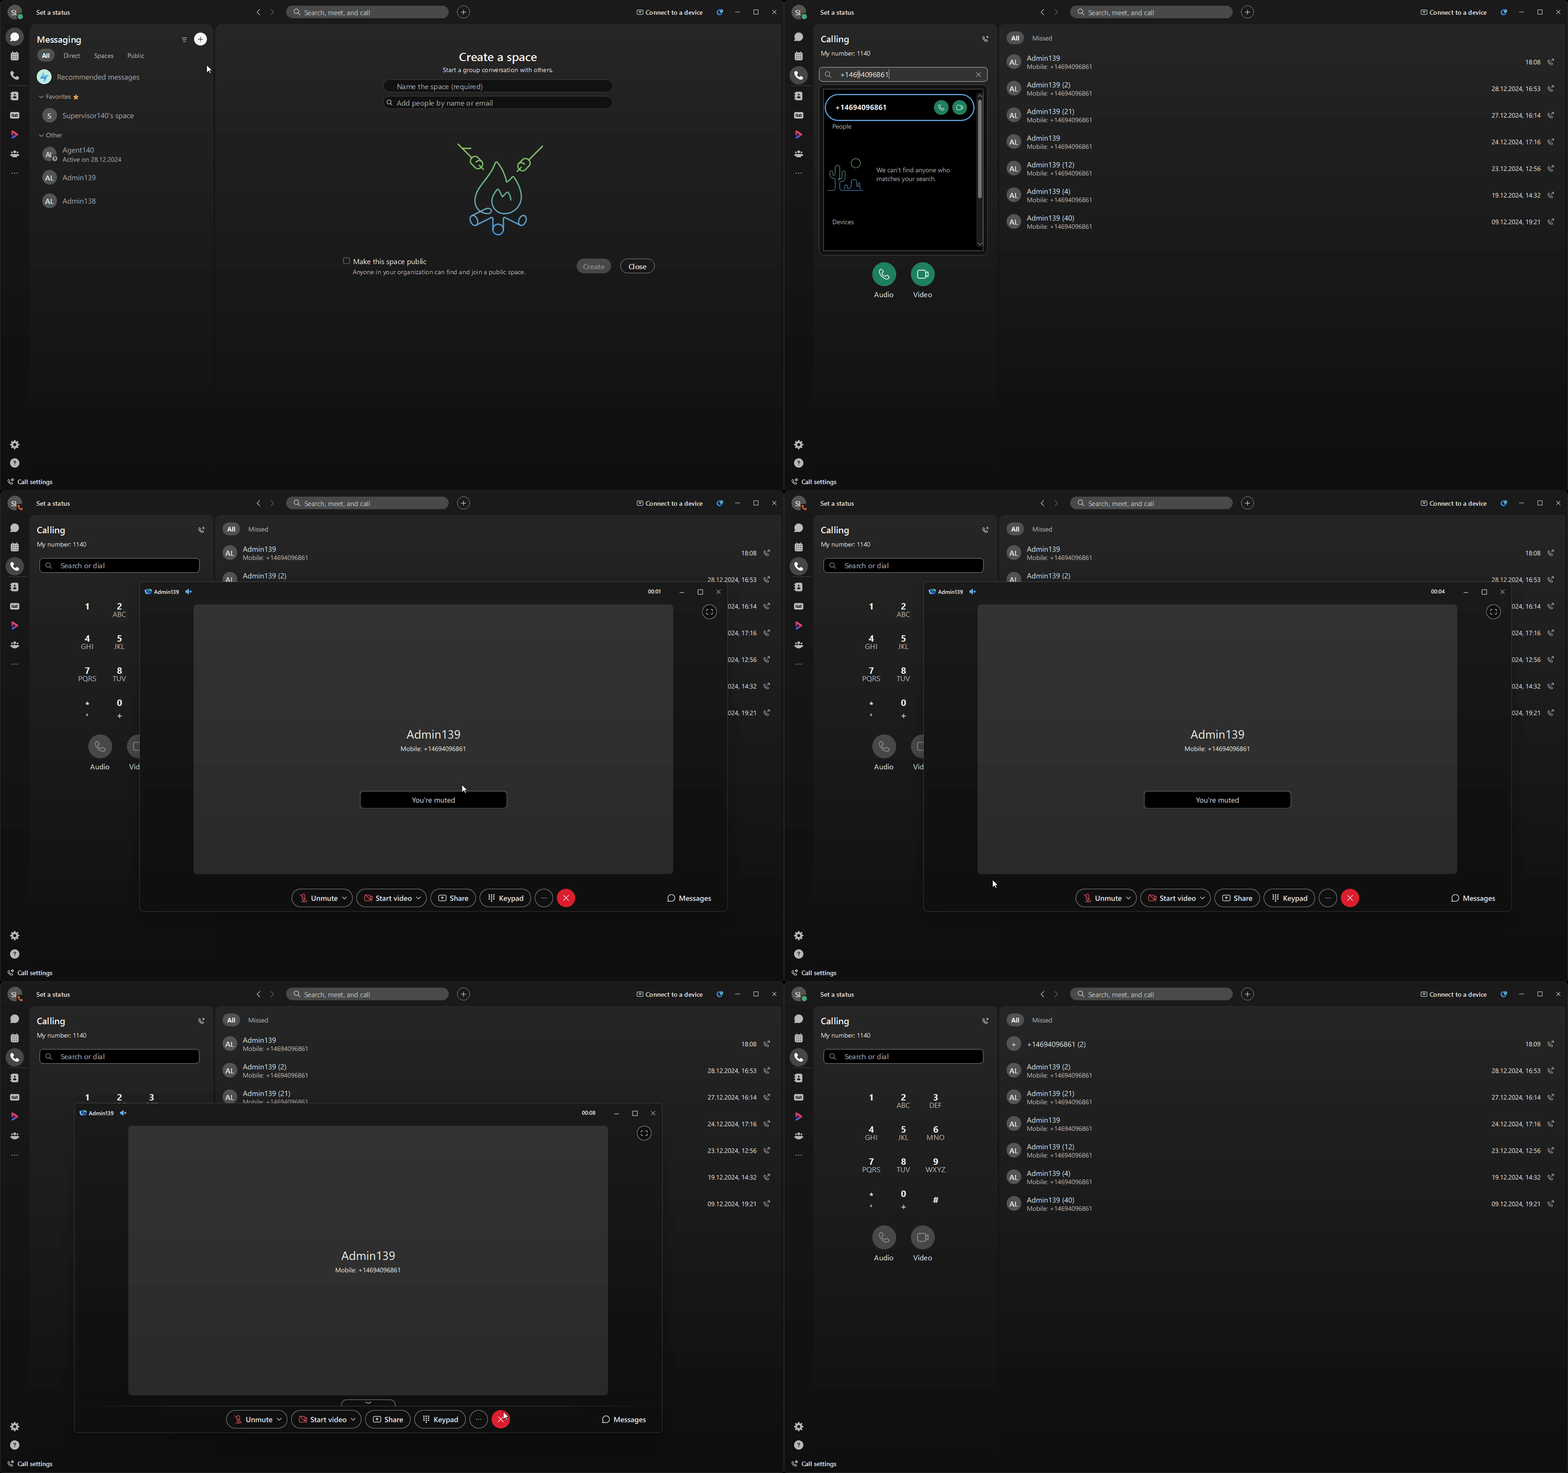
Open your Webex App and dial the Support Number provided to you, which is configured in your Your_Attendee_ID_Channel configuration.
-
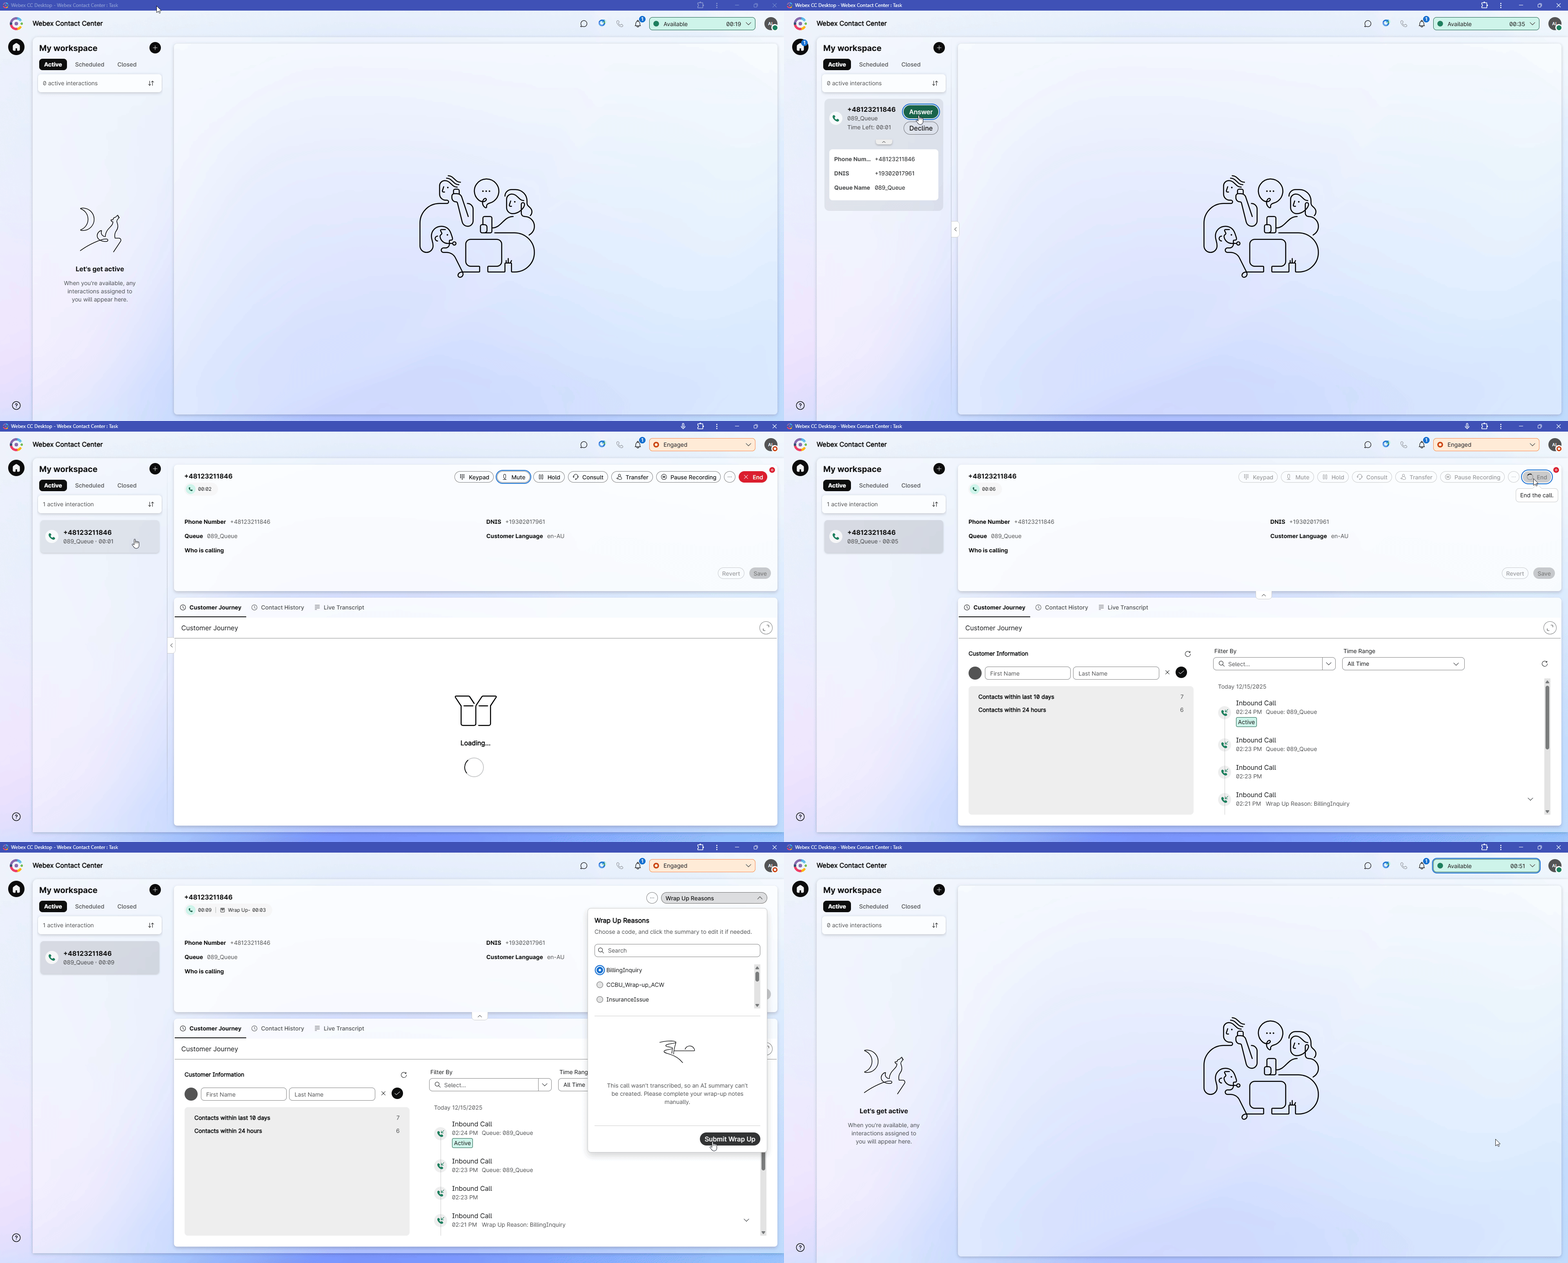
Ensure that you hear a welcome prompt configured in your flow and receive an incoming call in your agent desktop. Answer the call in the agent desktop and confirm that it has been successfully established. Then end the call, select any value from the Wrap Up Reasons dropdown list on the agent desktop, and press the Submit Wrap Up button.
Enhance you flow with Language and Voice Name
Enhancement Details
Your mission is to:
- Use the same flow created in the previous section.
- Add Language and Voice Name global variables to the flow.
- Modify Text-To-Speech (TTS) settings to use Australian English language and Male Voice.
- Place a call to verify and validate the speech functionality.
Text-to-Speech (TTS) in Webex Contact Center [Optional]
All supported TTS Languages and Voice Names can be found in the table here: Text-to-Speech-(TTS)-in-Webex-Contact-CenterBuild
-
Open your flow Main_Flow_Your_Attendee_ID. Make sure Edit toggle is ON.
-
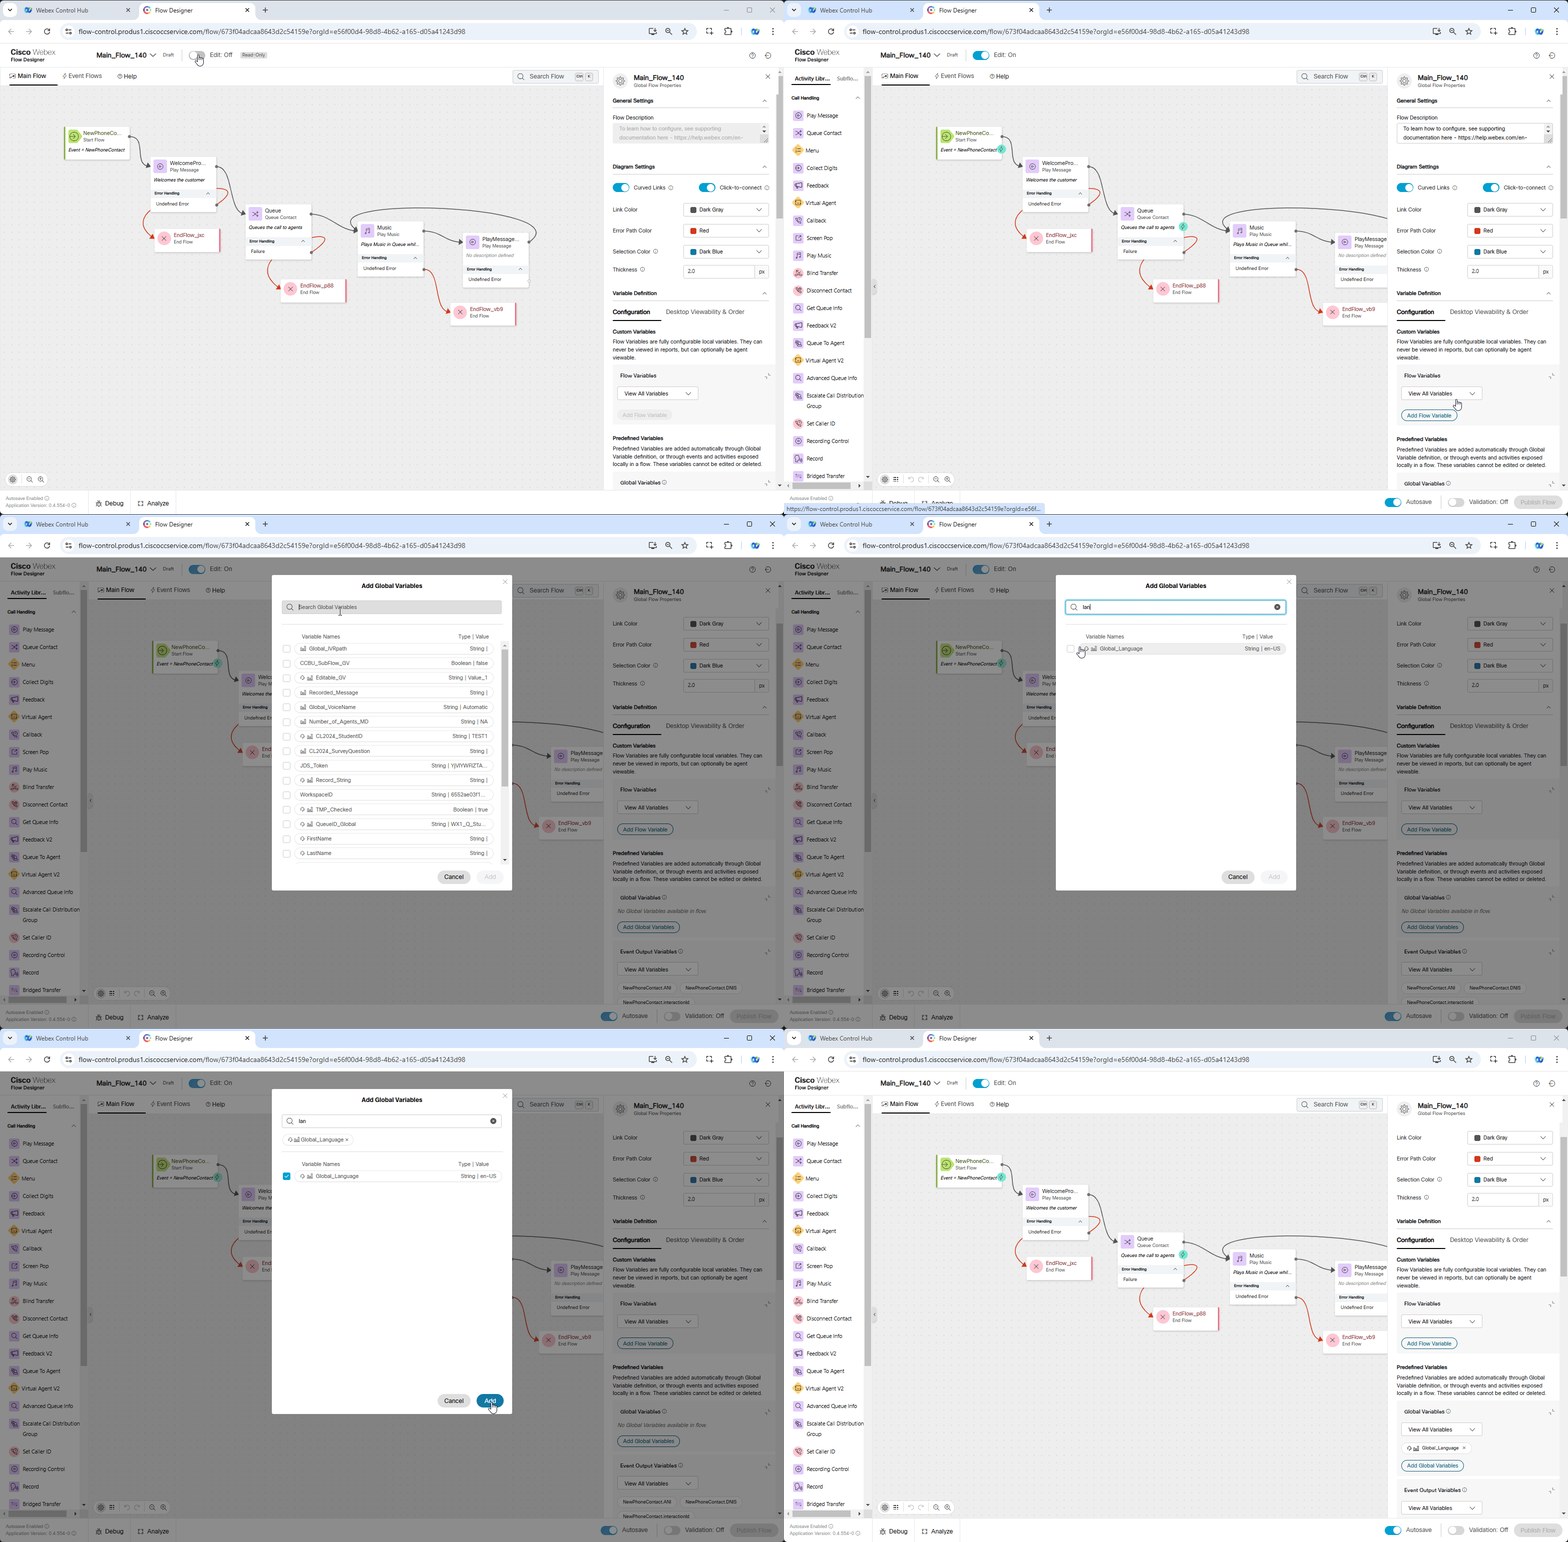
Navigate to the Global Flow Properties panel on the right-hand side.
-
Scroll down and Locate the Predefined Variables section.
-
Click on the Add Global Variables button.
-
Search for Global_Language variable and click on Add button.
-
Click on the Add Global Variables button one more time.
-
Search for Global_VoiceName variable and click on Add button.
-
-
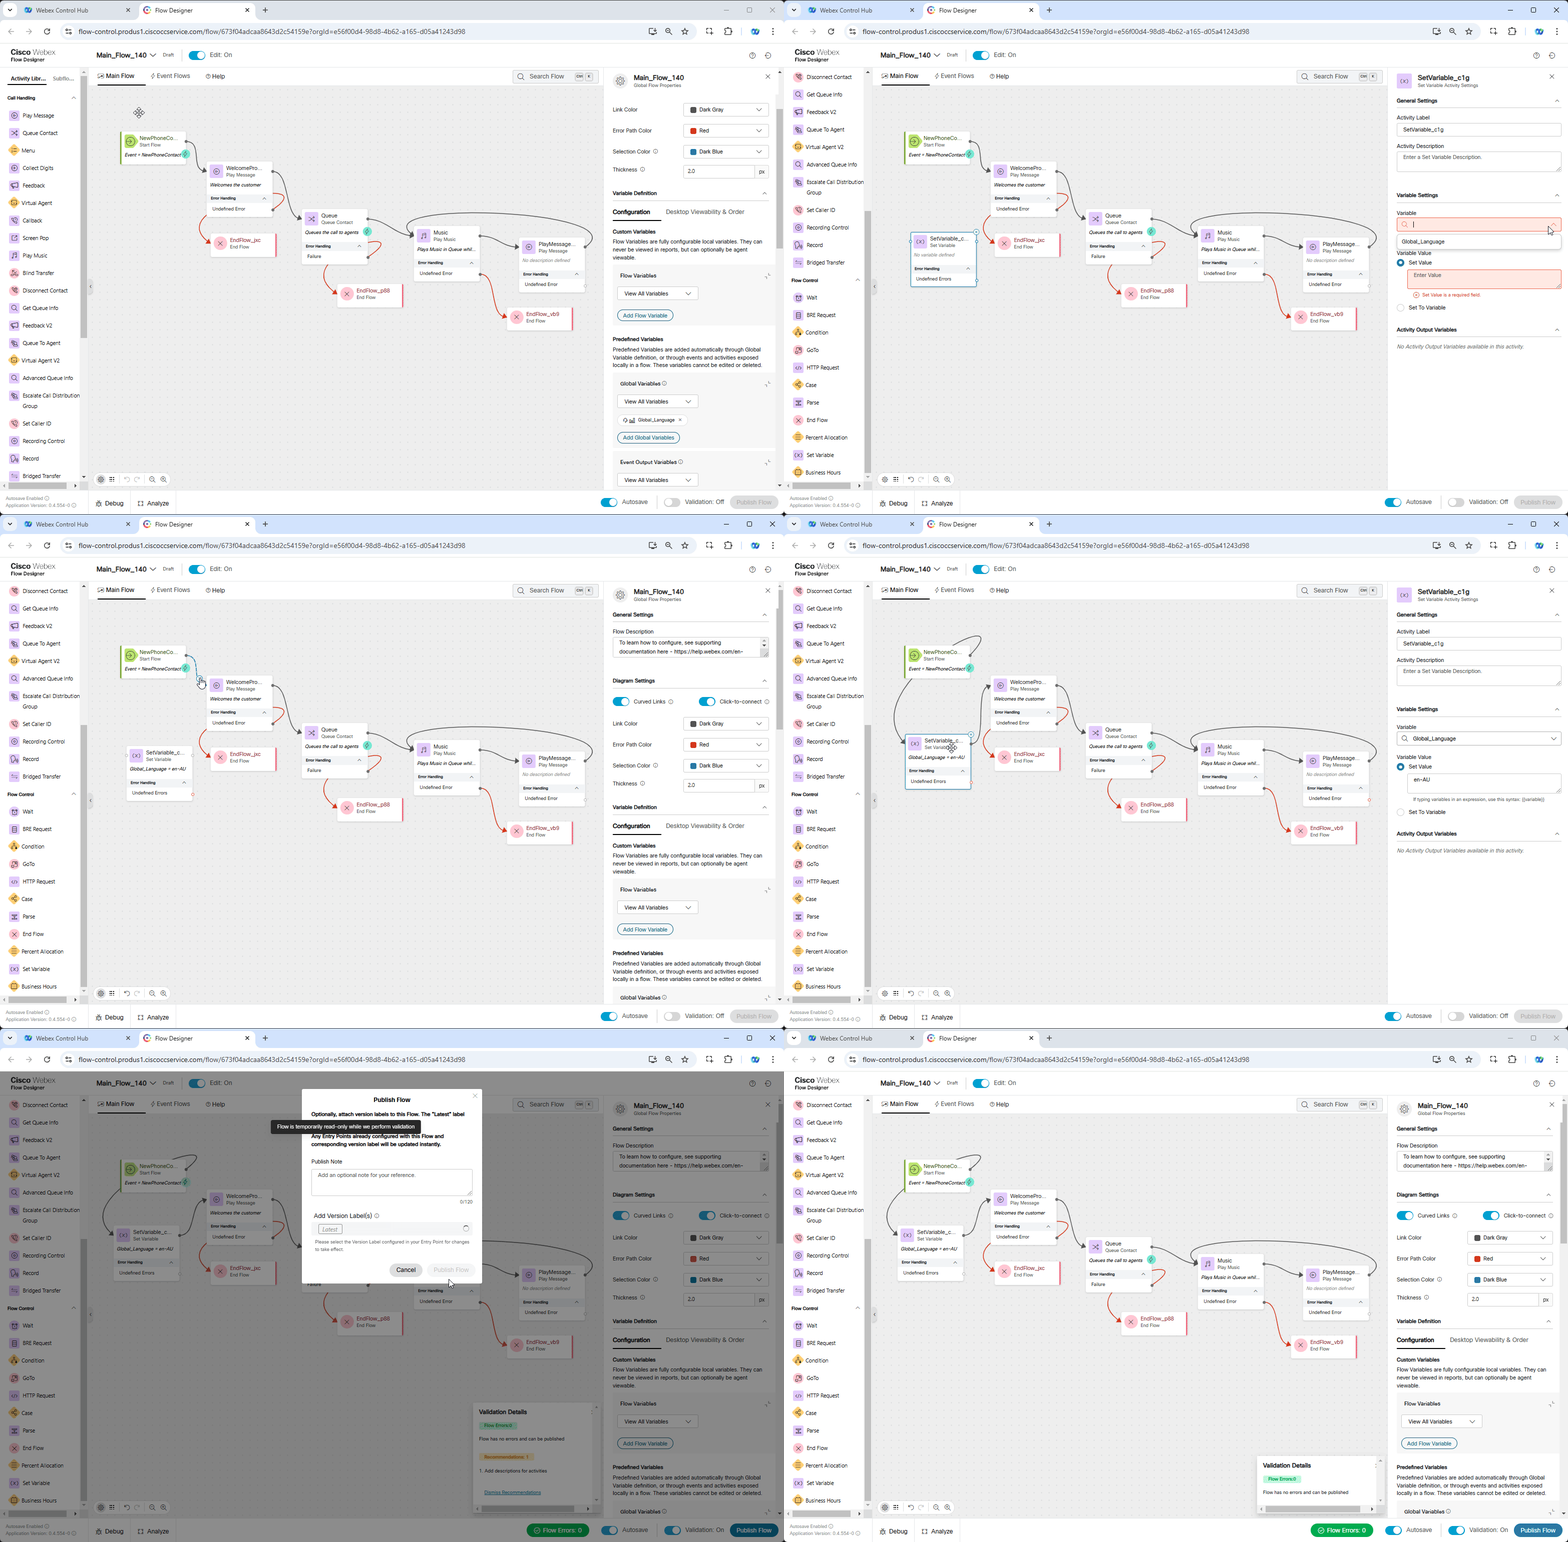
Add a Set Variable node from the activity library on the left with following configuration:
-
Navigate to the Variable Settings section.
-
Click on the Variable drop-down list and select Global_Language.
-
Set Value: en-AU.
-
Click on the + Add New button under the variable you have just added to add another one.
-
Click on the Variable drop-down list and select Global_VoiceName.
-
Set Value: en-AU-Chris.
-
Return to the flow canvas and delete connection between NewPhoneContact and WelcomePrompt nodes.
-
Connect NewPhoneContact to Set Variable.
-
Connect Set Variable to WelcomePrompt.
-
-
Validate and publish the flow:
-
Enable the Validation toggle in the bottom right corner of the flow designer window to check for any potential flow errors and recommendations.
-
If there are no Flow Errors after validation is complete, click on Publish Flow next to it.
-
In the pop-up window, ensure that the Latest label is selected in the Add Version Label(s) list, then click Publish Flow.
-
Testing
-
Open your Webex Desktop and make your agent is Available, and you're ready to make a call.
-
Open your Webex App and dial the Support Number provided to you, which is configured in your Your_Attendee_ID_Channel configuration.
-
Listen to the welcome prompt to confirm the TTS language and voice have changed.
Congratulations, you have succesfully completed Basci Call Routing mission! 🎉🎉