CoreTrack Mission2
🚨 Important Lab Dependency
This mission requires configuration created in the following missions:
If this mission was not completed, some steps in current mission will not function correctly.
Story
Skill-Based Routing (SBR) intelligently matches customer contacts with agents who have the specific expertise needed (e.g., language, product knowledge, service level), using configurable skill requirements and relaxation rules to ensure the best fit, which improves resolution and satisfaction by avoiding simple "first-available" routing.
This mission focuses on enhancing customer satisfaction by enabling Skill-Based Routing in Webex Contact Center call flow to direct the call to the qualified agent. At the same time, we will look into the effectiveness of skill relaxation rules to reduce the waiting time for callers if all more qualified agents are busy.
Call Flow Overview
- A new call enters the flow.
- The flow executes the logic and places the call into a skill-based queue, applying the skill requirements and relaxation rules defined for the queue.
- Once the call is placed in the queue, the following logic applies:
- If there is an available agent with matching skills, the call is routed to that person.
- If there are no available agents with matching skills, the call waits in the queue until the skill-relaxation rule is applied.
- If the skill-relaxation rule is applied, it lowers the skill requirements for the call, and Webex Contact Center starts looking for an agent using the updated requirements.
- If there is an available agent with matching skills, the call is routed to that person.
Mission Details
Your mission is to:
- Switch to a skill-based queue and define the skill requirement for it.
- Configure a skill relaxation rule to lower skill requirement after a time interval.
- Make test calls and verify the agent selection logic before and after skill relaxation.
Note
The Skill Definition and Skill Profile are preconfigured for you and linked to your agent account. Your task is to focus on configuring the flow and ensuring the agent is selected properly depending on current skill requirements.
Preconfigured entities
- Skill Definition: Webex CC Lab Expert.
- Skill Profile: Webex CC Lab Skill Profile with Webex CC Lab Expert skill set as 5.
- Skill Profile is associated with your agent account wxcclabs+agent_IDYour_Attendee_ID@gmail.com.
Part 1 - Add Skill-Based Queue
Build
-
Switch to the Flow Designer tab with your Main_Flow_Your_Attendee_ID, make sure Edit toggle is ON.
Note
If you closed browser tab with Flow Designer before, switch to Webex Control Hub. Look for the contact center option in the left pane under SERVICES – Contact Center and click on it. Then navigate to Flows, search for your flow Main_Flow_Your_Attendee_ID and click on it to open it in the flow designer.
-
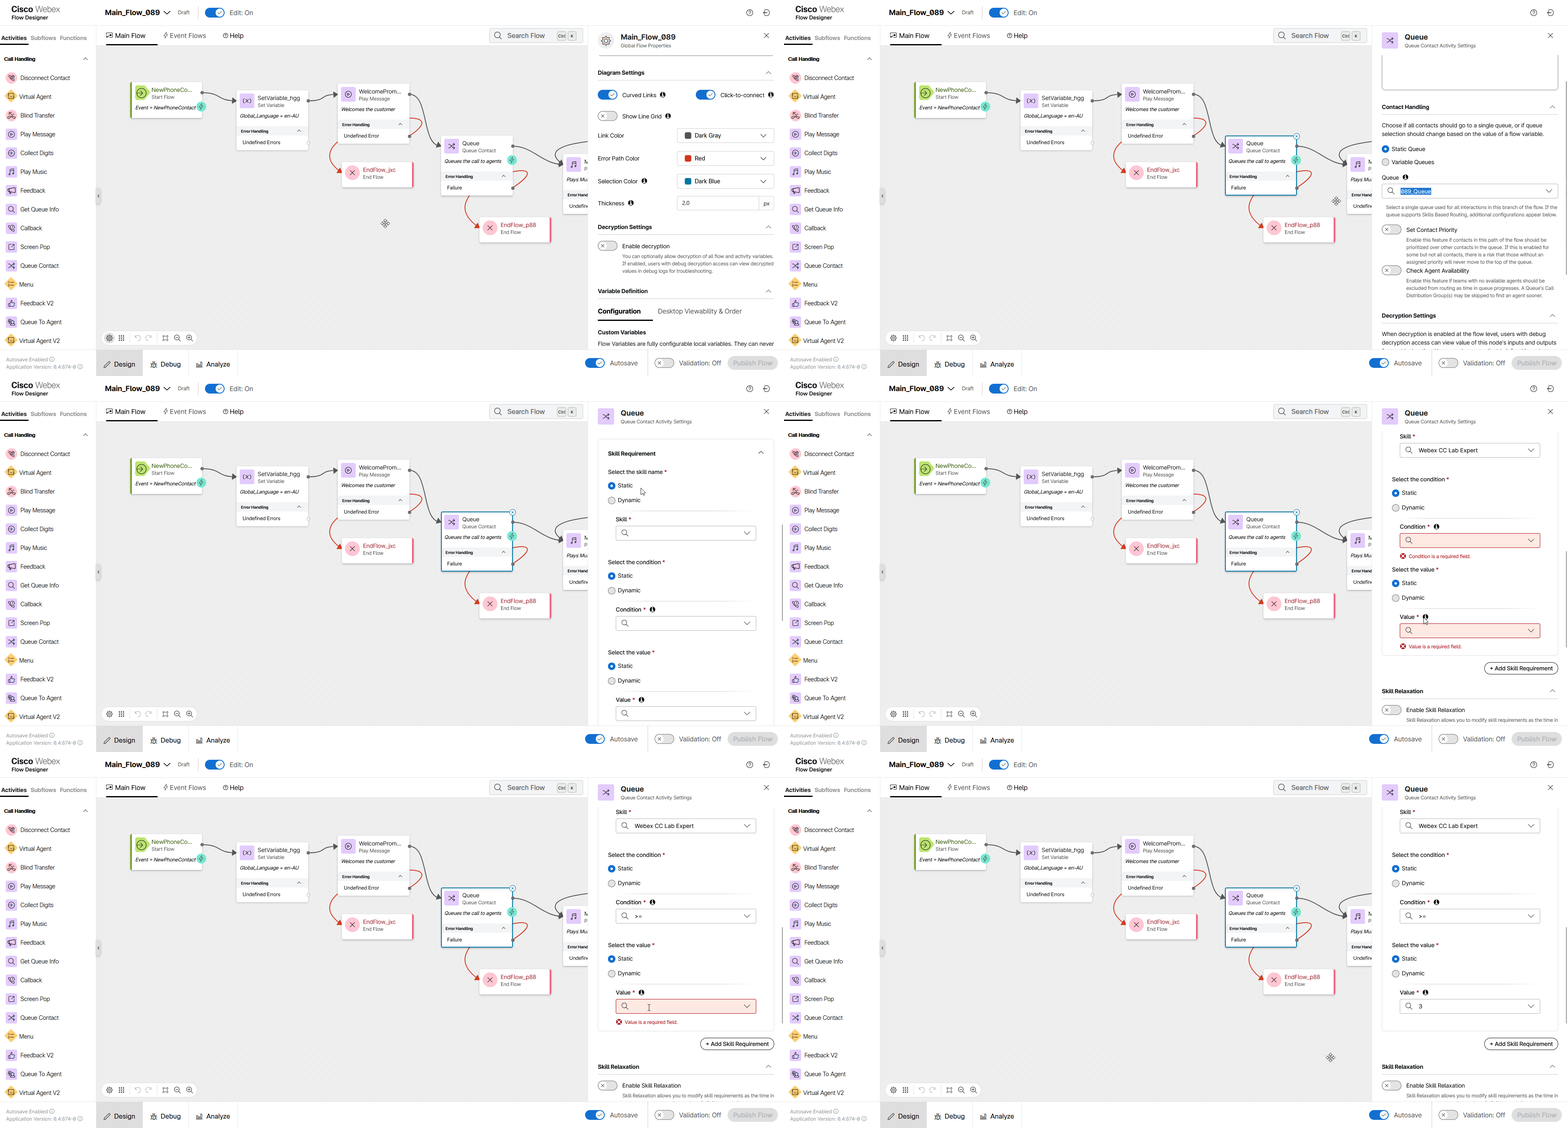
Click on Queue node and select Your_Attendee_ID_SBR_Queue Then scroll down to the Skill Requirements section and configure the following fields in the Skill Requirement block:
-
Select the skill name: Static
-
Skill (drop-down list): Webex CC Lab Expert
-
Select the condition: Static
-
Condition (drop-down list): >=
-
Select the value: Static
-
Value (drop-down list): 3
-
-
Validate and publish the flow:
-
Enable the Validation toggle in the bottom right corner of the flow designer window to check for any potential flow errors and recommendations.
-
If there are no Flow Errors after validation is complete, click on Publish Flow next to it.
-
In the pop-up window, ensure that the Latest label is selected in the Add Version Label(s) list, then click Publish Flow.
-
Checkpoint Test
Note
The skill requirement we have set for Your_Attendee_ID_SBR_Queue is applied to every call that lands in that queue.
Since we set the requirement Webex CC Lab Expert >= 3 and the current value of Webex CC Lab Expert skill configured under the skill profile Webex CC Lab Skill Profile assigned to your agent account is 5, the agent meets skill requirement for the call and should be selected to take it.
Let's test this.
-
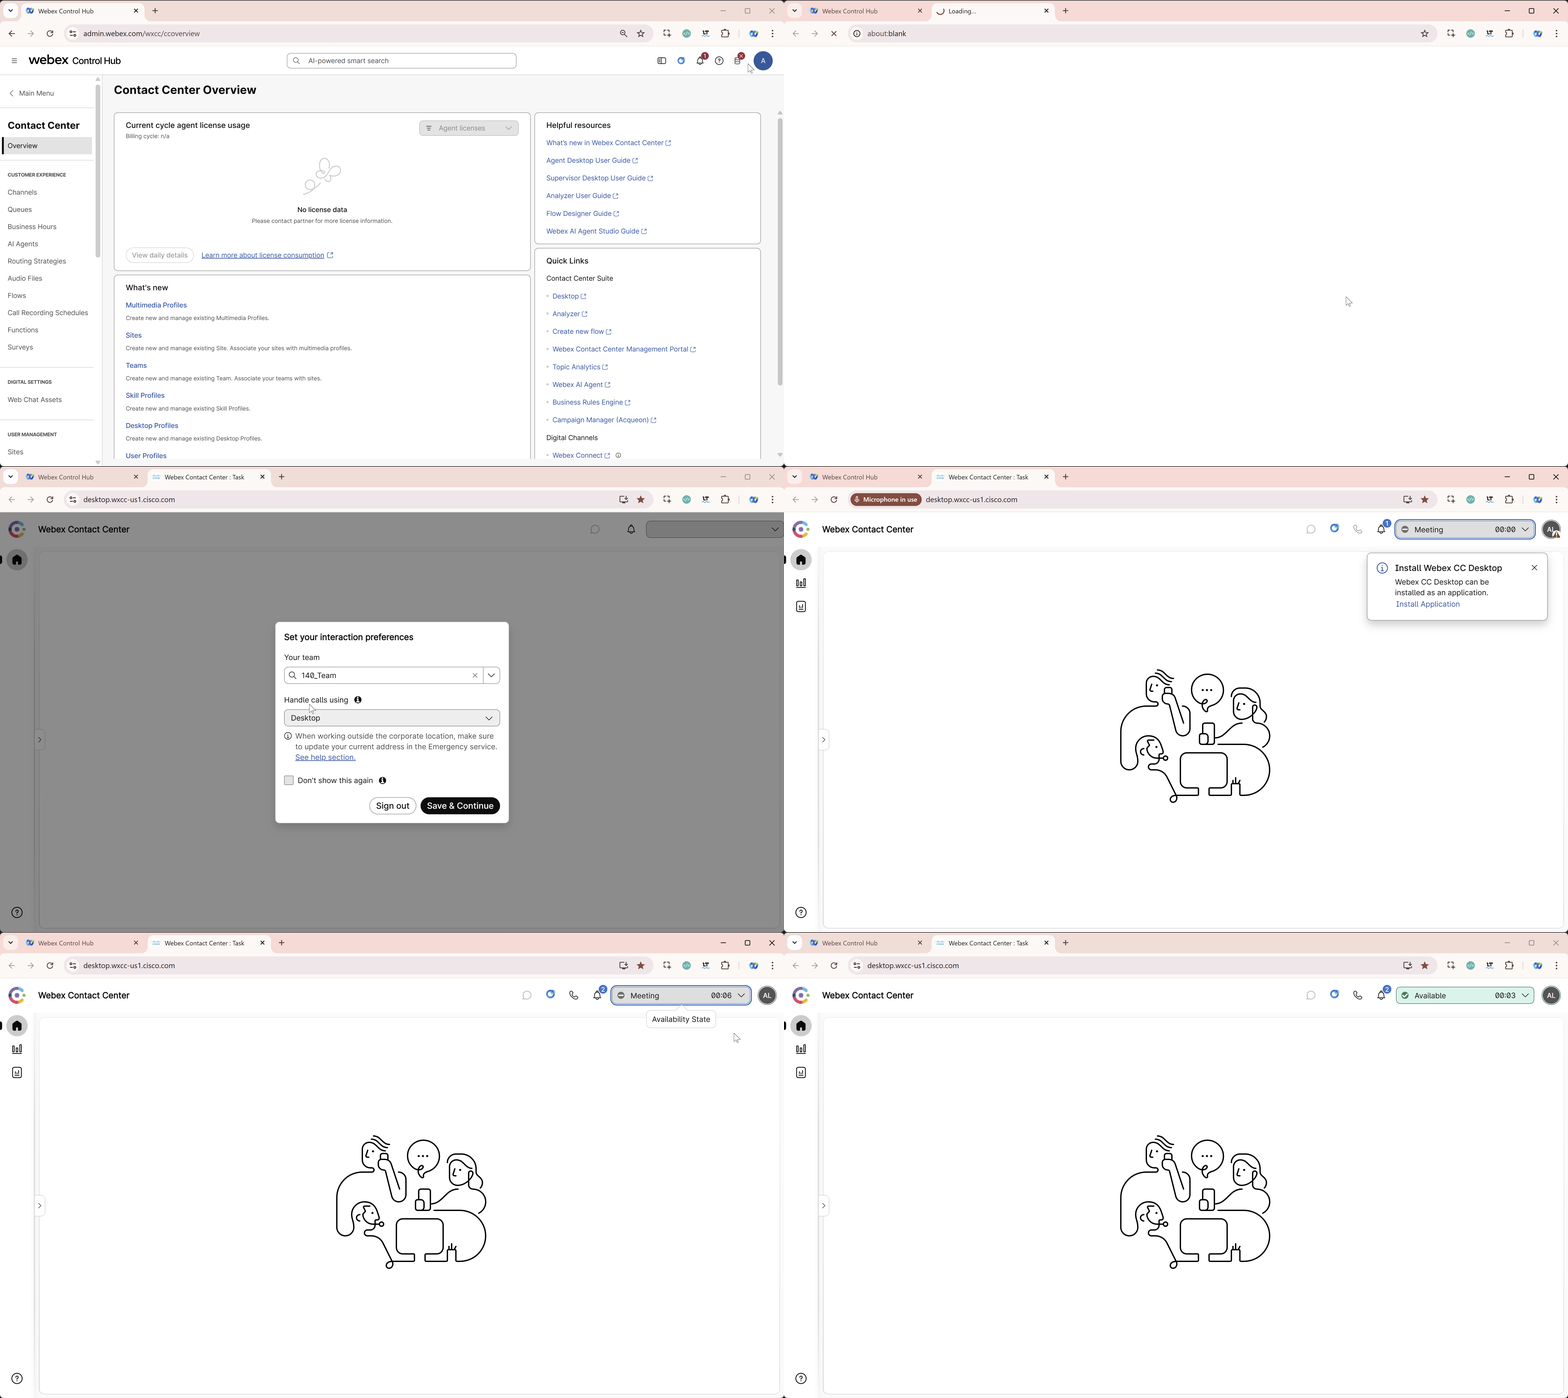
Your Agent Desktop session should still be active. If it is not, launch Desktop using the cross-launch link in Control Hub.
See how to run Agent Desktop from the Control Hub
-
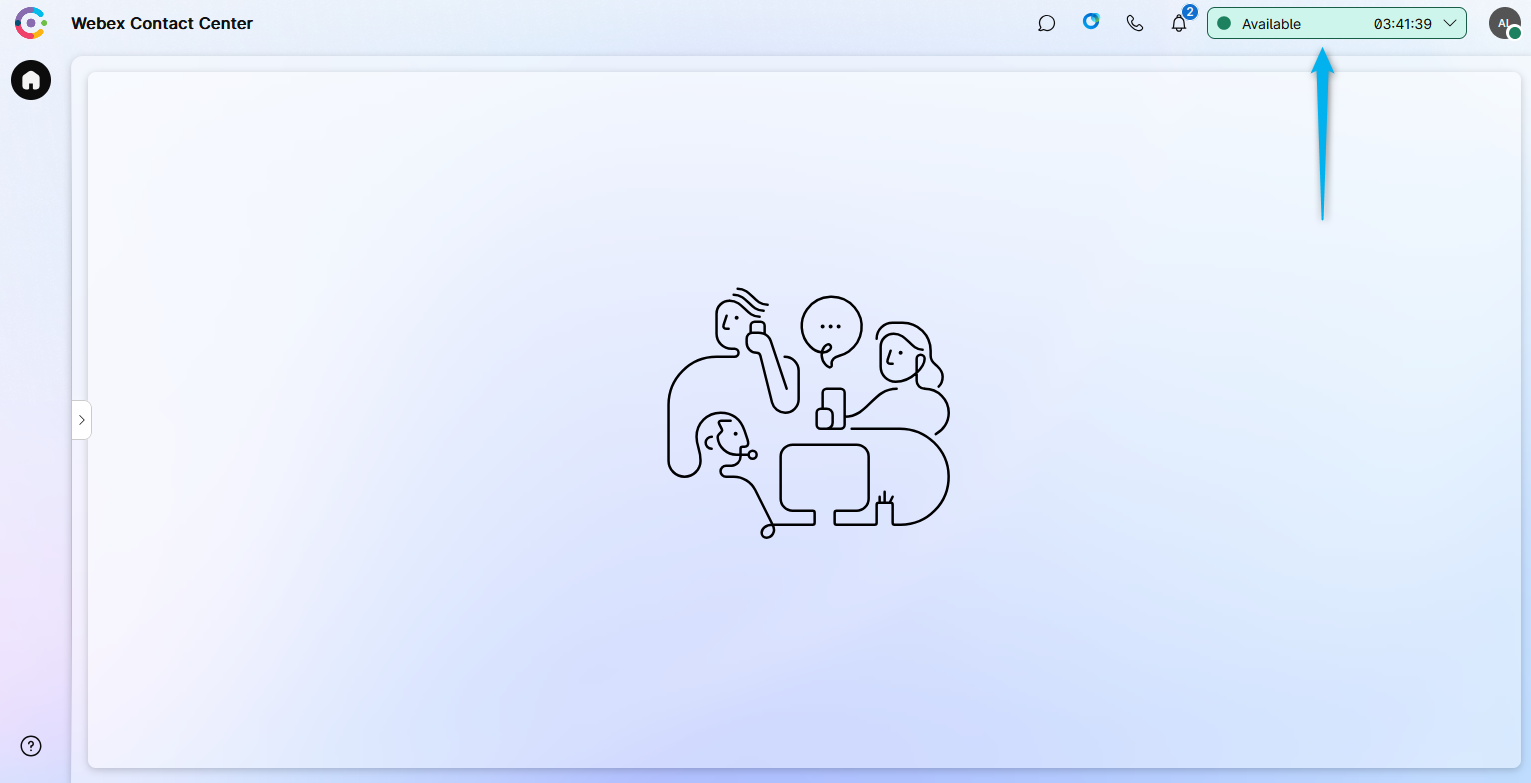
On your Agent Desktop, make your agent Available and you're ready to make a call.
-
Make a test call to the Support Number, ensure the call is assigned to your Agent and answer it.
- Finish the call.
Part 2 - Raise Skill Requirement
Note
Let's raise skill requirement to see what happens if there are no agents with the appropriate skill level available.
Build
-
Switch to your flow and make the following changes to raise skill requirement:
-
Click on Queue node - you should see Your_Attendee_ID_SBR_Queue skill-based queue configured there.
-
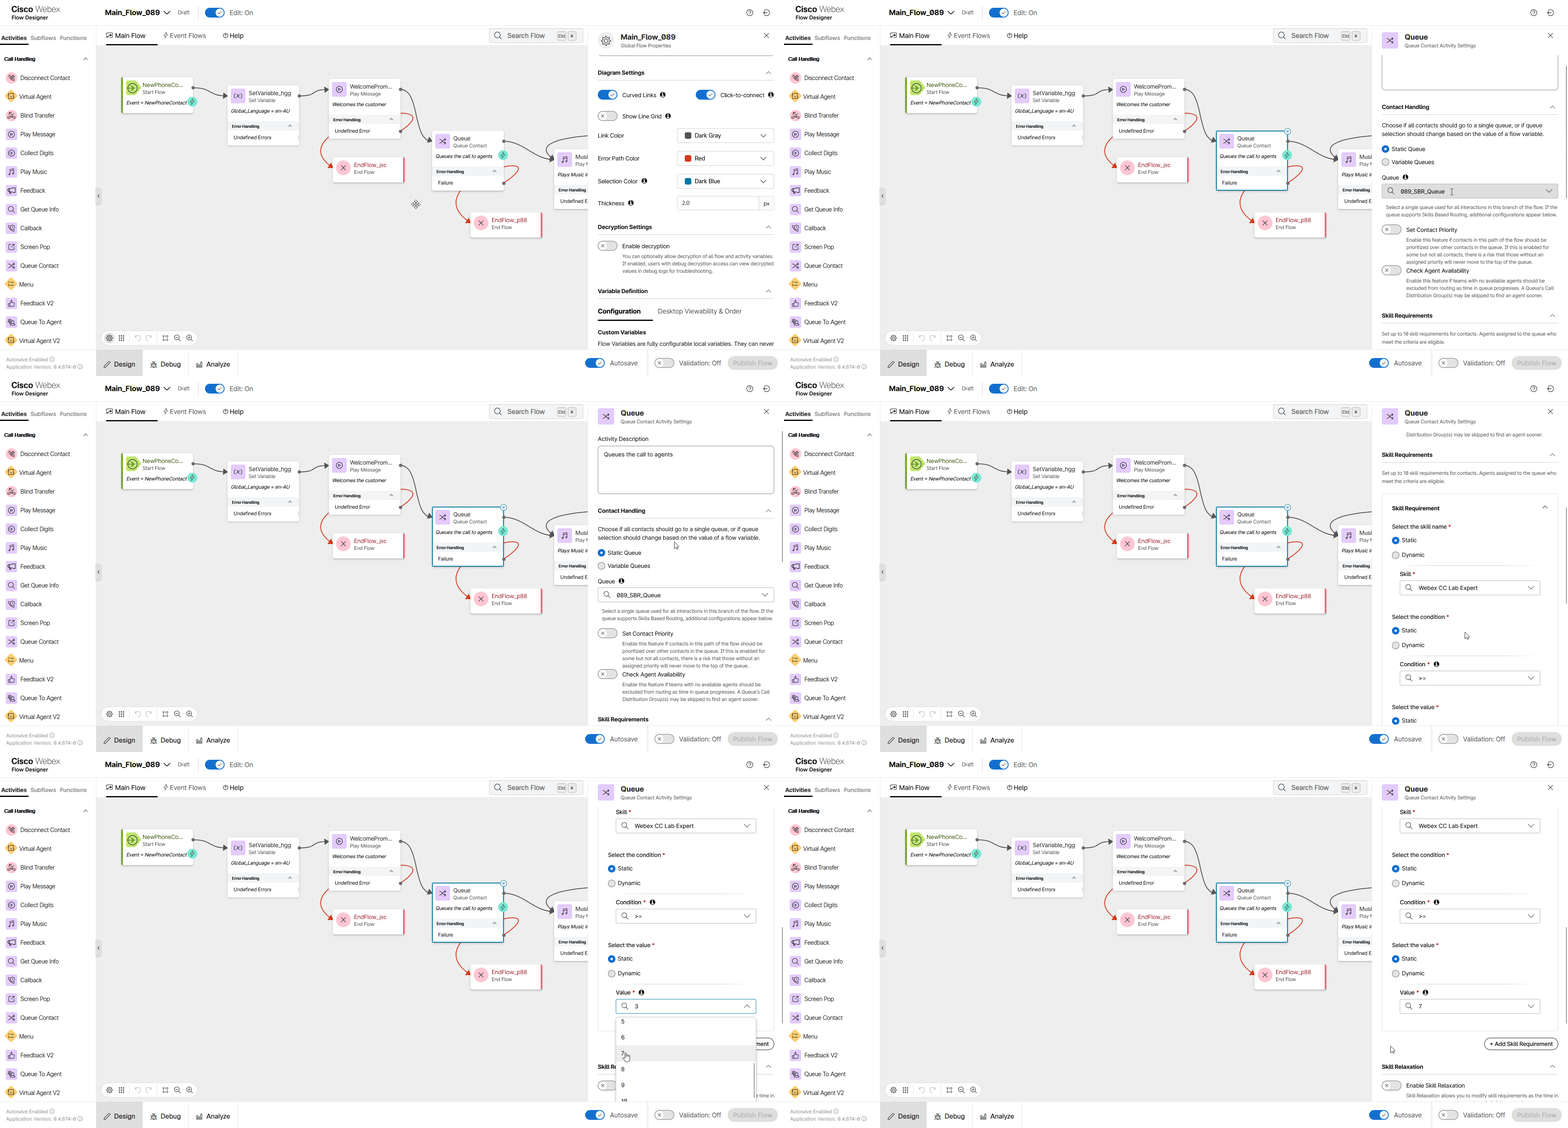
Scroll down to the Skill Requirements section and update the required value for Webex CC Lab Expert skill from 3 to 7. The full requirement should be Webex CC Lab Expert >= 7:
-
-
Validate and publish the flow:
-
Enable the Validation toggle in the bottom right corner of the flow designer window to check for any potential flow errors and recommendations.
-
If there are no Flow Errors after validation is complete, click on Publish Flow next to it.
-
In the pop-up window, ensure that the Latest label is selected in the Add Version Label(s) list, then click Publish Flow.
-
Checkpoint Test #2
Note
Since we have raised the requirement Webex CC Lab Expert >= 7 and the current value of Webex CC Lab Expert skill for your agent is still 5, the agent no longer meets the skill requirement for the call and should not be selected to pick it up.
Let's test this.
-
Your Agent Desktop session should still be active. If it is not, launch Desktop using the cross-launch link in Control Hub.
See how to run Agent Desktop from the Control Hub
-
On your Agent Desktop, make your agent Available and you're ready to make a call.
-
Make a test call to the Support Number. Ensure the caller hears the welcome prompt, then the call is placed in a queue and the caller hears music in queue.
- Make sure the call stays in the queue and not assigned to your agent even though the agent is available.
- Finish the call.
Part 3 - Add Skill Relaxation Rule
Note
The skill relaxation rule allows for lowering the skill requirements for the call after a certain period of time. This helps to reduce the waiting time for callers by engaging less qualified agents when all more qualified agents are busy.
Since our current skill requirement is Webex CC Lab Expert >= 7 and our agent account has skill profiviency Webex CC Lab Expert = 5, let's configure the skill relaxation rule to lower the skill requirement to Webex CC Lab Expert >= 4 after 15 seconds.
Build
-
Switch to your flow and click on Queue node - you should see Your_Attendee_ID_SBR_Queue skill-based queue configured there along with skill requirement Webex CC Lab Expert >= 7.
Scroll down to the Skill Relaxation section, turn on Enable Skill Relaxation toggle and lower skill requirement Webex CC Lab Expert by configuring the following fields of Skill Relaxation Step 1 block:
- After waiting in queue for: 15 seconds
-
Select the skill name: Static
-
Skill (drop-down list): Webex CC Lab Expert
-
Select the condition: Static
-
Condition (drop-down list): >=
-
Select the value: Static
-
Value (drop-down list): 4
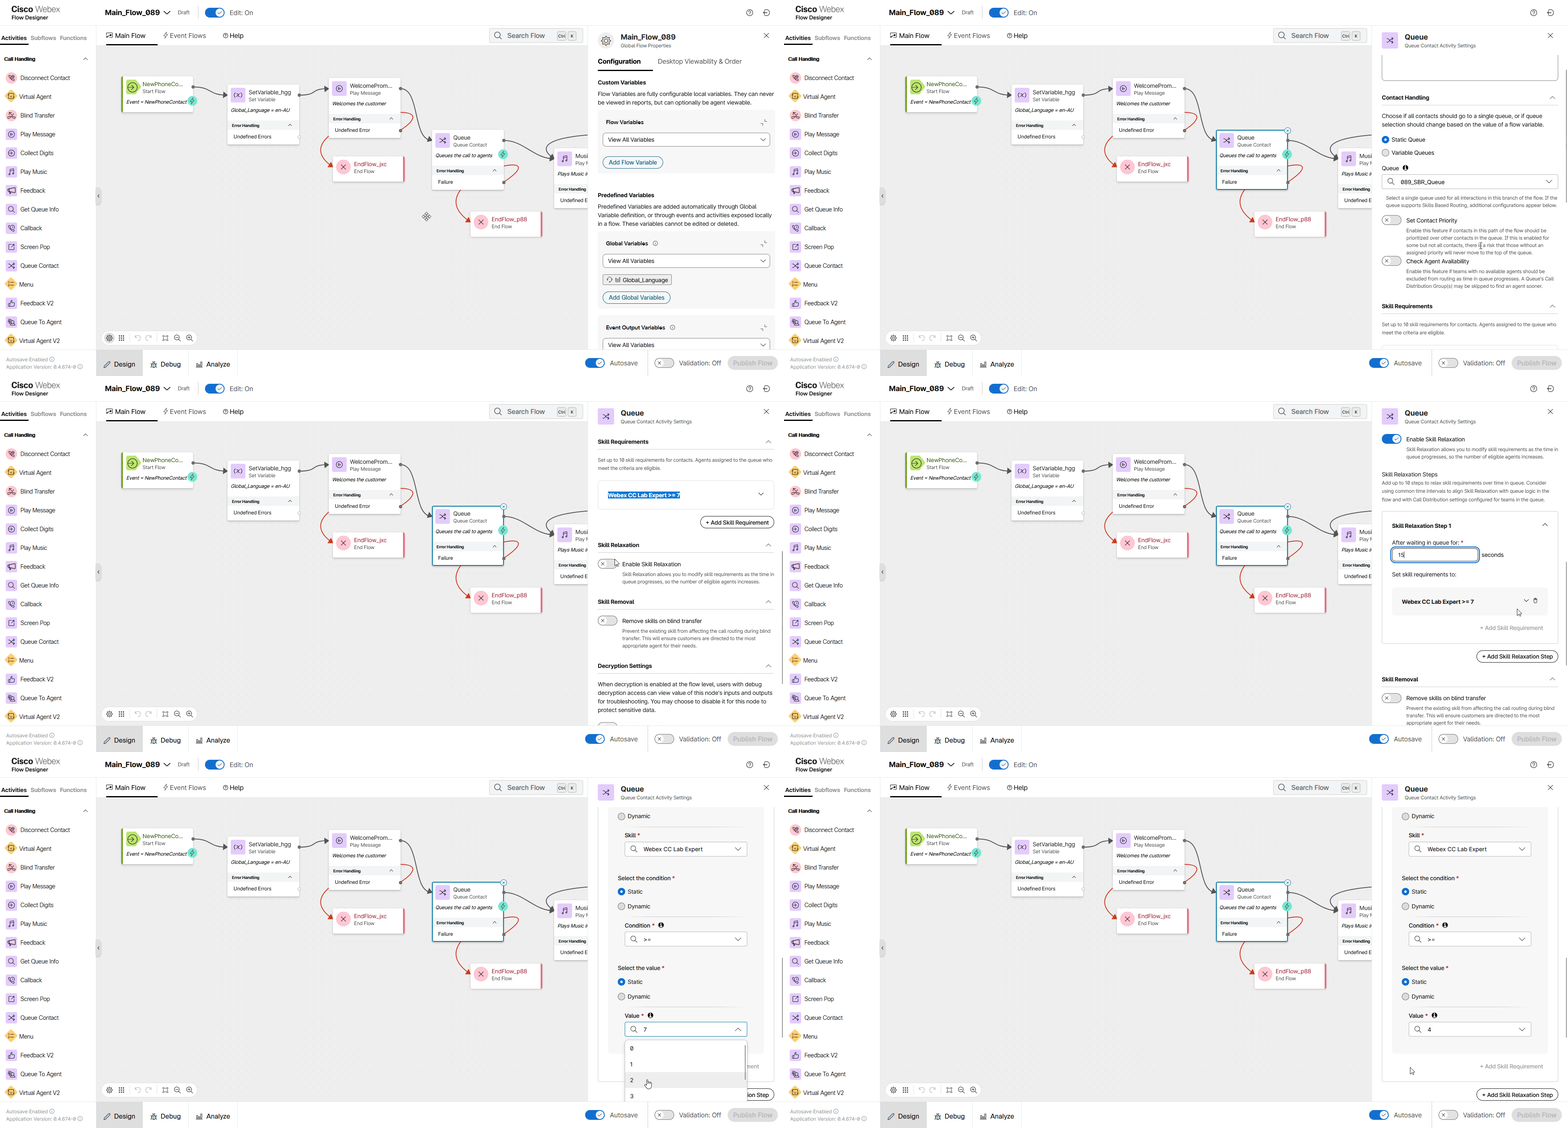
- After waiting in queue for: 15 seconds
-
Validate and publish the flow:
-
Enable the Validation toggle in the bottom right corner of the flow designer window to check for any potential flow errors and recommendations.
-
If there are no Flow Errors after validation is complete, click on Publish Flow next to it.
-
In the pop-up window, ensure that the Latest label is selected in the Add Version Label(s) list, then click Publish Flow.
-
Final mission test
Note
We have lowered the skill requirement for Webex CC Lab Expert from >= 7 to >= 4 after 15 seconds in the queue.
Since the current skill proficiency of Webex CC Lab Expert for your agent is still 5, the agent does not meet the skill requirement for the call when it lands in the queue and should not be selected to answer it. Therefore, the call will remain in the queue. However, after 15 seconds, the skill requirement will be lowered to Webex CC Lab Expert >= 4, and the agent should be selected to answer it.
Let's test this.
- Open your Webex CC Desktop and make sure your agent is in the Available state.
- Make a test call to the Support Number. Ensure that the caller hears the welcome prompt, then the call is placed in a queue and caller hears music in queue.
- Make sure the call stays in the queue for 15 seconds before being assigned to your agent.
- Answer the call and verify that it works.
- Finish the call.
Post Testing steps
-
[IMPORTANT] Now we need to revert the configuration of Queue node in your flow to the non-SBR queue Your_Attendee_ID_Queue as we are going to use same flow in upcoming tasks:
-
Click on the Queue node on the flow canvas.
-
Navigate to the node settings panel on the right.
-
Scroll down and select Your_Attendee_ID_Queue from Queue dropdown list.
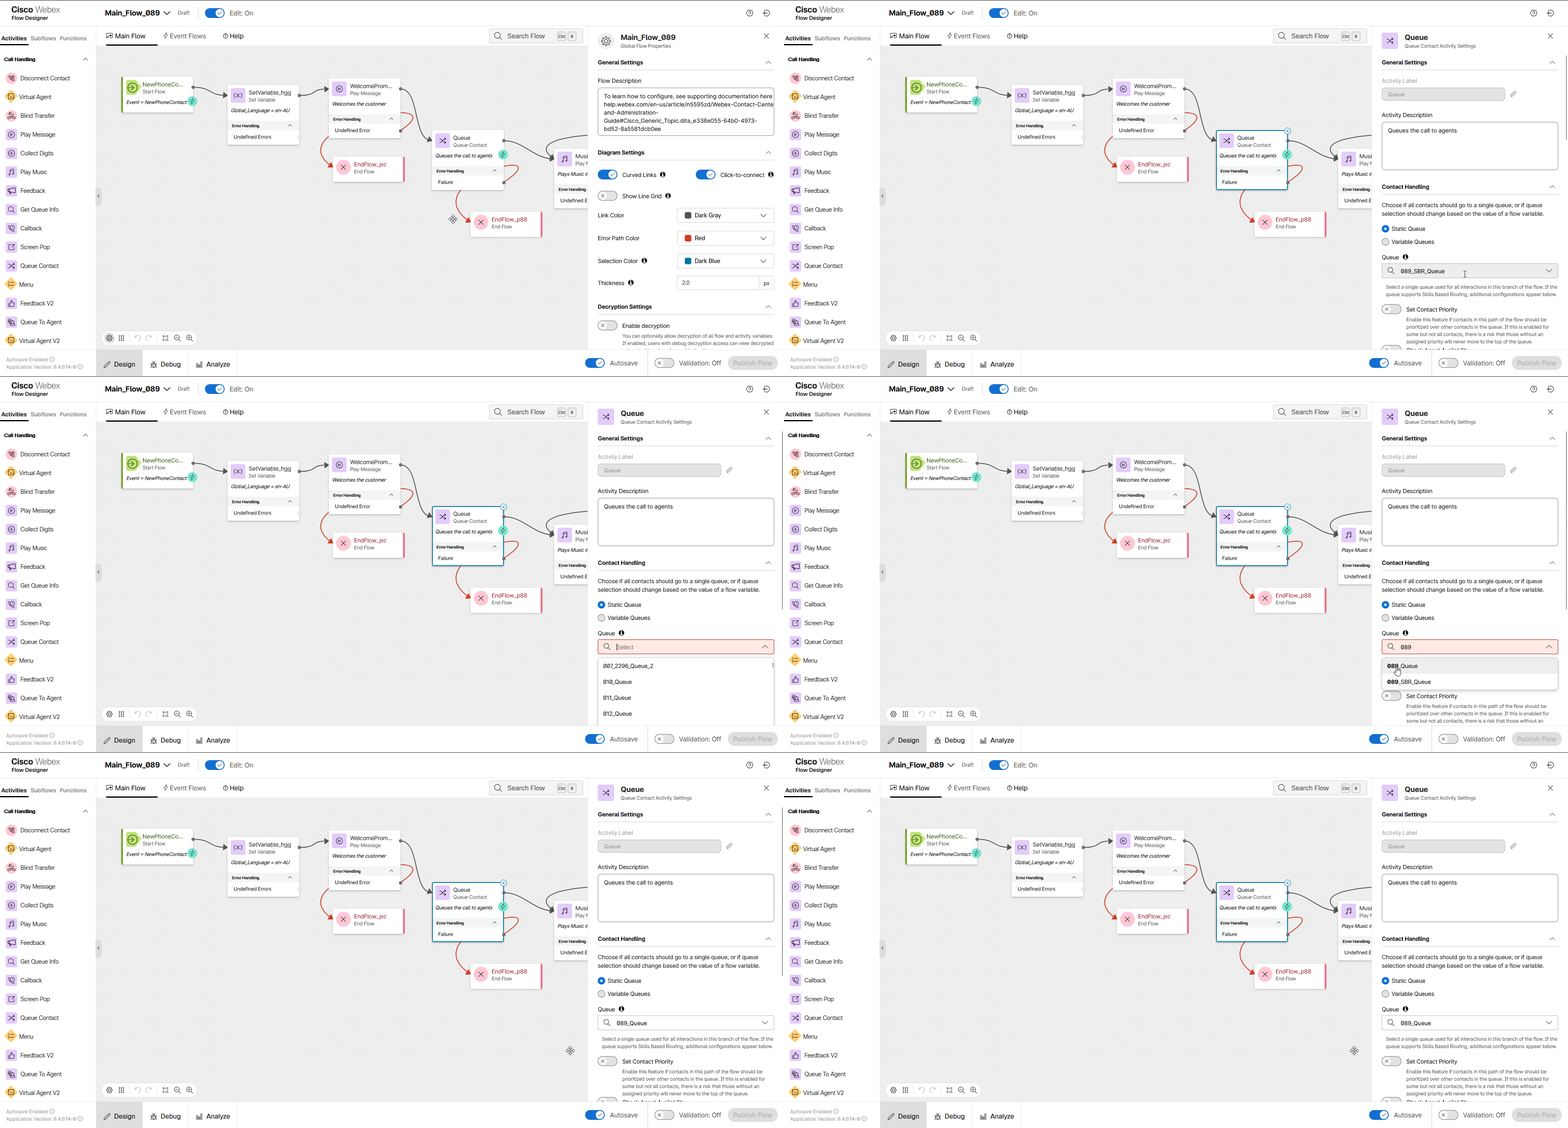
-
-
Validate and publish the flow:
-
Enable the Validation toggle in the bottom right corner of the flow designer window to check for any potential flow errors and recommendations.
-
If there are no Flow Errors after validation is complete, click on Publish Flow next to it.
-
In the pop-up window, ensure that the Latest label is selected in the Add Version Label(s) list, then click Publish Flow.
-
-
Open your Webex CC Desktop and make sure your agent is in the Available state.
- Make another test call to the Support Number and confirm that the caller hears the welcome message, and then the call is instantly assigned to your agent after entering the queue.
Congratulations, you have succesfully completed Skill-Based Routing mission! 🎉🎉