CoreTrack Mission3
🚨 Important Lab Dependency
This mission requires configuration created in the following missions:
If this mission was not completed, some steps in current mission will not function correctly.
Story
Business Hours allows you to configure the operational hours of the contact center, offering an enhanced experience in routing strategy configuration and simplifying the routing flow for improved efficiency and customer satisfaction.
Call Flow Overview
- A new call enters the flow.
- The flow determines the caller's language preference and plays a preconfigured Text-to-Speech (TTS) prompt.
- The flow determines whether it is currently within working hours and routes the call appropriately.
- The call is routed to the appropriate queue.
Mission Details
Your mission is to:
-
Continue to use same flow Main_Flow_Your_Attendee_ID we created in previous Mission.
-
Add Business Hours functionality Your_Attendee_ID_Bussiness_Hours to your flow. Business Hours entity has been configured for you and contains the following settings:
-
Working Hours - Define the time during which the contact center will be operational. Each working hour configuration can include one or more shifts. Different schedules can be set for various time zones.
-
Holidays - Specify a day or range of days declared as holidays. The entire 24 hours of the selected day(s) are marked as non-operational.
-
Overrides - Configure working hours for special cases, such as emergencies or occasions like Christmas, when the contact center operates for additional hours.
-
Build
-
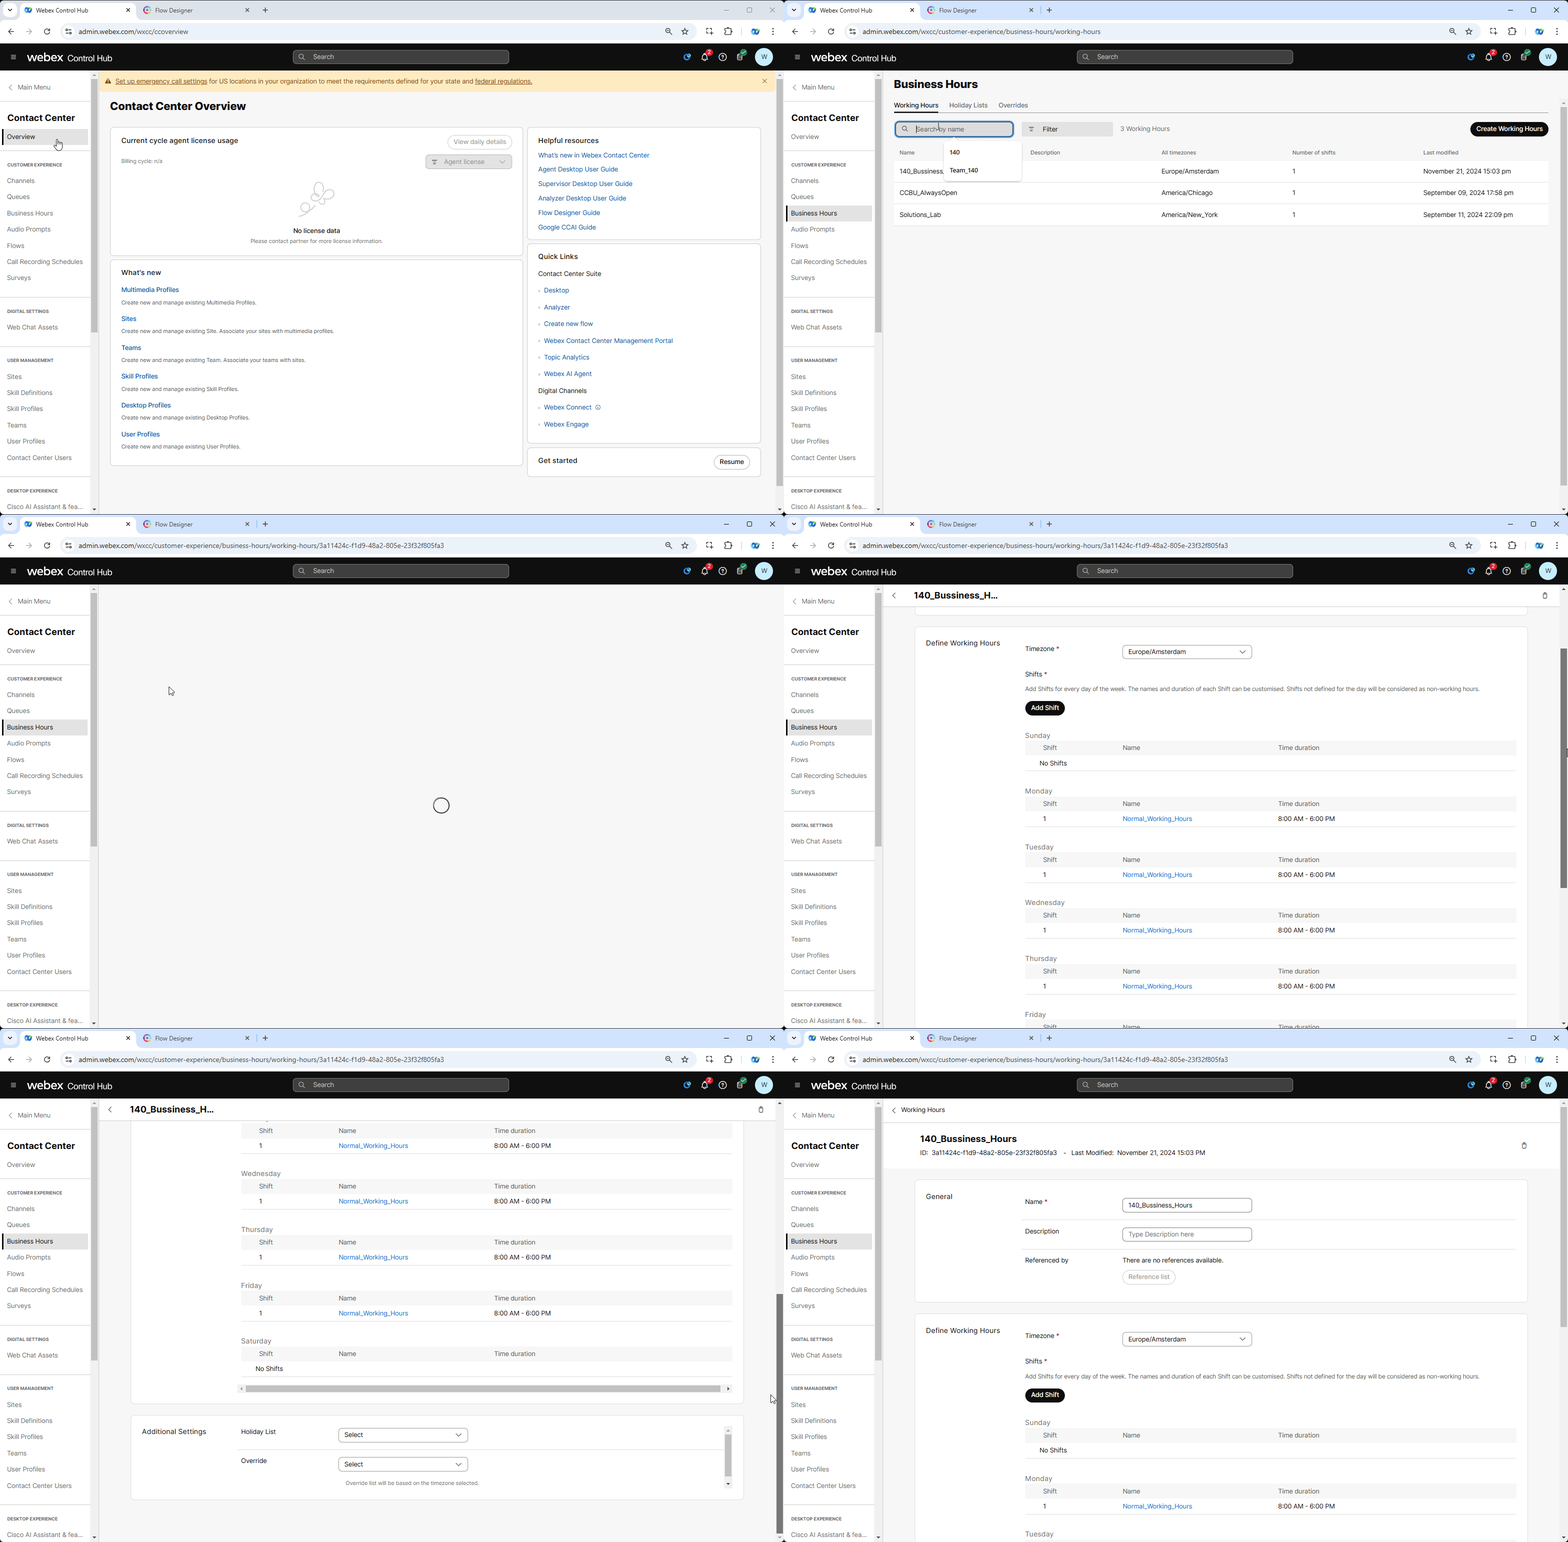
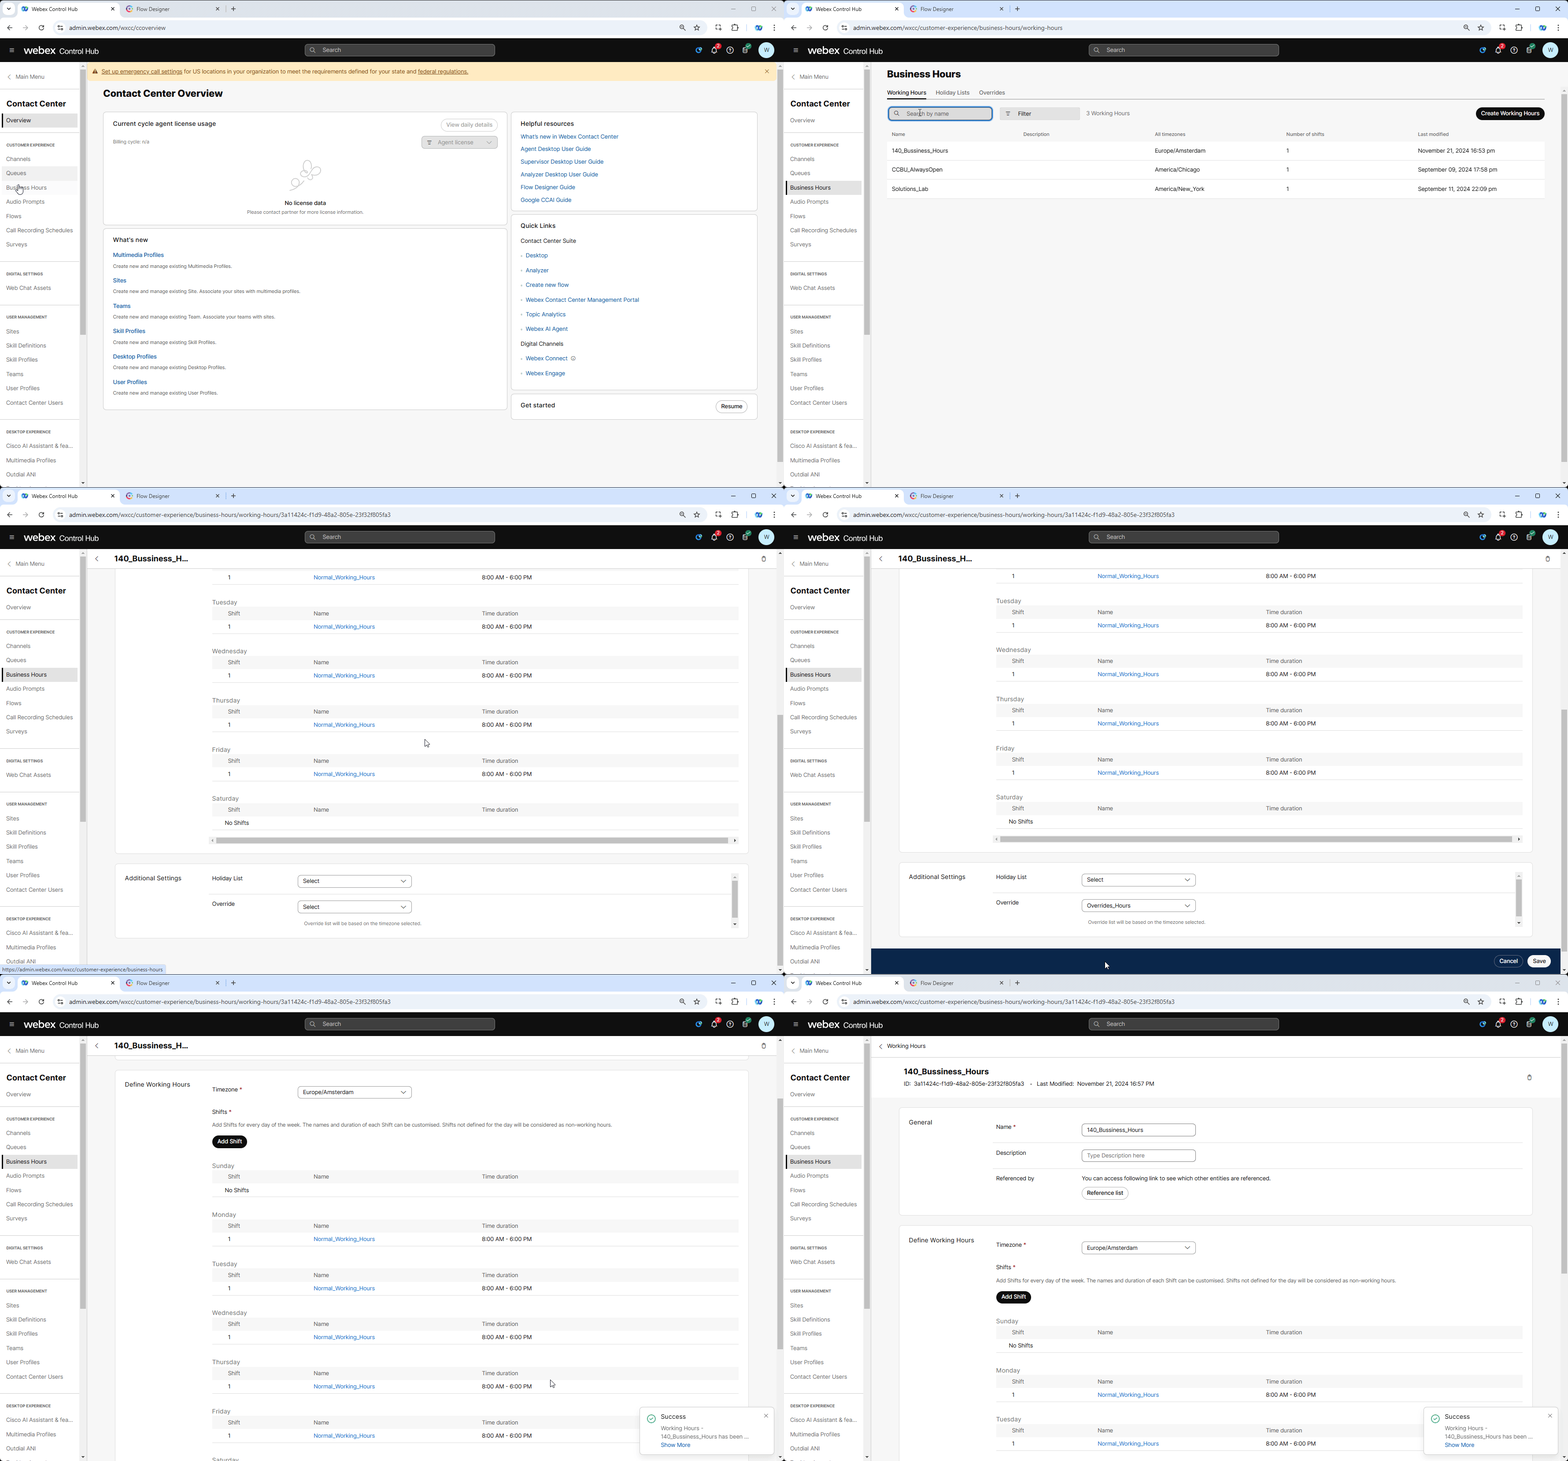
Switch to Control Hub and navigate to Business Hours under Customer Experience section. Locate your Your_Attendee_ID_Bussiness_Hours You will see that currently only Working Hours are configured for every working day between 12:00 AM to 11:59 PM".
-
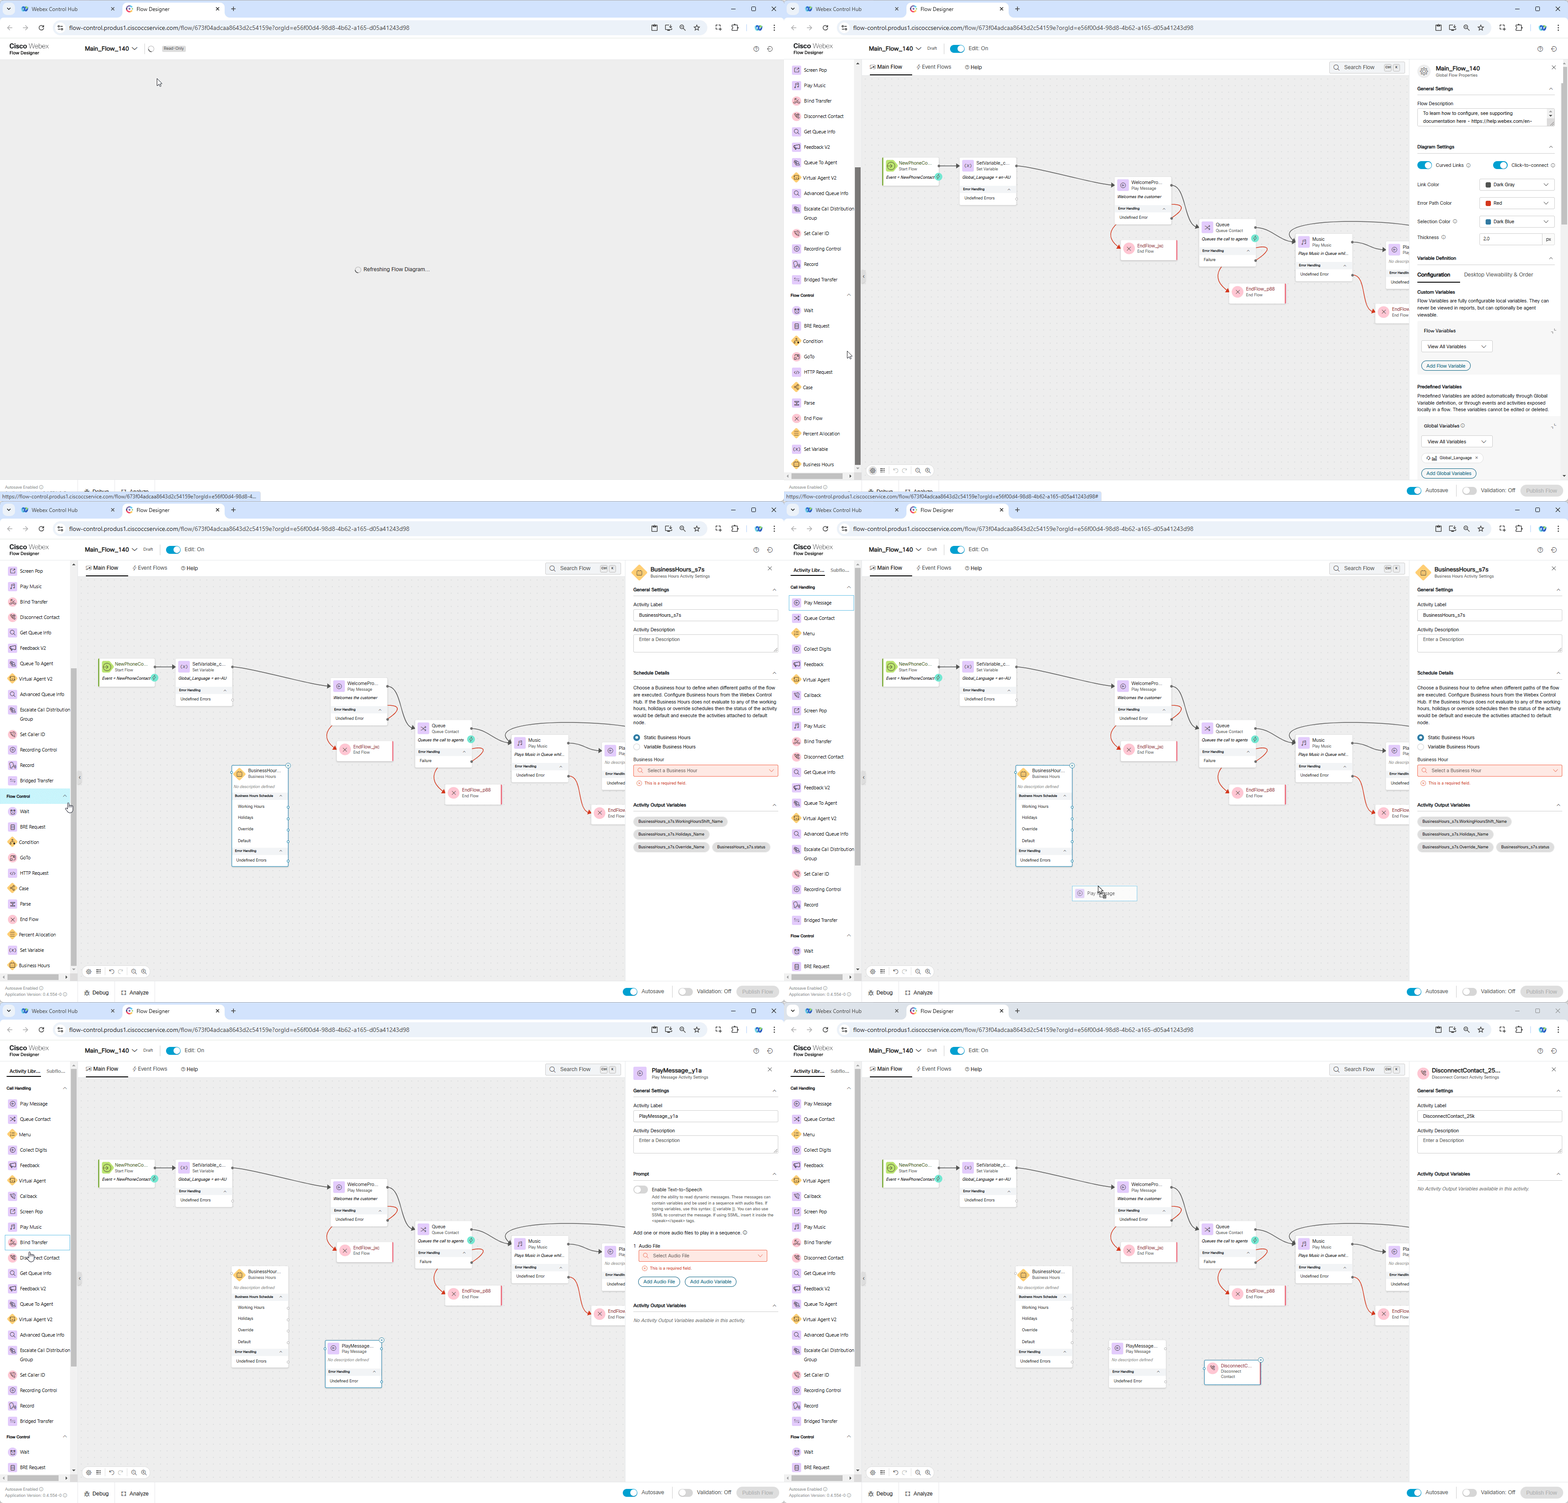
Switch to Flow Designer. Open your flow Main_Flow_Your_Attendee_ID and make sure Edit toggle is ON.
-
Drag and drop following nodes to the canvas:
-
Business Hours
-
Play Message
-
Disconnect Contact
-
-
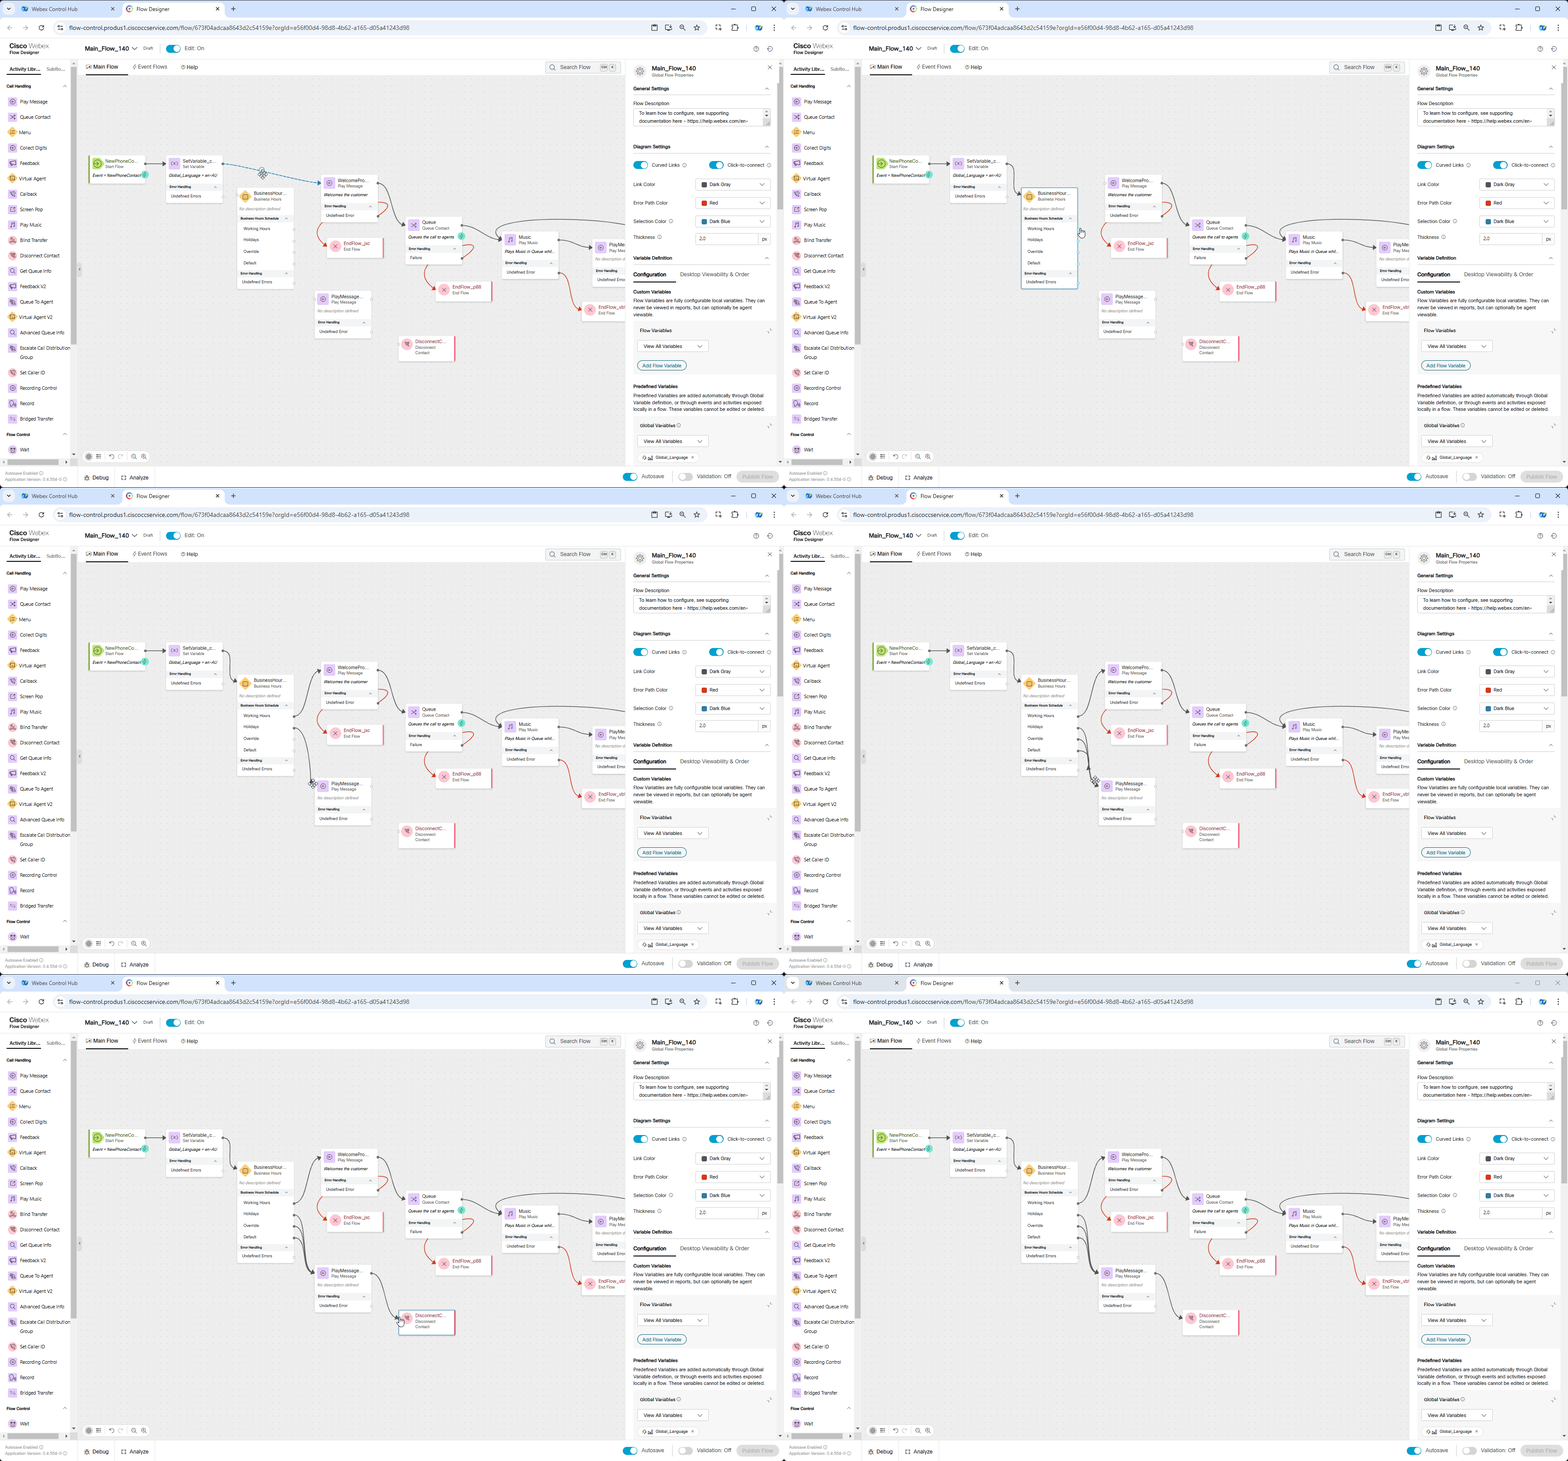
Connect Set Variable node to Business Hours and Business Hours node exits as follows:
-
Working Hours connect to WelcomePrompt node.
-
Holidays, Overrides and Default connect to new added Play Message node.
-
New added Play Message connect to Disconnect Contact node.
-
-
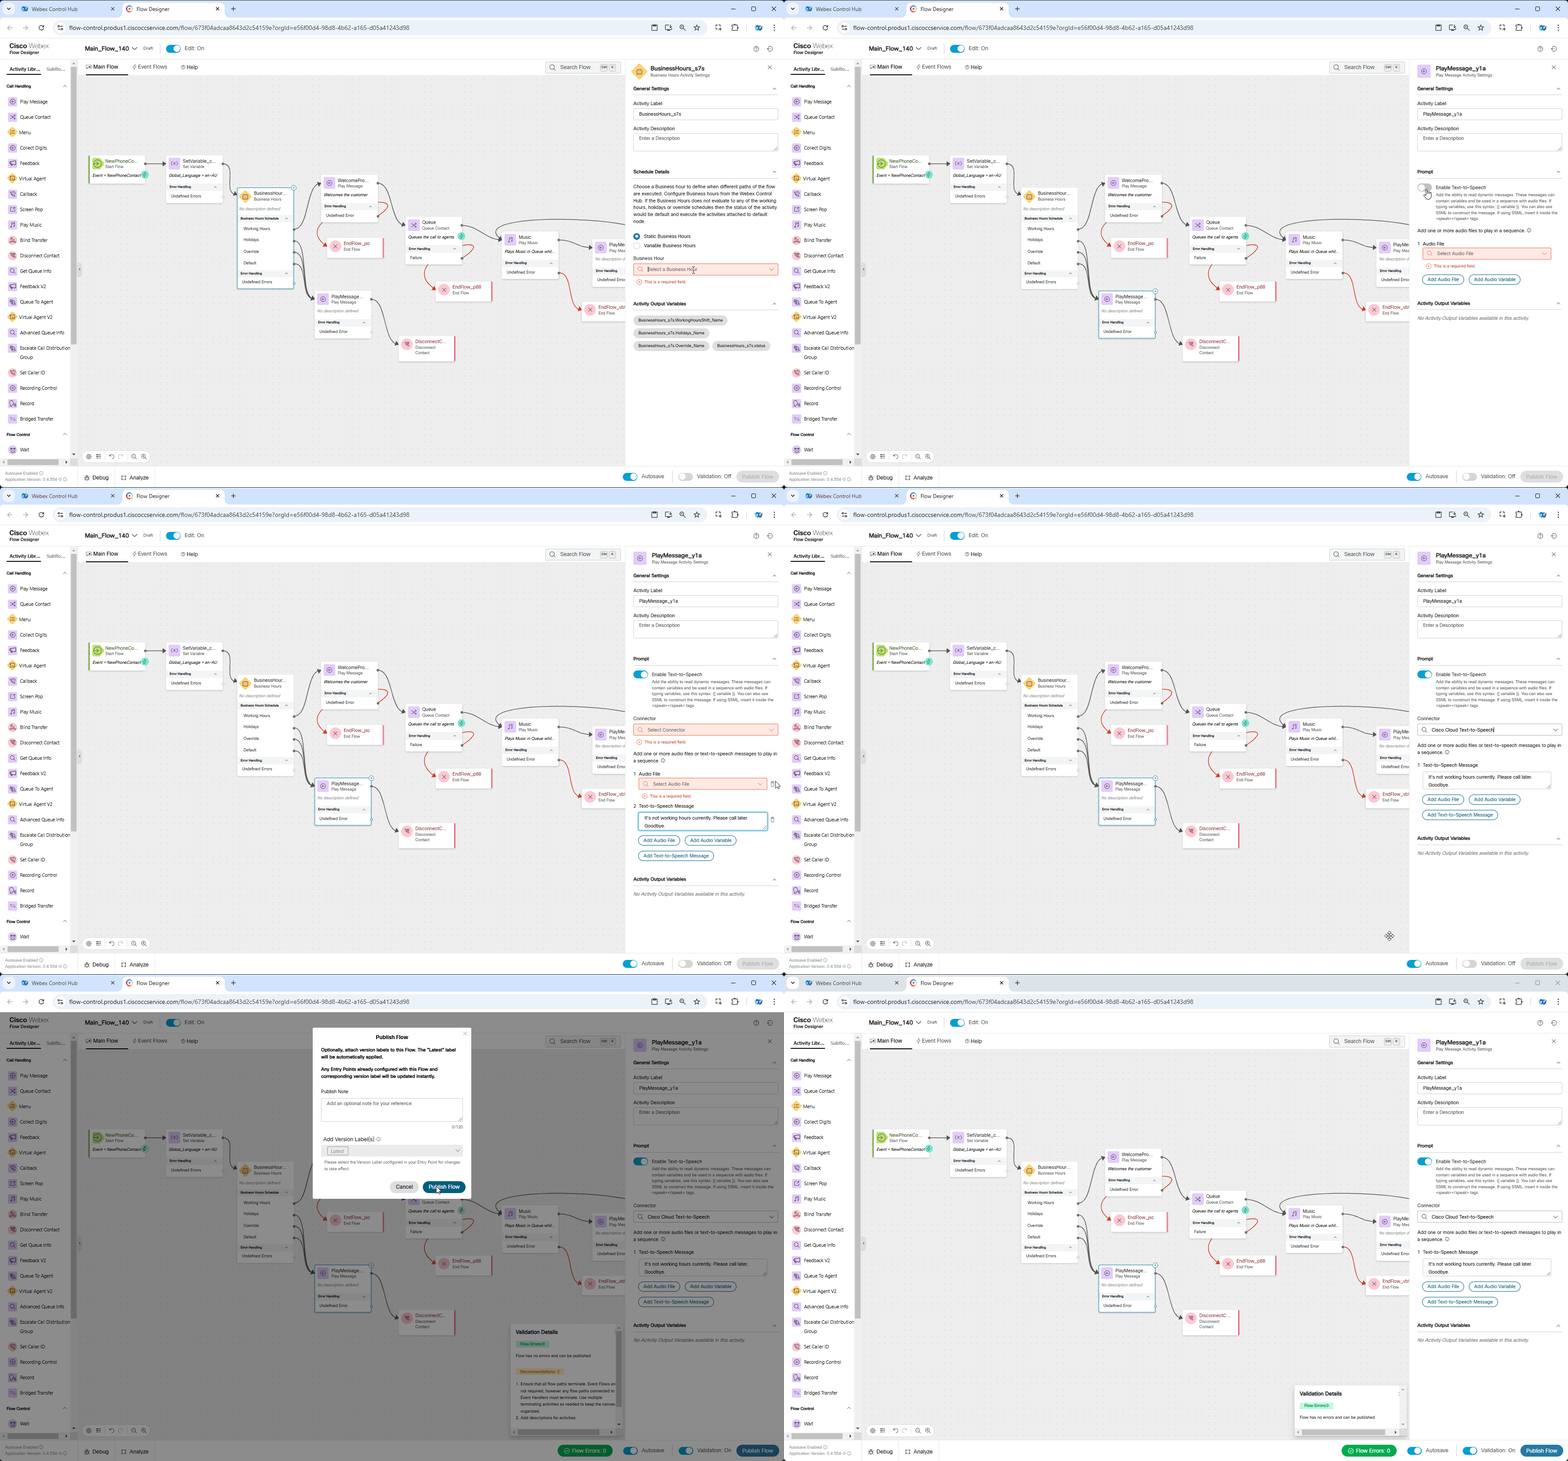
Click on Business Hours node and select preconfigured Business Hours Entity Your_Attendee_ID_Bussiness_Hours .
-
Configure Play Message node as follows:
-
Turn on Enable Text-To-Speech toggle
-
Select the Connector: Cisco Cloud Text-to-Speech
-
Click the Add Text-to-Speech Message button and paste text: It's not working hours currently. Please call later. Goodbye.
-
Delete the selection for Audio File
-
-
Validate and publish the flow:
-
Enable the Validation toggle in the bottom right corner of the flow designer window to check for any potential flow errors and recommendations.
-
If there are no Flow Errors after validation is complete, click on Publish Flow next to it.
-
In the pop-up window, ensure that the Latest label is selected in the Add Version Label(s) list, then click Publish Flow.
Note
We haven't changed the flow behavior yet as Working Hours covers the current time. You can make a call and accept it on agent desktop to verify.
-
-
We are going to use Override option to change the logic. Overrides as well as Business hours have been preconfigured for you. Now we need to apply it on your Your_Attendee_ID_Bussiness_Hours entity. Switch to Control Hub and open Your_Attendee_ID_Bussiness_Hours in Control Hub, scroll down to Additional Settings and select Overrides_Hours from Override dropdown list. Then click Save.
Note
Override Hours entity was configured to overwrite Working Hours and set to duration of current Cisco Live lab
Testing
- Open your Webex App and dial the Support Number provided to you, which is configured in your Your_Attendee_ID_Channel configuration. Make sure you hear the message we set in Step 6.
Post Testing steps
-
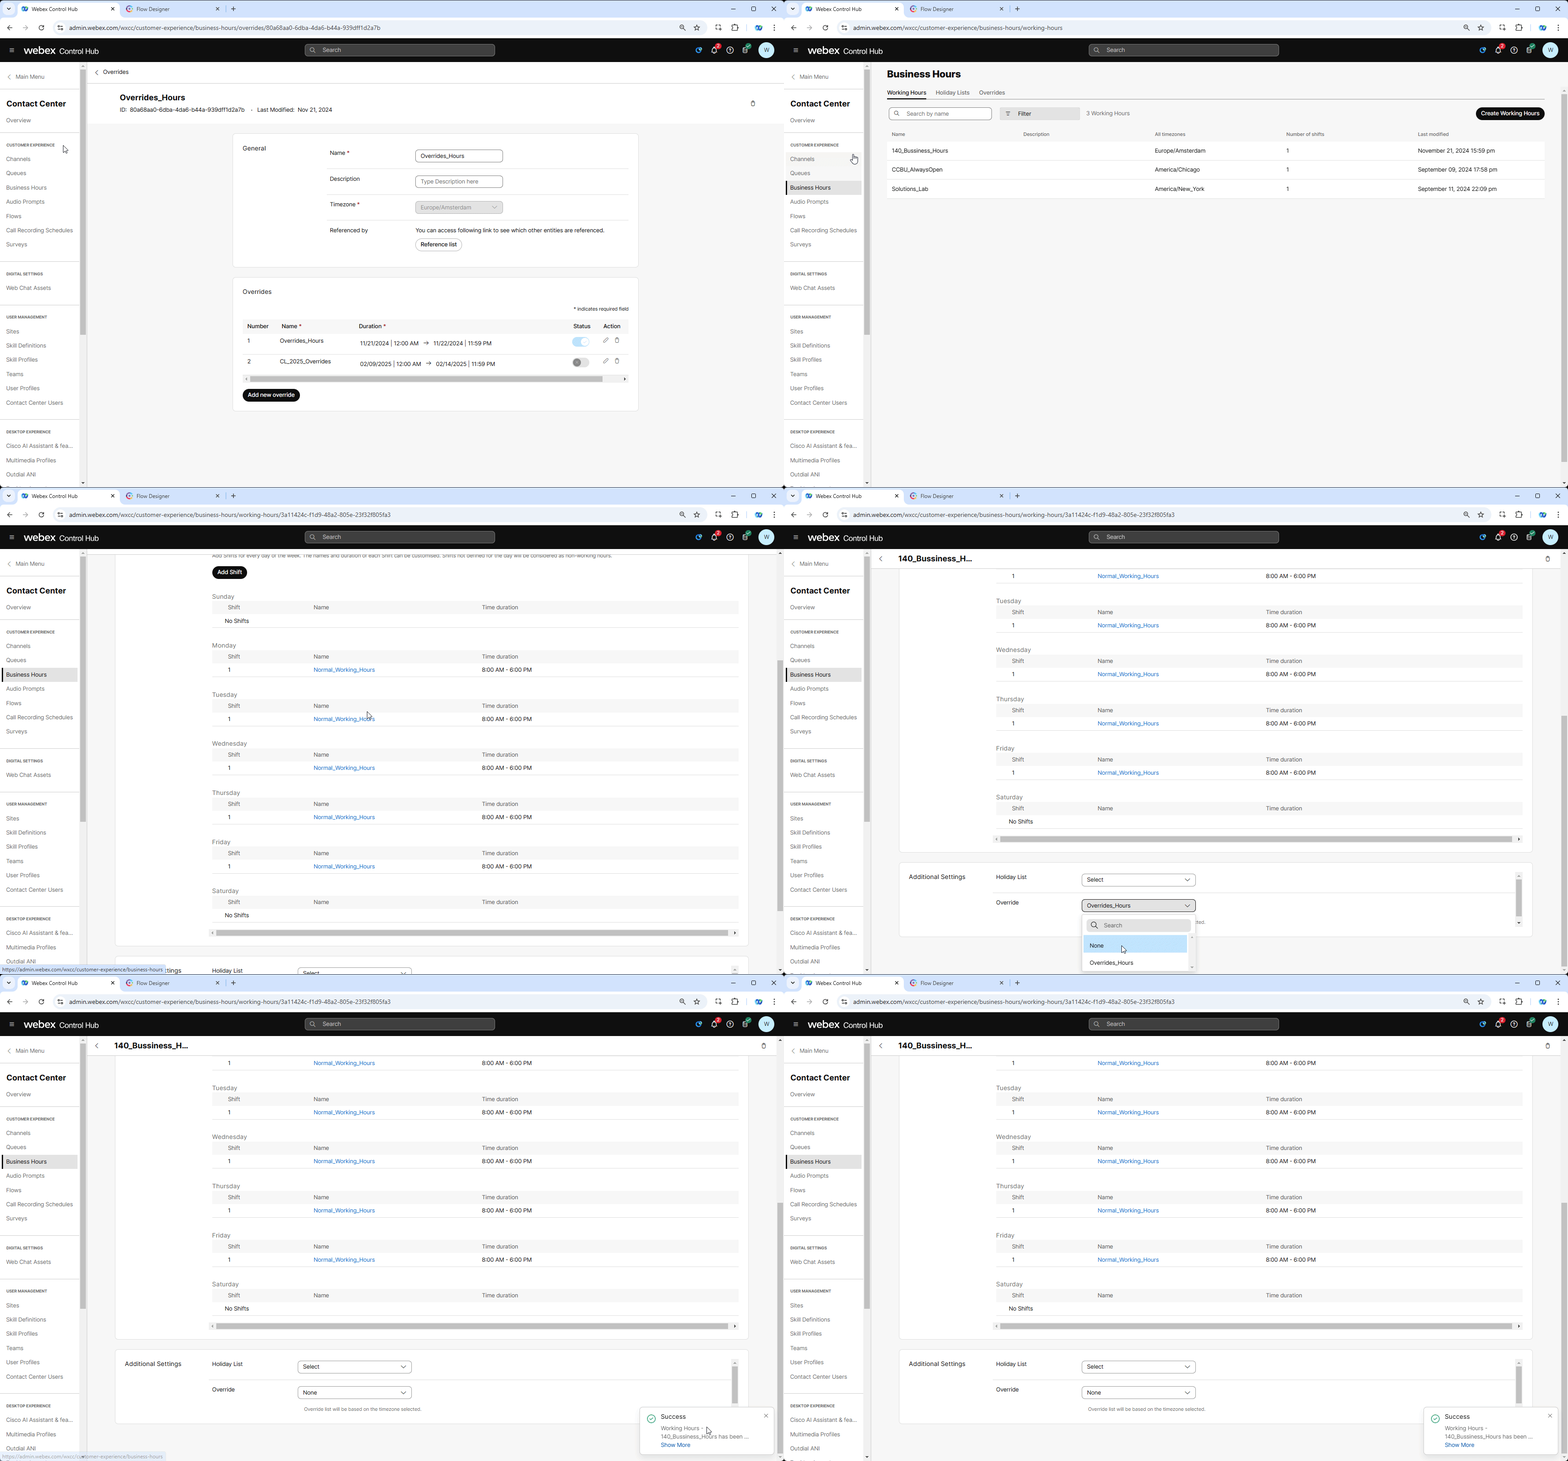
[IMPORTANT] Now we need to revert the configuration we made in Step 8 as we are going to use same flow in upcoming tasks. Open Your_Attendee_ID_Bussiness_Hours in Control Hub, scroll down to Additional Settings and select None from Override dropdown list. Then click Save.
-
Make one more call from Webex App to make sure you hear the original Welcome message you set on first steps of previous Mission.
Congratulations, you have succesfully completed Using Business Hours mission! 🎉🎉